 Simon Prickett

I’ve written several articles before using Low Voltage Labs Traffic Light LEDs for Raspberry Pi, but never tried this with Arduino before. A little while back I noticed that they also make Traffic Lights for Arduino and Breadboards so I decided to try these out using a couple of different types of Arduino board that I had on hand:
- Arduino Uno: Ideal for trying the lights by plugging them straight into the headers already attached to the Arduino. This board uses a USB B port for its power and data connection to the Arduino IDE.
- Adafruit Feather Huzzah ESP8266: Ideal for trying the breadboard approach as the board has leg like headers that attach all the pins to a breadboard. This board uses a micro USB port for its power and data connection to the Arduino IDE. Note you need to buy the version of the board with the headers attached unless you want to solder your own on there.
In common with the various traffic light demos I built using a Raspberry Pi and different programming languages, I wanted to show how to get the traffic lights to show the UK light pattern:
- Red
- Red + Yellow
- Green
- Yellow
- repeat…
If you’re interested in how to program the traffic lights for the Raspberry Pi, check out one or more of these articles:
Arduino Hardware Setup
Arduino Uno
Hardware setup for the Arduino Uno is straightforward… it’s already set for working with the Arduino IDE, so no need to install a different bootloader or anything. It also has headers attached, so connecting the traffic lights is a simple matter of plugging them in.
The lights need to be attached to a ground pin followed by three digital pins that we’ll use as outputs.

Looking at the diagram above, we want to attach the lights so that the ground pin attaches to ground, meaning the red light will be on pin 13, the yellow on 12 and the green on 11. This is the only place on the Uno that this sequence of pins occurs.
Adafruit Feather Huzzah ESP8266
The Feather Huzzah differs from the Arduino Uno in a few ways…
- The headers are more like legs rather than the stacking / socket type on the Uno… so the lights won’t plug directly into them… we’ll use a breadboard.
- The layout of the pins differs from the Uno, and the pins we need aren’t located adjacent to each other. We’ll solve this using jumper wires on the breadboard.
- The board ships with a Lua interpreter, but we want to use the Arduino IDE and write C so that we can share the code with the Uno board. To do this, we’ll need to re-flash the board which Adafruit provides a handy guide for.
- It is 3.3v logic not 5v, so we can expect the lights to be a little dimmer than with the Uno. This is also true of the Raspberry Pi that’s 3.3v too.
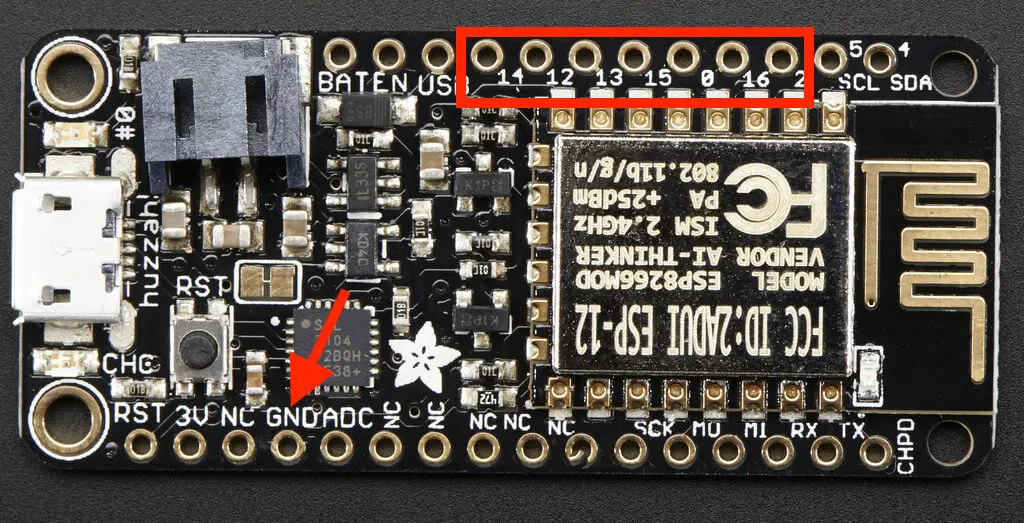
Here’s a pinout for the Huzzah showing where the pins we’ll need are:
Here’s how we’d wire up the breadboard, the blue rectangle here represents where you’d plug the traffic lights into.
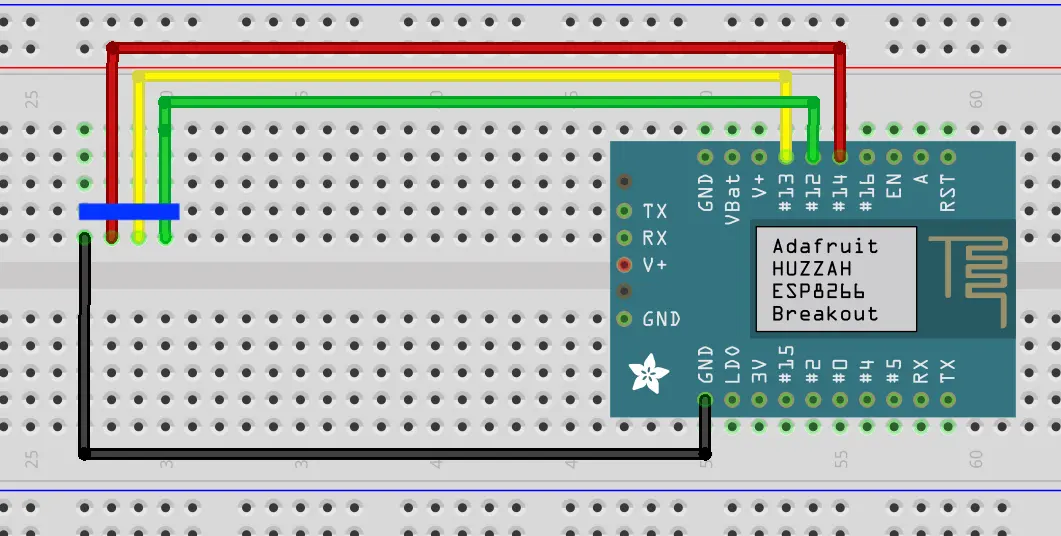
We’re assuming here that the Feather is powered from a micro USB cable not from the breadboard.
Arduino Development Environment Setup
We’ll need the Arduino IDE… I found on Mac OS Catalina I had to get the latest beta version to avoid issues compiling code later on. This is related to the 64 bit nature of newer Mac OS releases.
Your support helps to fund future projects!
Setup for the Arduino Uno
There should be nothing more needed for the Arduino Uno… if you connect it to your maching using a USB A<->B cable and choose “Arduino Uno” as your board and the appropriate USB port as your port that’s all you need to do.
If your development machine doesn’t run Mac OS you may need to perform different and/or additional steps. Those, plus a guide on how to set the board type and port can be found on the Arduino Getting Started page.
Setup for the Adafruit Huzzah ESP8266
The Adafruit board requires you to download a driver and get the ESP8266 board package for the Arduino IDE. There’s a guide for this over at Adafruit. You’ll also need a USB to micro USB data cable, the same as you might use with a lot of Android phones.
Coding
The majority of the code for both boards is identical. Where it differs is in the pin numbers used to control the lights. To distinguish between the boards at compile time, I check to see if ARDUINO_AVR_UNO is defined, and use the pin numbers for the Uno if so, otherwise the pins for the Huzzah are used.
#ifdef ARDUINO_AVR_UNO
// Arduino Uno
const byte redLight = 13;
const byte amberLight = 12;
const byte greenLight = 11;
#else
// Adafruit Feather Huzzah
const byte redLight = 14;
const byte amberLight = 12;
const byte greenLight = 13;
#endif
The rest of the code is the same for both boards, and works as follows:
- In the
setup()function that runs once when the board is powered on, I set each of the three pins for the traffic lights to be outputs, and set them to be low (off). - In the
loop()function that runs continuously aftersetup()has been called one, I use an infinitewhileloop, then set each pin to be high or low as required for each state of the traffic light sequence. Thedelay()function s used to wait an appropriate number of milliseconds before transitioning to the next state.
Here’s the complete source code that you can also get from my GitHub repo.
Deployment to the Arduino Boards
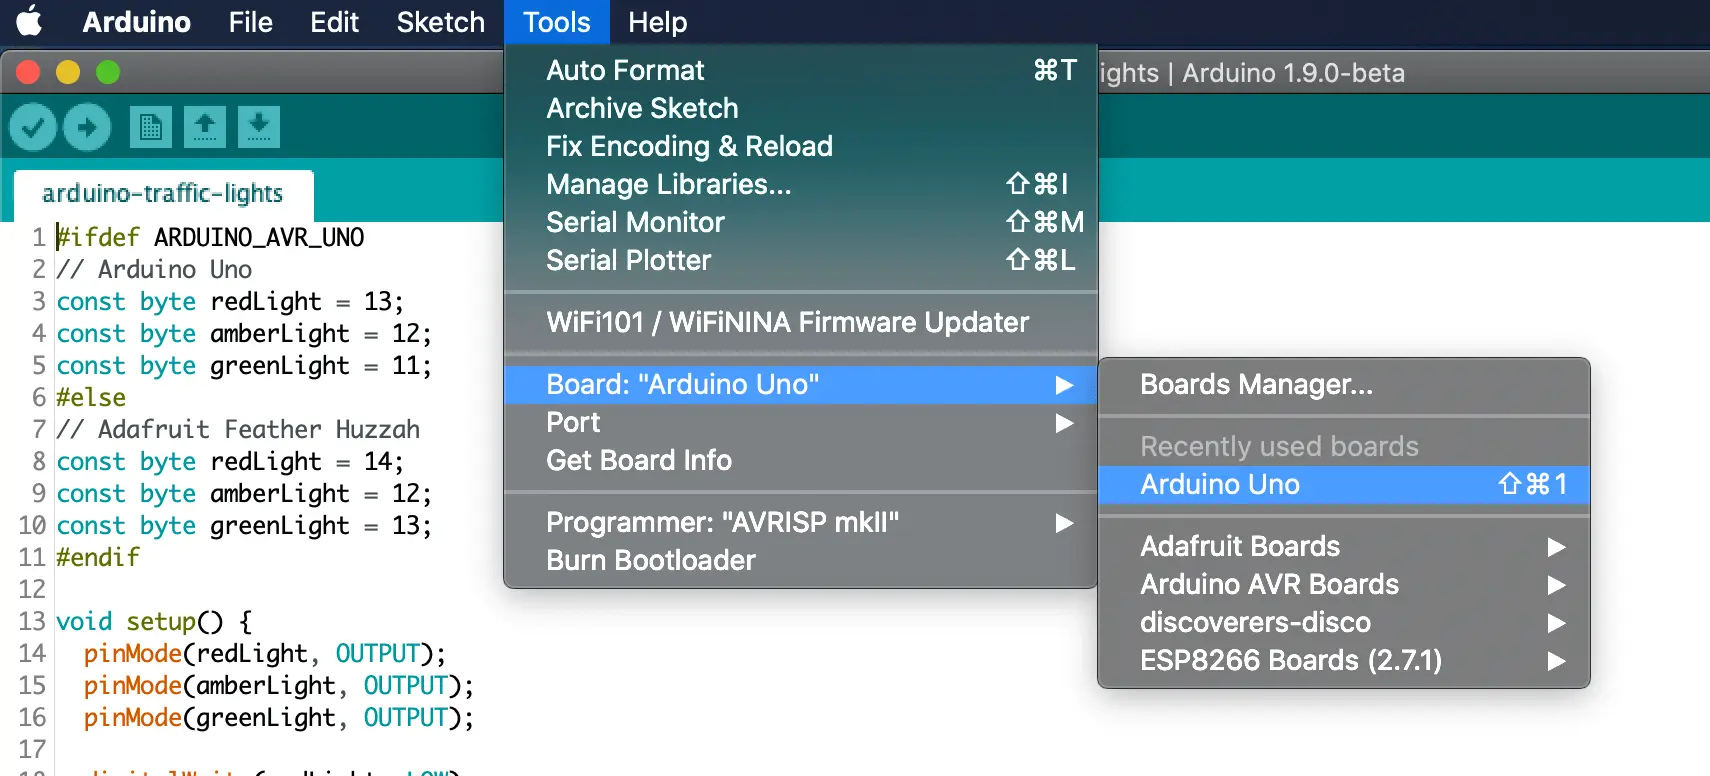
To deploy to the Arduino boards, connect one of them using a USB data cable, then select the correct board…
Arduino Uno:
Adafruit Feather Huzzah:

Note the Adafruit Feather Huzzah is under ESP9266 Boards rather than the Adadfruit Boards that you may also have installed for other boards that you own.
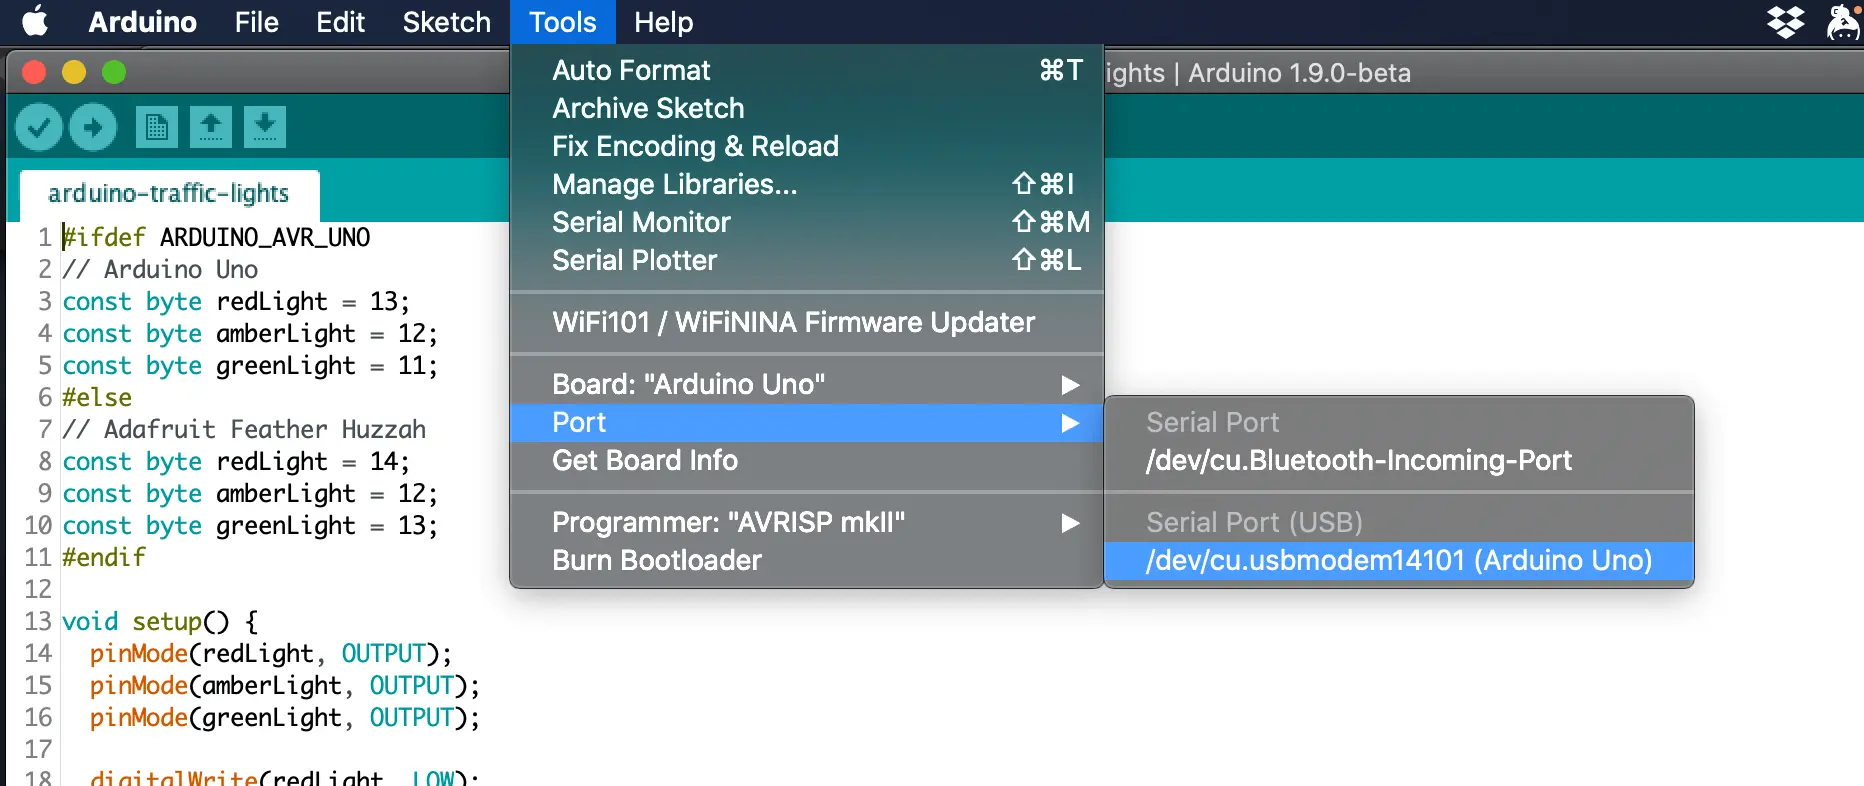
In both cases, don’t forget to also choose the right USB port which should be the one that appears when you plug the board in. Here’s an example with the Uno…
Once deployed, the Arduino should restart and being executing the code… if all is well you should see the traffic lights operating in the right sequence!
I’d love to see what Arduino projects you’re working on - get in touch via the Contact page if you’d like to share!
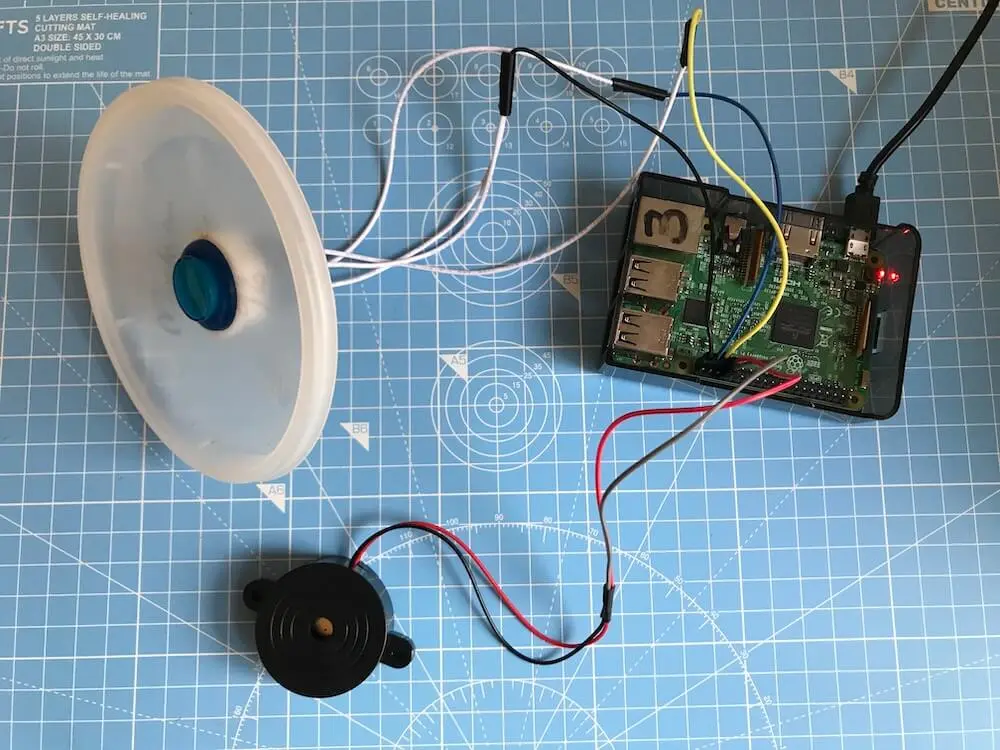 Making a Game with a Raspberry Pi, LED Arcade Button, Buzzer and Python