 Simon Prickett
It’s time to produce yet another version of my original Raspberry Pi / Low Voltage Labs traffic lights Python article. This time, let’s try it with Rust - a compiled language with syntax similar to C++, and which was originally designed at Mozilla.
If you want to check out the original article, you can (read it here).
To make this a standalone guide, there will be some re-use of content from the prior article here. Since writing this article, I’ve also written up the same exercise using Swift (Swift version), Node.js (read about that here), Node RED (try here), Java (try here), Bash scripting (Bash article), C (check it out here), Go, .NET/C# and also for Arduino.
Shopping List
To try this out, you will need the following (links here mostly go to Adafruit, UK customers may want to consider Pimoroni as a UK based alternative. Amazon has most if not all of this stuff too):
- A Raspberry Pi (I’ll use the Pi 3 Model B here, but any model with GPIO pins will work — if you want to use the Pi Zero you’ll need to solder some headers onto it or buy one with those pre-attached). I’m going to assume you have a Pi 2, 3 or 4 with 40 pins
- A power supply for your Pi (Raspberry Pi 4 requires a different USB C power supply)
- Some sort of case is probably a good idea to protect the Pi (but you’ll need to leave the lid off to expose the GPIO pins to connect your lights to)
- A Micro SD card to install your operating system on (or get one with the OS pre-installed). If you want to install the operating system yourself, you’ll need a Mac, PC, Linux machine with an SD card reader
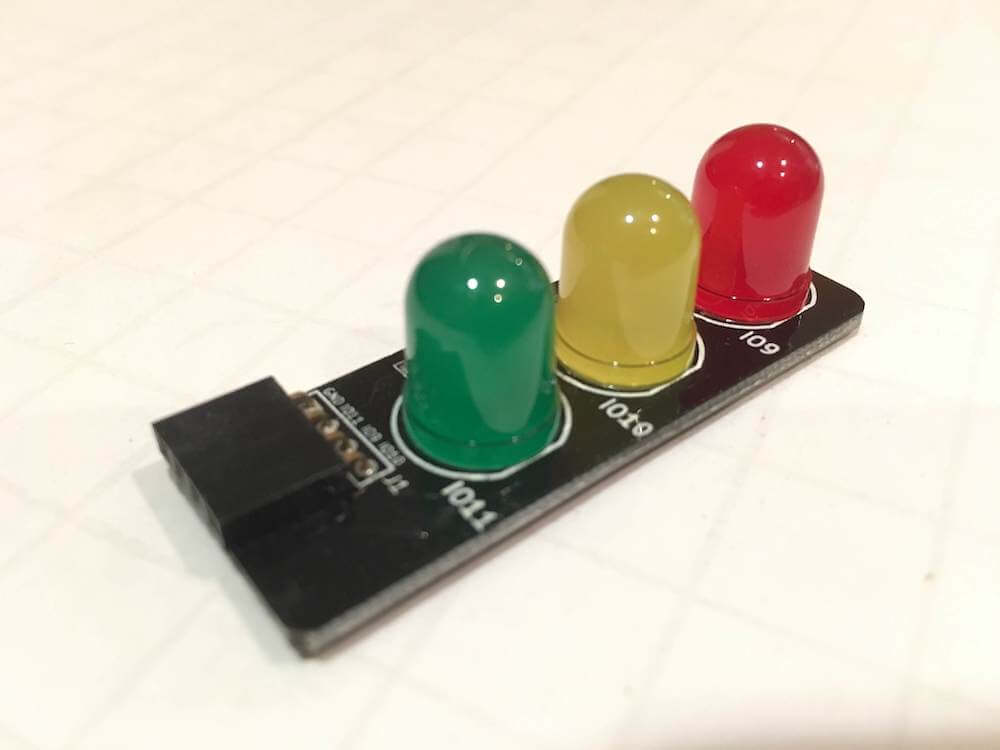
- A set of traffic lights from Low Voltage Labs (the two pack is good value)
- Any USB keyboard to type on the Pi, you might want a mouse too
- Any HDMI display to show output from the Pi
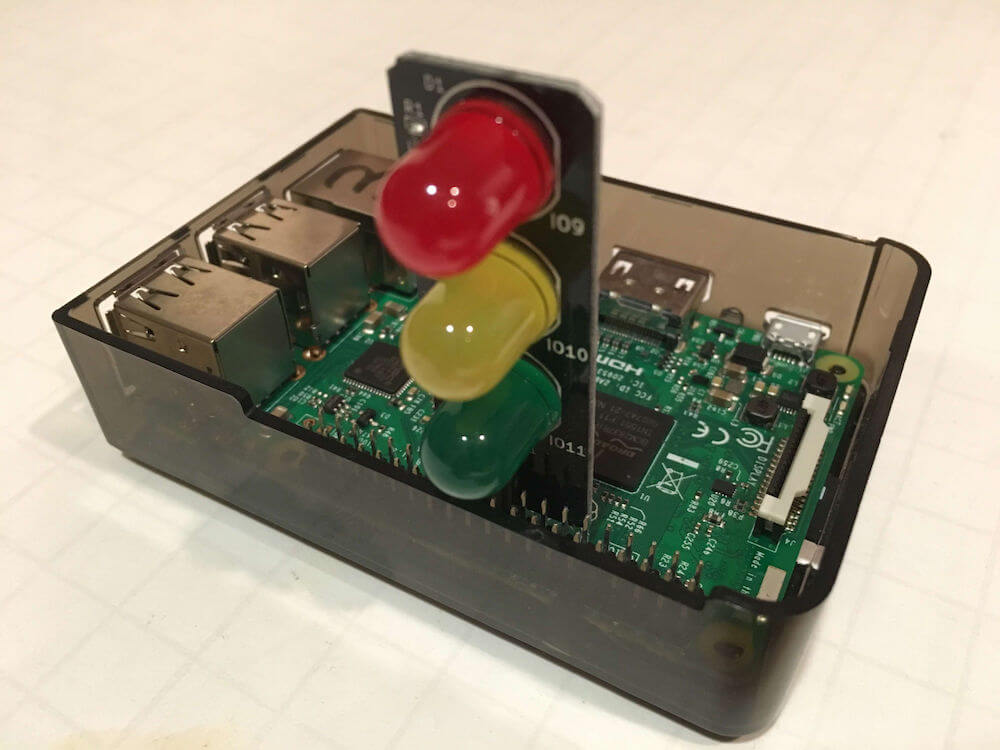
Attaching the Traffic Lights
The Low Voltage Labs traffic lights connect to the Pi using four pins. One of these needs to be ground, the other three being actual GPIO pins used to control each of the individual LEDs.
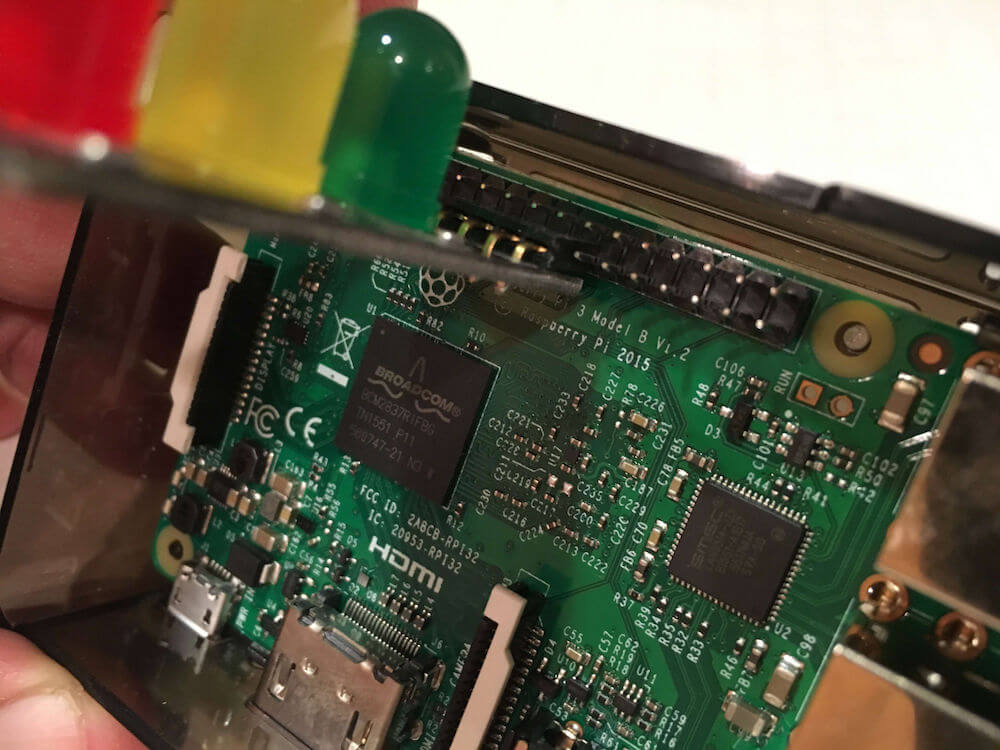
Before powering up the Pi, attach the traffic lights so that the pins connect to the GPIO pins highlighted in red:
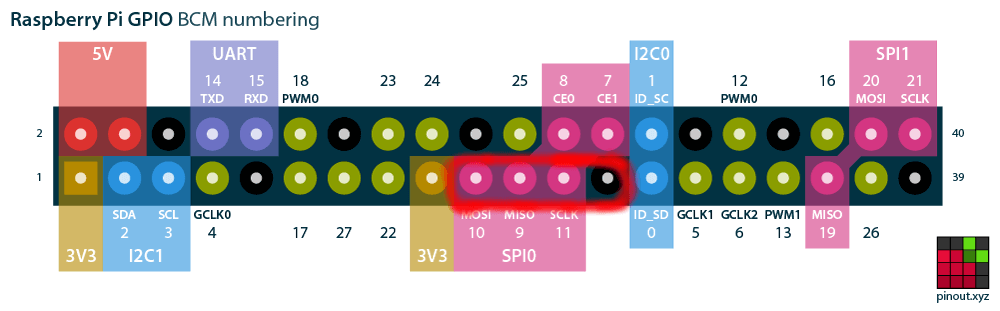
When you’re done it’s going to look something like this… (an easy way to make sure you have it right is to locate the lights on the left hand row of pins as you look at the Pi with the USB ports to the bottom, then count 8 pins up and attach the lights there).
Don’t turn the Pi on yet, you’ll need to prepare an operating system image for it first…
Your support helps to fund future projects!
Operating System Setup
Install the Raspberry Pi OS which can be downloaded from the official Raspberry Pi site. You can also find an excellent installation guide there should you need help. As I didn’t need a full graphical desktop for this project, I went with the Lite version.
Once you’ve got the operating system installed, make sure you can login, and have a working wired or wifi internet connection. You can configure the wireless network settings using the raspi-config tool. If needed, start it as follows:
$ sudo raspi-config
Now you can go ahead and start turning lights on and off!
Installing Dependencies
To get started, we’ll need to install git so that we can get the project code later:
$ sudo apt-get install git
$ git --version
git version 2.30.2
(Version number was correct at the time of writing).
Installing Rust
To install Rust and Cargo (Rust’s build tool and package manager), follow the instructions at rust-lang.org:
$ curl --proto '=https' --tlsv1.2 -sSf https://sh.rustup.rs | sh
When asked to choose an installation option, go with the default:
...
Current installation options:


   default host triple: armv7-unknown-linux-gnueabihf
     default toolchain: stable (default)
               profile: default
  modify PATH variable: yes

1) Proceed with installation (default)
2) Customize installation
3) Cancel installation
Once the installer finishes, update your current shell’s profile:
$ source $HOME/.cargo/env
Now make sure you have the Rust compiler and Cargo installed (version numbers may vary - these were current at the time of writing):
$ rustc --version
rustc 1.56.1 (59eed8a2a 2021-11-01)
$ cargo --version
cargo 1.56.0 (4ed5d137b 2021-10-04)
Programming the Traffic Lights
I’ve already created a project and Rust code for you, so we just need to get that from GitHub:
$ git clone https://github.com/simonprickett/rustpitrafficlights.git
$ cd rustpitrafficlights
The first time you run the project, Cargo will download the required crates (packages) and compile and run the code (the code is in the file src/main.rs):
$ cargo run
    Updating crates.io index
  Downloaded autocfg v1.0.1
  Downloaded bitflags v1.3.2
  Downloaded lazy_static v1.4.0
  Downloaded ctrlc v3.2.1
  Downloaded rppal v0.12.0
  Downloaded memoffset v0.6.4
  Downloaded cfg-if v1.0.0
  Downloaded nix v0.23.0
  Downloaded libc v0.2.107
  Downloaded rust_gpiozero v0.2.1
  Downloaded 10 crates (908.3 KB) in 1.15s
   Compiling lazy_static v1.4.0
   Compiling rppal v0.12.0
   Compiling rust_gpiozero v0.2.1
   Compiling rustpitrafficlights v0.1.0 (/home/pi/rustpitrafficlights)

    Finished dev [unoptimized + debuginfo] target(s) in 2m 46s
     Running `target/debug/rustpitrafficlights`
This project makes use of a couple of crates (packages). One for interfacing with the GPIO pins on the Pi, the other for handling Ctrl-C / SIGINT interrupts. These are specified in the Cargo.toml file which looks like this:
[package]
name = "rustpitrafficlights"
version = "0.1.0"
edition = "2021"

[dependencies]
rust_gpiozero = "0.2.1"
ctrlc = "3.2.1"
If the lights are connected to the correct GPIO pins, they should start to flash on and off in the UK traffic light pattern (red, red + amber, green, amber, red). If you don’t see anything, make sure that you have the lights connected to the right pins.
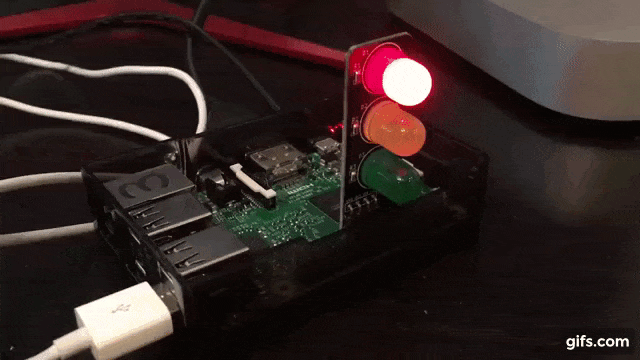
To exit, press Ctrl + C. This will cause all of the lights to turn off after a short delay, and the program will exit.
How it Works
Here’s a brief walkthrough of the complete source code…
- Lines 1-5 import things we’ll need from the crates that the code depends on.
- The
mainfunction that’ll get executed when we run the code is declared at line 7. - Lines 8-9 declare essentially a global Boolean variable that we’ll use while handling a Ctrl-C event to shut down the code. This seems overly complex to me, and is to do with Rust’s memory management guarantees / checking. This seems somewhat pedantic to me and means I probably won’t use Rust for bigger Pi projects.
- At lines 11-13, we declare variables representing the three GPIO pins that the traffic lights are connected to.
- Lines 15-17 declare a function that will run when Ctrl-C is pressed and the
SIGINTsignal raised. This function gets the pseudo-global Boolean tofalse, which will terminate thewhileloop that begins at line 23. - Lines 19-21 make sure that each of the three lights are off, so we begin in a known state.
- At line 23, we enter a
whileloop that will continue until the pseudo-global Boolean isfalse. - In the loop, we use the
.on()function to turn each light on and off in the right order, and thethread::sleepfunction to wait a number of seconds. - Lines 47-49 run after Ctrl-C /
SIGINThas been detected, and the pseudo-global Boolean variable set tofalse… here we make sure that the lights are all switched off before exiting.
I find this a bit dissatisfying… in other languages, I’ve declared a function that turns all the lights off and called this before starting and whenever SIGINT / Ctrl-C is detected. This involves declaring the objects that represent each GPIO pin as global variables. Rust doesn’t as such allow this, and I wasn’t able to see a good solution (experienced Rust coders - please feel free to offer one, I’d love to learn!). So my implementation as it stands could likely be improved by someone who knows what they’re doing!
I’ve put the full source code on GitHub for your enjoyment.
I’d love to hear what you’re up to with the Raspberry Pi — get in touch via the Contact page. If you enjoyed this article, please share it far and wide!
 Raspberry Pi Coding with .NET: Traffic Lights