 Simon Prickett

Public transport services can be great sources of live or near-live data to use when building out an application or trying some new front end technology. For years my usual go to API when I want to play with something like this has been the BART (Bay Area Rapid Transit) train API. I love working with this API because it provides data about train movements through the network and information about each station. It’s also free to sign up for here.
I decided I wanteed to build some projects out that used a more local data source, so I took a look at what the local tram company Nottingham Express Transit and bus company Nottingham City Transport offer in the way of data services. All of the tram stops and many of the bus stops have live departure screens. Here’s my local bus stop and its display:

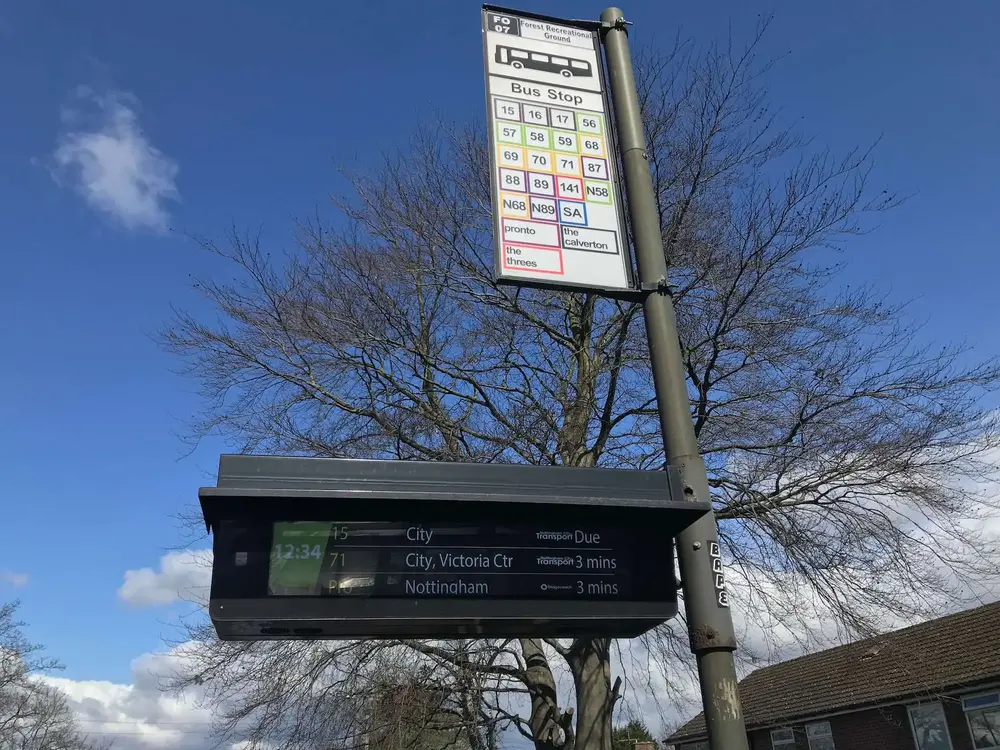
There must be some sort of data feed driving these, but I wasn’t able to find a way that anyone could get at this data via an API. The same applied to the tram network. So, I decided I’d use the age old technique of screen scraping to build a small API that would tell me which buses are coming, when they’re expected to arrive, and to be able to do some basic filtering of the data. For example, I might want to see only buses expected in the next 10 minutes.
Your support helps to fund future projects!
To build such an API, I needed some sort of cloud hosted runtime that would allow me to host code that could:
- Listen for requests on (ideally a secure) URL.
- Run custom logic (my code) each time a request was received.
- Make a request from my code to the bus company’s website to get the departure page for a bus stop.
- Parse the resulting HTML from the bus company, get data items out of it and filter them.
- Return a JSON response to the caller in a reasonable timeframe.
Demo
Here’s a quick demo that calls the API to get the next 8 buses headed into the city from the Forest Recreation Ground stop (stop ID 3390FO07). The URL for this is https://nctx.crudworks.workers.dev/?stopId=3390FO07&maxResults=8 and there’s some basic JavaScript embedded in this page that fetches that and renders the results below (what you see may depend on what time it is in England as the buses don’t run 24 hours a day)…
Loading bus data from API...
Building with Cloudflare Workers
I could have built this any number of ways - Google Cloud Functions or AWS Lambda would both have been solid, sensible choices. Another option is Cloudflare Workers - I decided to take this route because I’ve had success with it at work for dynamic URL routing, and because my own website sits behind Cloudflare so I’m already signed up and set up on their platform.
A worker script is associated with one or more URL paths (Cloudflare users get an account specific *.workers.dev subdomain, and/or can map paths from domains that you have setup to point to Cloudflare too). When Cloudflare receives a request for one of these paths, it runs the worker logic to determine what to do and what response to send back. Cloudflare also handles SSL for you.
Workers can be written in JavaScipt, Rust or C/C++. I decided to use JavaScript as I’m most familiar with it and I thought it would make the code accessible to the widest number of other people.
This article won’t cover how the code works or how to deploy it yourself, for that I wrote a detailed README in the project’s GitHub repo. Here, we’ll focus on how to use the API to see which buses are expected at a given stop.
Using the API
I deployed my workers code to a URL associated with my Cloudflare account to make the API live on the internet. I’m on Cloudflare’s free plan which gives me 100,000 requests to my workers per day with 10ms CPU time allowed for each request… I figure this will do for hobbyist use. If I go over my allocation, you’ll see a Cloudflare error page instead of an API response!
The API’s at https://nctx.crudworks.workers.dev/ and to use it, you’ll need a stop ID for the bus stop you want to see departures for…
Obtaining a Stop ID
This API works at the bus stop level, there’s no endpoints to get a list of routes or stops. To make it work you’ll need a bus stop ID. You can get one of these from the Nottingham City Transport website like so:
- Go to the Nottingham City Transport home page.
- Enter a location into the “Live Departures” search box (example locations: “Sherwood”, “Gotham”, “Victoria Centre”), or click “find your stop on the map”.
- A map appears showing bus stops near your location - pick one and click on it.
- A pop up appears, click “Departures”
- You should now be looking at the live departure board for a stop. The stop ID is the final part of the page URL, for example given the URL
https://www.nctx.co.uk/stops/3390J1, the stop ID is3390J1. - Make a note of your stop ID and use it in the examples below.
Getting Departures from a Stop
To get all the departures for a given stop ID make a GET request or point your browser at:
https://nctx.crudworks.workers.dev/?stopId=3390FO07
Be sure to replace 3390F007 (my stop ID) with yours.
This returns a JSON response that looks like this:
{
  "stopId": "3390FO07",
  "stopName": "Forest Recreation Ground",
  "departures": [
    {
      "lineColour": "#FED100",
      "line": "yellow",
      "routeNumber": "70",
      "destination": "City, Victoria Centre T3",
      "expected": "2 mins",
      "expectedMins": 2,
      "isRealTime": true
    },
    {
      "lineColour": "#935E3A",
      "line": "brown",
      "routeNumber": "16",
      "destination": "City, Victoria Centre T2",
      "expected": "3 mins",
      "expectedMins": 3,
      "isRealTime": true
    },
    {
      "lineColour": "#522398",
      "line": "purple",
      "routeNumber": "88",
      "destination": "City, Parliament St P4",
      "expected": "5 mins",
      "expectedMins": 5,
      "isRealTime": true
    }
  ]
}
The stopId field contains the ID of the stop that you provided. stopName contains the full name for that stop. The remainder of the response is contained in the departures array. Each departure has the following data fields:
lineColour: a string containing the HTML colour code for the line that the bus is on. The buses run on colour coded lines, each line may contain up to three or four route numbers and all buses on the same line colour head in roughly the same direction.line: a string containing the name of the line that the bus is on. This is lowercase. See later in this document for a list of possible values.routeNumber: a string containing the route number. It’s a string not a number because some routes have letters in them e.g.N1,59A,1C,69X.destination: where the bus route terminates / where the bus is headed to. This is a string.expected: when the bus is expected to arrive at the stop. This is a string value that takes one of two forms:<number> minsor<hh>:<mm>with the hours in 24 hour format.expectedMins: the number of minutes until the bus is expected to arrive at the stop. This will be an integer number, and0if the bus is due at the stop now.isRealTime: is a boolean that will betrueif this departure is a real time estimate (the bus has tracking on it) orfalseotherwise… the bus either doesn’t have tracking or hasn’t started on the route yet, so timetable information is shown instead.
Customizing the Response
You can customize the response in four ways:
- By limiting the number of results returned.
- By filtering to include only results that meet certain criteria.
- By telling the API to return a subset of the fields for each matching result.
- By changing the response data format.
These are all specified using request parameters (the part of the URL after the ?) and can all be combined in the same request.
For example, let’s get the next 3 buses from stop 3390FO07 that are on the yellow line, expected within the next hour, and let’s only return the routeNumber, destination and expected fields:
https://nctx.crudworks.workers.dev/?stopId=3390FO07&maxResults=3&line=yellow&maxWaitTime=60&fields=routeNumber,destination,expected
Here’s an example of what the response might look like:
{
  "stopId": "3390FO07",
  "stopName": "Forest Recreation Ground",
  "departures": [
    {
      "routeNumber": "68",
      "destination": "City, Victoria Centre T4",
      "expected": "6 mins"
    },
    {
      "routeNumber": "70",
      "destination": "City, Victoria Centre T3",
      "expected": "16 mins"
    },
    {
      "routeNumber": "69",
      "destination": "City, Victoria Centre T4",
      "expected": "32 mins"
    }
  ]
}
The order of the request parameters on your URL doesn’t matter.
Limiting the Number of Results Returned
By default, you’ll get all the results that the City Transport website shows. If you want go get only up to a certain number of results, use the maxResults request parameter. To get the first 5, add &maxResults=5 to your URL. You will, of course, see fewer results if less than 5 departures are listed, or less than 5 match any other search criteria that you have specified.
Filtering
There are various ways in which you can filter and limit the data returned. These are all specified using extra parameters on the request, and can be combined together in a single request.
Use the filters by adding additional request parameters:
line- to filter by a specific line colour using the line’s name e.g.&line=yellow. Valid values forlineare (note these are case sensitive):browngreenredpinkturquoiseorangeskybluelilacyellowpurplenavygreybluelime
lineColour- to filter by a specific line colour using the line’s HTML colour code e.g.&lineColour=#3FCFD5. Valid values forlineColourare (note these are case sensitive):#935E3A(brown)#007A4D(green)#CD202C(red)#DA487E(pink)#3FCFD5(turquoise)#E37222(orange)#6AADE4(skyblue)#C1AFE5(lilac)#FED100(yellow)#522398(purple)#002663(navy)#B5B6B3(grey)#00A1DE(blue)#92D400(lime)
routeNumber- to filter by a specific route number. This will also return variants of that route number for example&routeNumber=69will return69,69A,69Xetc.&routeNumber=69Xwill only return69X.realTimeOnly- set to true to return only departures that have real time estimates (where the bus is reporting its live location). Example:&realTimeOnly=true. Note: SettingrealTimeOnlyto any value whatsover turns on this filter.maxWaitTime- use to filter departures that are due in the next so many minutes. Example:&maxWaitTime=10.
Specifying which Fields to Return
Use the fields request parameter to specify a comma separated list of field names that you want returned. All other fields for each departure will be removed. For example, let’s request that all matching departures only have the line, routeNumber and expected fields in them, by adding this to the request URL:
&fields=line,routeNumber,expected
Specifying the Response Format
The API can return data in two different formats:
- JSON (default)
- Delimited Strings
JSON is the default that we’ve seen in all of the examples so far. To use this, either don’t specify a format request parameter on your URL, or add &format=json.
To get a delimited string response (perhaps useful when processing the response on a device that has limited storage or processing power, and on which a JSON parser may not be viable), set the format request parameter to string.
When using delimited string responses, the response format looks like this:
3390FO07|Forest Recreation Ground|#FED100^yellow^68^City, Victoria Centre T4^1 min^1^true|^#92D400^lime^56^City, Parliament St P2^4 mins^4^true|^#522398^purple^89^City, Parliament St P5^5 mins^5^true
The following fields are returned, separated by | characters:
- The stop ID.
- The stop name.
- Each departure.
Within each departure, fields are separated by ^ characters. If you choose to filter which fields are returned using the fields request parameter, those fields will be omitted without returning a blank value. For example:
?stopId=3390FO07&format=string&maxResults=3&fields=line,routeNumber,expected
returns:
3390FO07|Forest Recreation Ground|lime^59^2 mins|^brown^17^9 mins|^yellow^69^12 mins
Limitations
This obviously isn’t a complete API… you can’t use it for journey planning from one stop to another, viewing timetables, or whether the bus that’s coming has USB charging and wi-fi. That’s OK though, I specificially wanted real time departure information, with the ability to filter and just return the data I needed. For that purpose, this works pretty well.
As it’s using screen scraping, it will of course break and need updating should the bus company change the document structure of their live departure web pages.
Future Plans
What do I plan to use this for? That would be telling, but stay tuned as I’ve recently acquired a really appropriate type of display for this sort of information and that’s a project I am working on now and will write up when done!
If you use this for anything, please do get in touch and let me know what you’re up to… I’d love to see it.
 Raspberry Pi Coding with Rust: Traffic Lights