 Simon Prickett

I’ve previously produced guides describing how to use the Low Voltage Labs traffic lights with Raspberry Pi single board computers for Python (read Python article), Swift (read Swift article), Node.js (read Node.js article), Node RED (read Node RED article), Java (read Java article), C (read C article), Go (read Go article), Rust and .NET/C#. I even did this for Arduino (read Arduino article). This time, I’ll look at using a Bash script to do the same thing without employing a traditional programming language.
To make this a standalone guide, there will be some re-use of content from the prior articles here.
Shopping List
To try this out, you will need the following (links here mostly go to Adafruit, UK customers may want to consider Pimoroni as a UK based alternative, Amazon has most if not all of this stuff too):
- A Raspberry Pi (I’ll use the Pi 3 Model B here, but any model with GPIO pins will work — if you want to use the Pi Zero you’ll need to solder some headers onto it). I’m going to assume you have a Pi 2 or 3 with 40 pins
- A power supply for your Pi (Raspberry Pi 4 requires a different USB C power supply)
- Some sort of case is probably a good idea to protect the Pi (but you’ll need to leave the lid off to expose the GPIO pins to connect your lights to)
- A Micro SD card to install your operating system on (or get one with the OS pre-installed). If you want to install the operating system yourself, you’ll need a Mac, PC, Linux machine with an SD card reader
- A set of traffic lights from Low Voltage Labs (the two pack is good value)
- Any USB keyboard to type on the Pi, you might want a mouse too
- Any HDMI display to show output from the Pi
Attaching the Traffic Lights
The Low Voltage Labs traffic lights connect to the Pi using four pins. One of these needs to be ground, the other three being actual GPIO pins used to control each of the individual LEDs.

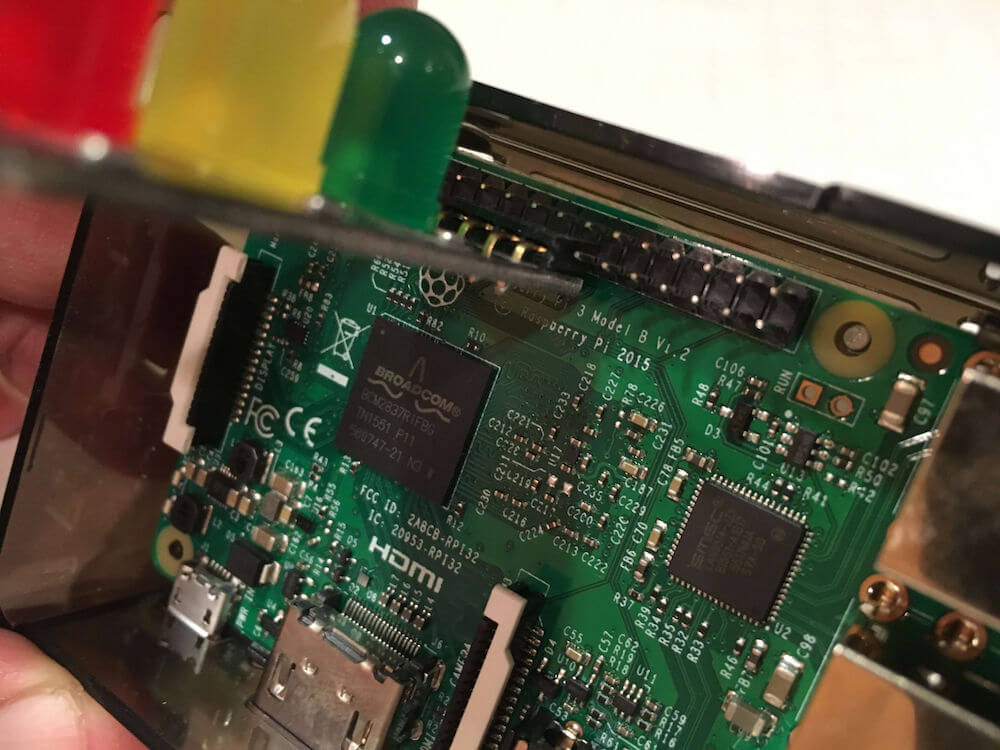
Before powering up the Pi, attach the traffic lights so that the pins connect to the GPIO pins highlighted in red:
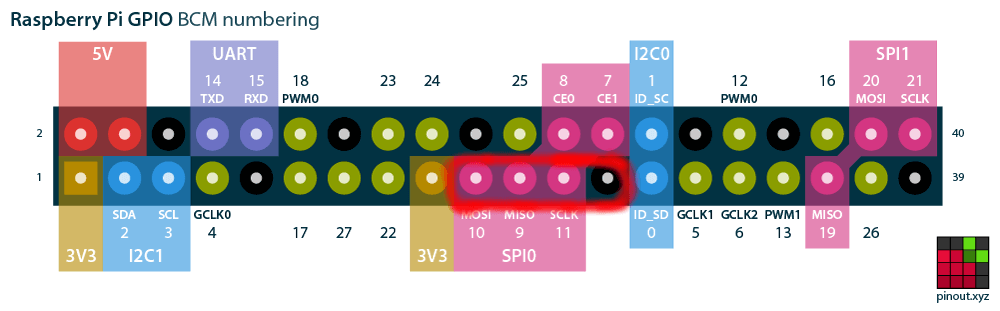
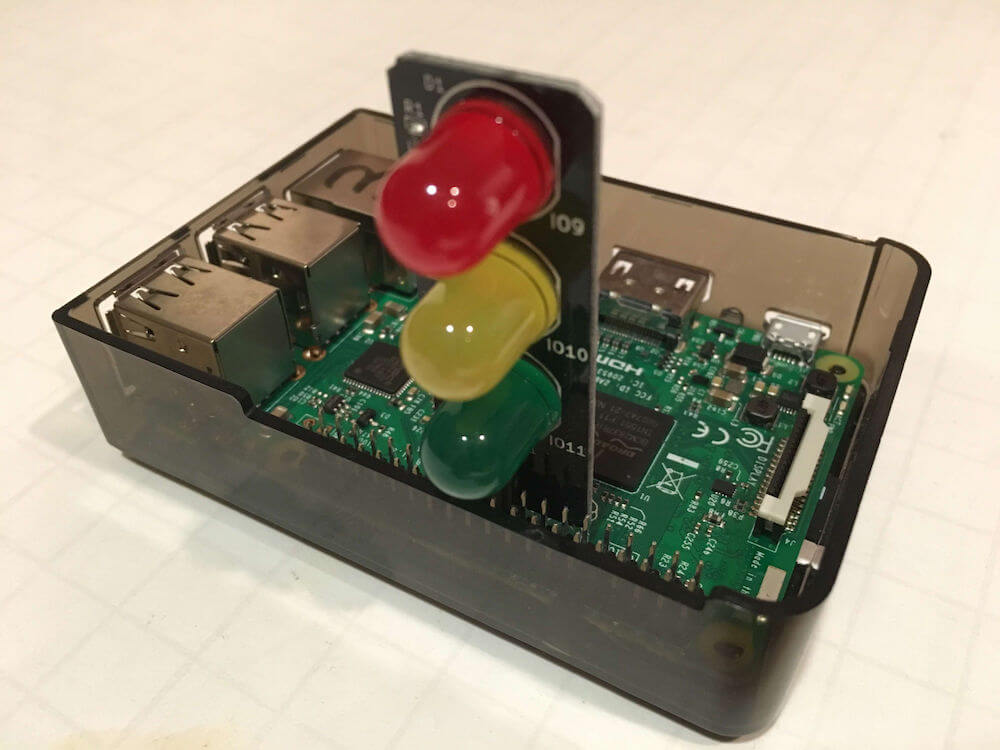
When you’re done it’s going to look something like this… (an easy way to make sure you have it right is to locate the lights on the left hand row of pins as you look at the Pi with the USB ports to the bottom, then count 8 pins up and attach the lights there).
Don’t turn the Pi on yet, you’ll need to prepare an operating system image for it first…
Operating System Setup
Install the Raspberry Pi OS which can be downloaded from the official Raspberry Pi site. You can also find an excellent installation guide there should you need help.
Once you’ve got the operating system installed, make sure you can login, and have a working wired or wifi internet connection.
Your support helps to fund future projects!
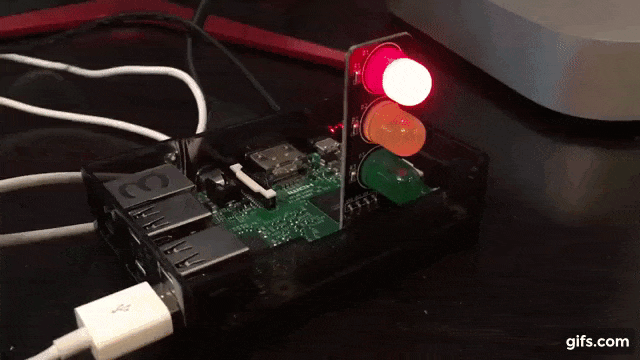
Now you can go ahead and start turning lights on and off!
Installing Dependencies
As Bash comes with the operating system, the only thing left to install is git so we can download the sample code from GitHub:
$ sudo apt-get install git
$ git --version

git version 2.11.0
Downloading the Sample Code
I’ve written some sample C code to demonstrate running the traffic lights in the UK light sequence (red, red + amber, green, amber, red):
To get the source code for this example from GitHub:
$ git clone https://github.com/simonprickett/bash-traffic-lights-pi.git
Accessing the GPIO Pins from a Bash Script
Without adding further dependencies, Bash scripts can access and control the Pi’s GPIO pins using sysfs. This presents as a set of filesystem paths which can be manipulated to configure individual pins as inputs or outputs and to set and read their values. On the Pi, these paths look like:
/sys/class/gpio/gpio<pin_number>
and each has a /direction and /value, for example for GPIO 11:
/sys/class/gpio/gpio11/direction
/sys/class/gpio/gpio11/value
As we will see later in this article, the direction and value can be set by writing values to these “paths” as the root user on the Pi.
The pin numbering scheme used by sysfs is the Broadcom (BCM) one, so the pin numbers that you need to use will match those in the diagram earlier in this article.
Running the Demo
Starting the demo is as simple as executing the script as root:
$ cd bash-traffic-lights-pi
$ sudo ./trafficlights.s
To stop the demo, press Ctrl-C at any time.
Note the use of sudo when starting the script. This allows it to run as the root user with access to write the file paths needed to control the GPIO pins using sysfs.
How it Works
Here’s the code, contained in trafficlights.sh in the GitHub repo:
Lines 1–13 set up some variables so that things we need have more meaningful names. The red LED is on GPIO 9, yellow on 10 and green on 11. We also abstract out the common base path /sys/class/gpio as we will be using that a lot. ON and OFF are used as they are more meaningful than the actual 1 and 0 values that the script will use.
Exporting Pins
In order to use a GPIO pin through sysfs, we first have to “export” each one to make the appropriate paths available. The function exportPin at lines 16–21 does this. For example to export pin 9 it will use the following command (once all variables have been resolved to their values):
echo "9" > /sys/class/gpio/export
This creates paths in /sys/class/gpio for pin 9 but will error if those paths exist already. To overcome this the exportPin function checks first and will only export a pin if the path to it does not yet exist.
Setting Pin Direction
Pins can be used for input or output. In this case we need to use them as outputs to control each of the three LEDs on the traffic lights. The function setOutput (lines 24–27) does this by sending “out” to the “direction” path for the pin. Example for GPIO 9:
echo "out" > /sys/class/gpio/gpio9/direction
Turning Lights On and Off
Function setLightState at lines 30–33 handles turning one of the lights on and off by setting its GPIO pin to high (1 — on) or low (0 — off). It does this by writing either 1 or 0 to the value path for the pin.
Example for GPIO 9:
echo "1" > /sys/class/gpio/gpio9/value
Turning Everything Off on Exit
The code’s going to run in an infinite loop exiting when Ctrl-C is pressed and the SIGINT signal is sent. In order to tidy up and turn all three of the lights off when this happens we need to trap and handle the SIGINT signal. This is achieved with lines 44–50 which define a function shutdown and register it as the handler for SIGINT.
shutdown calls another utility function that in turn calls setLightState for each of the three lights to switch them off. It then uses exit to cleanly stop the script, returning control to the shell.
The Main Code Loop
The main code entry point starts at line 52 and uses the functions we defined earlier to export each of the three required pins and to set them as outputs. It then calls the utility function allLightsOff which ensures that all three of the traffic light LEDs are turned off so that we are in a known state to begin from.
Lines 66–89 are an infinite loop in which we use setLightState to turn individual traffic light LEDs on and off in the correct order for a UK traffic light (red, red + yellow, green, yellow, red, repeat…). The built in sleep command allows the code to stay in each state for a few seconds before moving to the next.
The source code for this project is freely available on GitHub.
I’d love to hear what you’re up to with the Raspberry Pi - get in touch via the Contact page. If you enjoyed this article, please share it far and wide!
 Playing with Raspberry Pi: GPIO Pins and Traffic Lights in Java