 Simon Prickett

Recently I was looking for an excuse to try out the hosted Redis database service from Redis Labs. I co-incidentally found out that Monk Makes produce a smart card kit for the Raspberry Pi at a really nice price. This got me thinking about how I might get to play around with both of these things together. It didn’t take me long to cook up the idea of building out a smart card ticket vending and checking system such as you might find employed by various railways around the world.
Looking around at what I had in my project cupboard, I decided I had just about everything needed to build three things:
- A ticket (pass) sales terminal: the user taps their smart card to the reader, presses the button for the type of pass that they want to buy then taps the card to the reader again to finish the transaction. The sales terminal should play audio samples that guide the user through the process.
- An entry gate: the user taps their smart card to the reader and is allowed entry if the card has a valid pass associated with it. If the card doesn’t have a valid pass entry should be denied. The entry gate should show a red flashing light and play a buzzer sound when the user is denied entry. Users with valid passes should see a green light and hear a welcoming chime.
- A system monitor: this should record a log of all events happening in the system — a pass is sold, a user entered the system to begin a journey, a user was denied entrance to the system because their card didn’t have a valid pass.
Your support helps to fund future projects!
After some more thinking, I also decided that a good demo should have three different types of transit pass:
- Single use pass: can be used to enter the system once for a single journey. Once purchased, never expires until used.
- Ten trip pass: can be used to enter the system ten times, each for a single journey. Once purchased, only expires after the tenth use.
- Two hour pass: can be used to enter the system an unlimited number of times, but expires two hours after the first use.
I set forth to build out hardware and software for each of the components and to figure out how to use Redis to make them all talk to each other. This article describes how the system works at a high level. If you want to see a visual demo and run through I also made a video of the finished product…
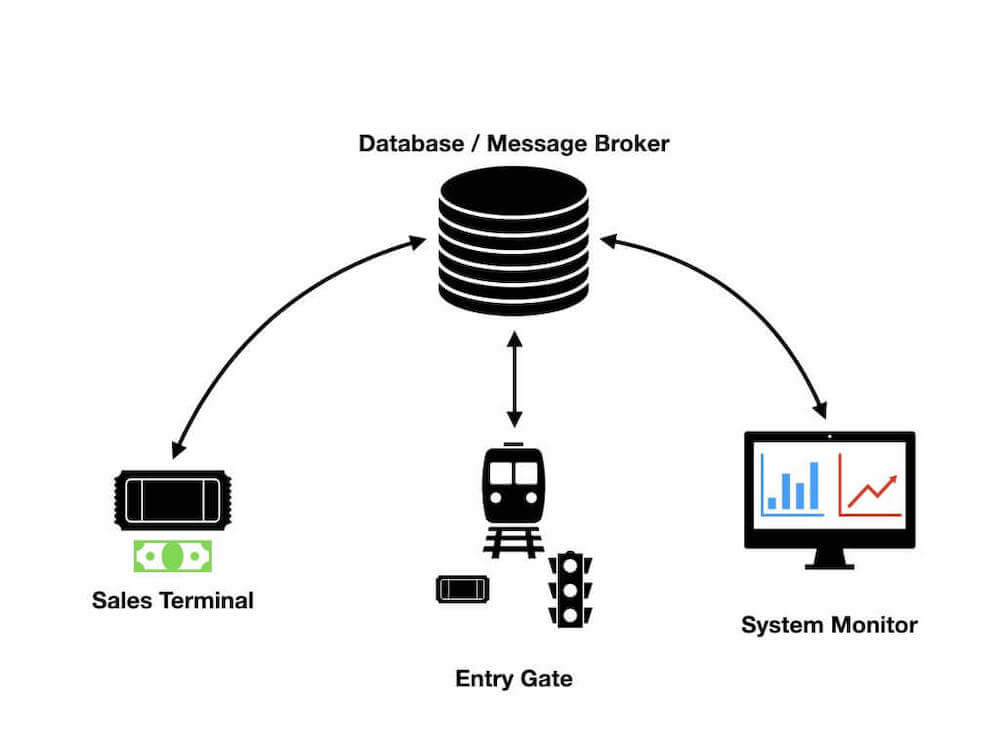
Let’s take a look at each component of the system in turn.
Redis Database
- The sales terminal writes records to the database that associate each smart card’s serial number (the key) with a group of key/value pairs representing the data for the pass that the user bought and associated with their card.
- The sales terminal also checks the database to see if the serial number for the user’s card already has a pass set for it. This stops users adding more than one pass at a time to their card.
- The sales terminal publishes a message to a topic every time a new pass is issued.
- The entry gate checks the database to see if the serial number of the user’s card has a valid pass (does a key exist for that serial number or not).
- If the entry gate finds a pass in the database, it checks the pass type and takes a different action depending on that. For a single use pass, it will delete the key from the database as the card is no longer valid for further entries. For a ten trip pass, it will reduce the number of remaining trips on the pass by one and update the database. If one trip remains, it will delete the key from the database as the pass has used up its allocation. For a two hour pass, it will use the time to live feature in Redis to set a two hour expiry time on the key in the database. Redis will expire the key two hours later meaning subsequent read requests for it will return nothing. If the user tries to enter the system after that, they will be denied.
- The entry gate publishes messages to various topics for each action that it takes: allowing a user entry to the system, denying them entry, activating a two hour pass.
- The system monitor consumes messages from the various pub/sub topics and outputs information about the state of the system based on the data in the messages. It does not use the database part of Redis at all.
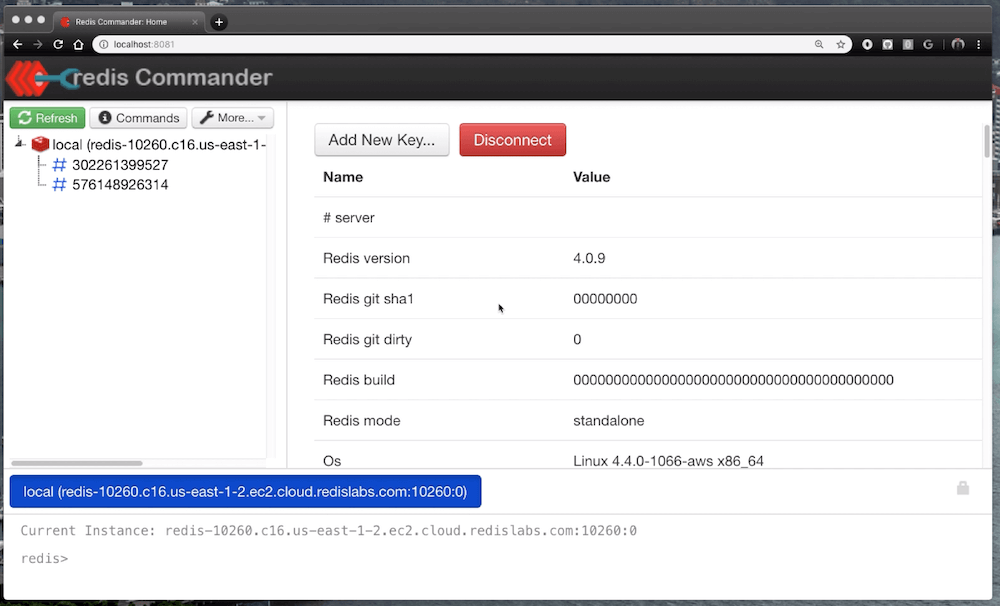
So that I didn’t have to run or provision extra hardware for my project, I chose to have my Redis instance hosted in the cloud by Redis Labs - update for 2019, I now work for Redis Labs full time building courses for Redis University :). For databases up to 30Mb in size this is a free option. The setup is simply a matter of answering a few questions after which you’ll have a URL, port and password for your hosted instance. These can then be used with the many programming language specific clients for Redis to connect to and manipulate the database. If you want to find out more about Redis, you can sign up for the next training courses at the Redis University which are also provided free of charge by Redis Labs.
For this project I used the Redis clients for Python and Node.js as well as the graphical Redis Commander to view the state of the database more easily. 2019 update - you could also now use Redis Labs RedisInsight graphical tool too.
Ticket Sales Terminal
Hardware
- One Raspberry Pi: acts as the brains of the system and will run the software that talks to the hardware using the GPIO pins. I used a Pi 3 as I also needed the built in wifi to talk to Redis in the cloud.
- *One card reader: This came with the Monk Makes Clever Card Kit. This kit is amazingly good value, needs no soldering and has great instructions and demo code that made it very easy to use on this project. The kit also contains an LED light and a push button switch that I didn’t use here.
- Three arcade buttons: these act as switches and have two wires each — one is for ground the other goes to a GPIO pin on the Pi. As we need to detect each button individually they each need separate connections to the Pi although the ground wires can be daisy chained into one ground pin (see wiring diagram). This was the only part of the project that required soldering.
- A speaker: there’s no screen based output for this component, so I wanted it to make sounds and speak instructions. To do this I used a Jawbone Jambox connected to the Pi’s audio out jack. Any external powered speaker should do.
- Some smart cards: These are 13.5MHz contactless RFID smart cards that are supplied with the Monk Makes kit. Each has an individual ID encoded onto it which we’ll use as a unique key in Redis.
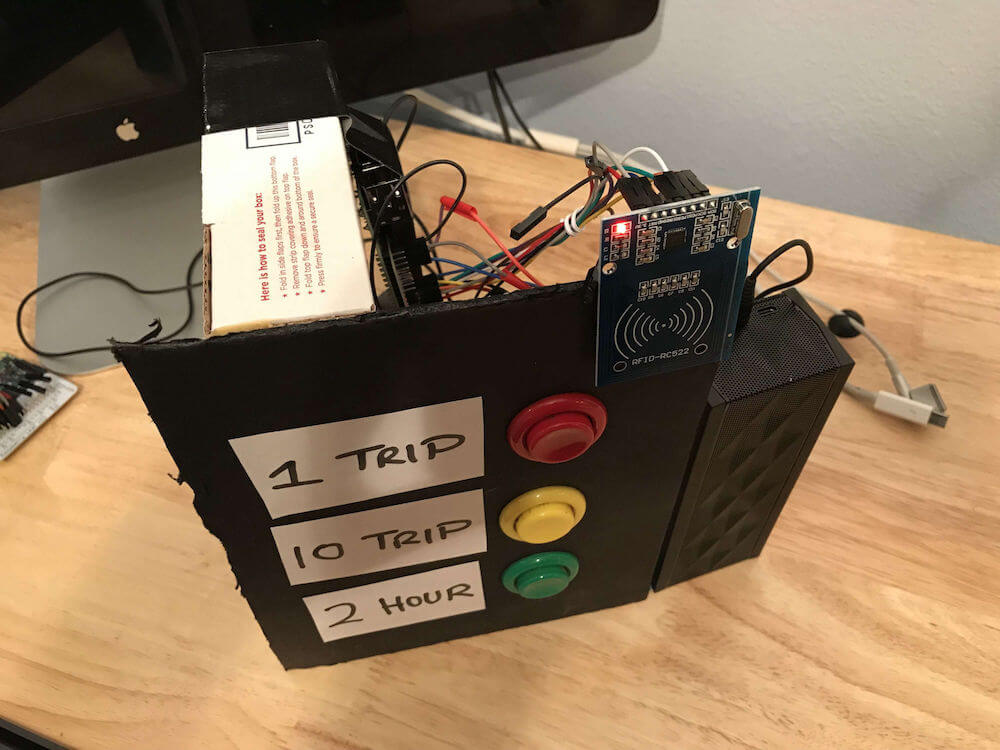
- A nice enclosure: A nice 3D printed box or similar to enclose the Pi and mount the card reader to. I didn’t have the time or materials to build one, so I used some foam board, tape, glue and a USPS flat rate Priority Mail box…
The final product looks like this (the Raspberry Pi is taped onto the rear of the foam board):
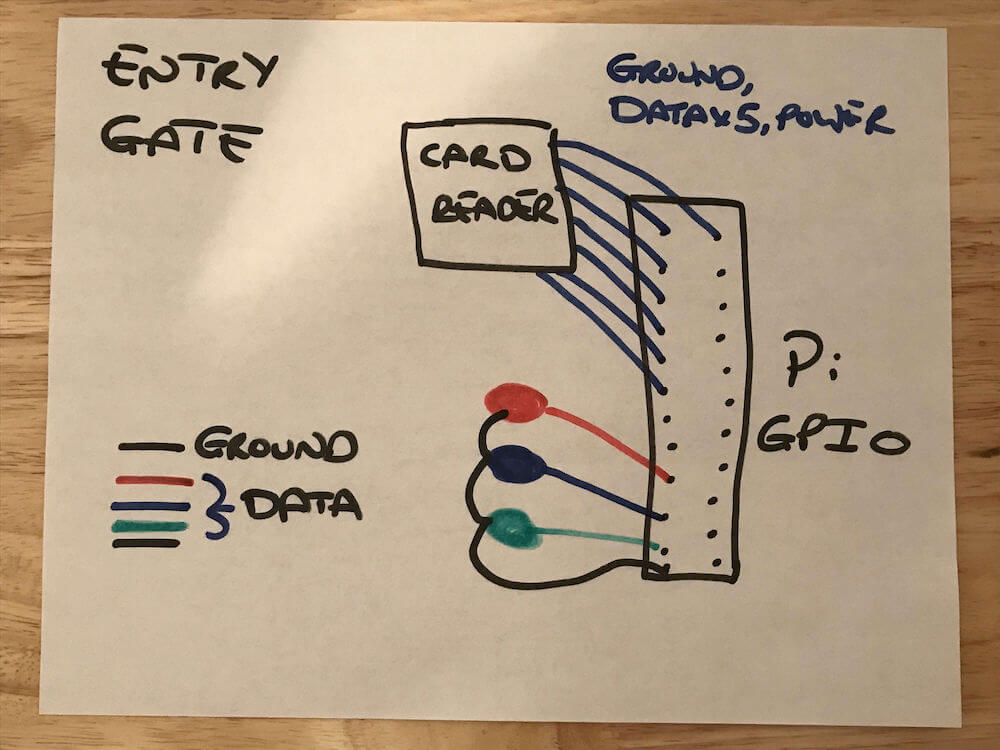
Here’s a rough diagram of how it is wired together… I don’t have a yellow pen, so used blue to represent the yellow button :)
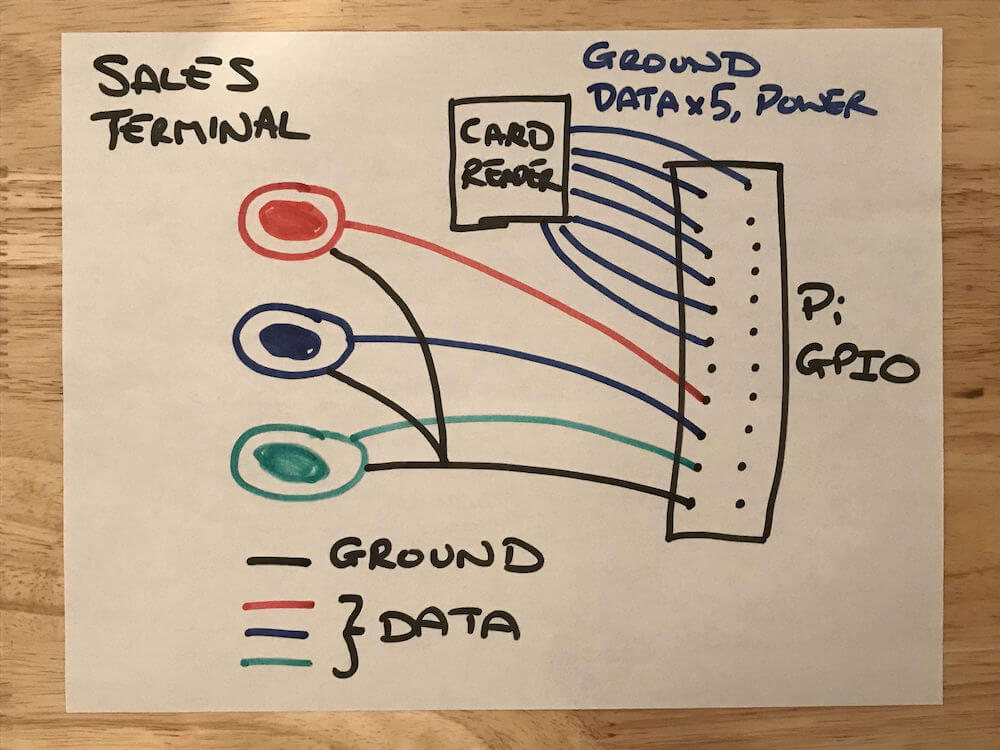
The three arcade buttons share a common ground connection to the Pi’s GPIO headers. Each also has its own individual connection to a GPIO pin, so that the software can check their states independently of each other. The card reader uses a seven wire configuration that is well documented in the kit’s instructions and includes a power connection, a ground, and five data pins.
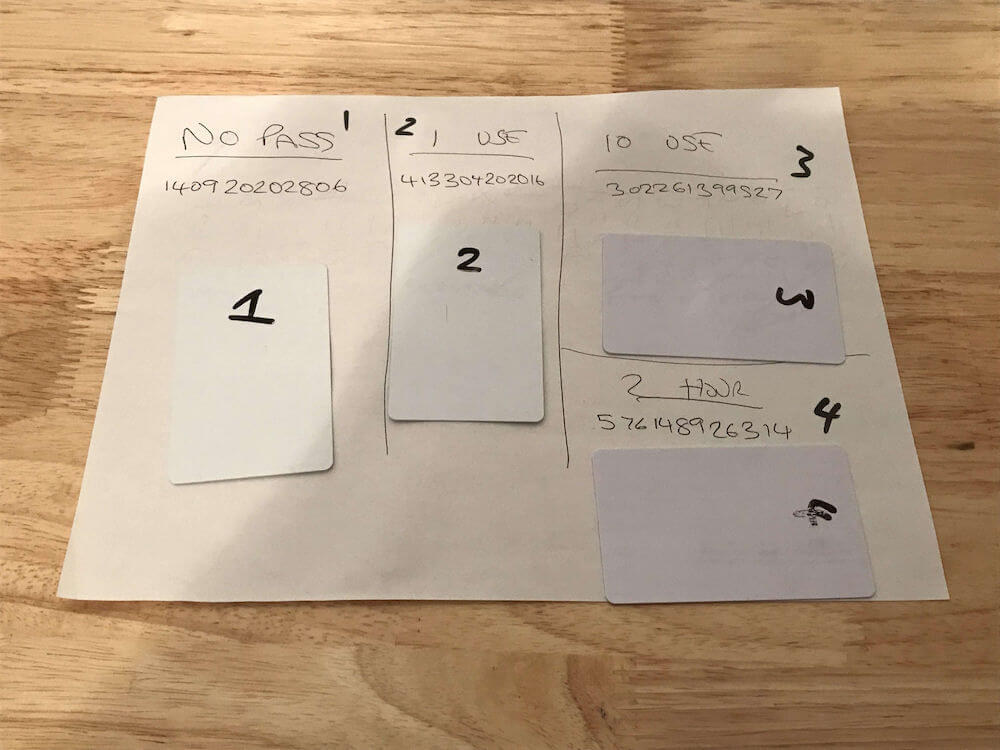
Here’s some of the cards that came with the kit. I wrote numbers on them for easy identification. The longer numbers written next to each are their ID numbers — I used Python software from the Monk Makes kit to read these values before writing my own software for the sales terminal.
Workflow
The logic for the Entry Gate looks goes something like this in pseudo Python notation:
while(True):
  # Wait for a card to be presented to the card reader

  # Get the serial number from the card
  if ( # Record for this card serial number was in Redis ):
    # Cannot add more than one pass to a card
    # Speak message to tell the user this card already
    # has a pass
  else:

    # Speak message to tell the user to select a pass
    # Wait for user to select a pass by pressing one
    # of the buttons
    # Speak message to tell the user to tap their
    # card on the reader again
    # Wait for a card to be presented to the card
    # reader

    # Check if it is the same card that was presented
    # at the beginning of the transaction
    if ( # Same card was presented ):

      # Write record to Redis associating card
      # serial number with the type of pass purchased
      # Speak thank you message to user confirming
      # the type of pass that they bought

    else:

      # Speak message to tell the user they didn't present
      # the same card so the transaction is void
Software
I chose to write the software in Python for this component. The reason for this was mostly because there was freely available and battle tested example code available for the card reader from Monk Makes. The arcade buttons can be accessed through the RPi.GPIO package for Python. Finally, Redis also has a mature client package for Python.
Rather than go through the code line by line, let’s take a look at how it accomplishes the key tasks required for this component:
Reading the Smart Cards
The Clever Card Kit from Monk Makes is a comprehensive package including a card reader, cards and downloadable sample code for Python. The software allows for both reading data from the cards and writing to them. As each card has an ID or serial number associated it it, I decided to use those as unique identifiers meaning I didn’t need to write any additional data onto the cards themselves.
Having imported the supplied library, the card reader can then be configured to work in pretty much the same was input from a regular keyboard would:
import SimpleMFRC522 # Supplied with the kit
...
cardReader = SimpleMFRC522.SimpleMFRC522()
...
def waitForCard():
  print('Hold a travel card close to the reader.')
  id, text = cardReader.read()
  cardSerialNumber = str(id)
  print('Card ' + cardSerialNumber + ' detected.')
  return cardSerialNumber
The above waits for a card to be presented to the reader, then pulls the card’s ID from it and returns it to the caller.
Playing Sounds
I decided to let an external program play the audio files that I recorded for the entry gate (each file is me speaking the instructions telling the user what to do next). As I developed the software partly on my Mac to run on the Raspberry Pi, I needed to find a way to do this on both operating systems. I went with afplay on the Mac which is built in and mpg123 on the Pi which has to be installed. It’s a really simple install on the Pi though:
$ sudo apt-get install mpg123
Playing a sound file on either operating system is then simply a case of calling the right program with the path to the audio file:
def playAudio(audioFileName):
  if (platform.system() == 'Darwin'):
    # MacOS testing
    os.system('afplay audio/' + audioFileName + '.mp3')
  else:
    # Assume Linux
    os.system('mpg123 -q audio/' + audioFileName + '.mp3')
Reading the Arcade Buttons
The arcade buttons are each wired to a GPIO port on the Raspberry Pi. They are also all wired to a single ground connection on the Pi by means of a chained ground wire.
To read their state, I first gave meaningful names to each of the GPIO pins that the buttons are connected to and tell the GPIO module that we’re using the Broadcom port numbering scheme:
GPIO.setmode(GPIO.BCM)

GPIO_ONE_TRIP=19
GPIO_TEN_TRIP=13
GPIO_TWO_HOUR=26
Each button’s GPIO pin then needs to be set as an input with the pull up resistor turned on so that we can determine when the button has been pressed:
# Repeat for GPIO_ONE_TRIP, GPIO_TEN_TRIP & GPIO_TWO_HOUR
GPIO.setup(
  GPIO_ONE_TRIP,
  GPIO.IN,
  pull_up_down=GPIO.PUD_UP
)
Whenever I need to wait for a button to be pressed, I use the following code which basically sits in a loop waiting for one of the GPIO pins to go low:
def waitForButton():
  oneTrip = True
  tenTrip = True
  twoHour = True

  while (oneTrip and tenTrip and twoHour):
    oneTrip = GPIO.input(GPIO_ONE_TRIP)
    tenTrip = GPIO.input(GPIO_TEN_TRIP)
    twoHour = GPIO.input(GPIO_TWO_HOUR)

    if (oneTrip == False):
      print('One trip button pressed.')
      return GPIO_ONE_TRIP
    elif (tenTrip == False):
      print('Ten trip button pressed.')
      return GPIO_TEN_TRIP
    elif (twoHour == False):
      print('Two hour button pressed.')
      return GPIO_TWO_HOUR
Interacting with Redis
The sales terminal needs to connect to Redis in order to:
- Check if a smart card has a pass associated with it.
- Add a new pass to a smart card that currently has none.
- Publish a message for any interested subscribers to pick up whenever a new pass is issued.
Connecting to Redis is very simple, I used some environment variables to keep sensitive secrets out of my code:
r = redis.Redis(
  host = os.environ['TRANSIT_PASS_DEMO_REDIS_HOST'],
  port = os.environ['TRANSIT_PASS_DEMO_REDIS_PORT'],
  password = os.environ['TRANSIT_PASS_DEMO_REDIS_PASSWORD'],
  decode_responses = True
)
The Redis EXISTS command is used to check whether a card has a pass associated with it:
def hasExistingPass(cardSerialNumber):
  return r.exists(cardSerialNumber)
In order to associate a pass with a card serial number in Redis, a pass has to be generated. The data varies a little depending on the type of pass selected, note that for the ten trip pass there’s an additional field that the others don’t have:
PASS_TYPE_SINGLE_USE = 'SINGLE_USE'
PASS_TYPE_TWO_HOUR = 'TWO_HOUR'
PASS_TYPE_TEN_TRIP = 'TEN_TRIP'
...
def generatePass(passType):
  if (passType == PASS_TYPE_SINGLE_USE):
    # Use once, never expires.
    return {
      'passType': PASS_TYPE_SINGLE_USE
    }
  elif (passType == PASS_TYPE_TWO_HOUR):
    # Use an unlimited amount of times within two
    # hours of first use.
    return {
      'passType': PASS_TYPE_TWO_HOUR
    }
  else:
    # Use ten times, never expires.
    return {
      'passType': PASS_TYPE_TEN_TRIP,
      'tripsRemaining': 10
    }
Assuming the result of a call to generatePass has been stored in newPass, storing the pass in Redis is then a simple matter of using the HMSET command to add a hash to the database using the card serial number as the unique key:
r.hmset(cardSerialNumber, newPass)
passType = newPass.get('passType')

# Publish a message saying that a pass was issued.
msgPayload = {
  'cardSerialNumber': cardSerialNumber,
  'pass': newPass
}

r.publish('pass-issued:' + passType, json.dumps(msgPayload, separators=(',', ':')))
Having added the new pass to Redis, the code then creates a JSON representation for it and calls the Redis PUBLISH command to tell other interest parties (in our case the System Monitor component) that a pass was issued. We use a fixed prefix pass-issued: as part of the channel name so that other components subscribing to the channel will be able to listen for either all types of passes or only a specific type (by listening for the full channel name rather than just the pass-issued: prefix). For more information about Redis Pub/Sub you can check out the documentation.
Entry Gate
Hardware
The entry gate uses similar components to the sales terminal with a couple of differences:
- One Raspberry Pi: Again the brains, interface to the card reader and connection to cloud Redis. I used another Pi 3 to take advantage of the built in wifi hardware.
- One set of traffic light LEDS: Instead of arcade buttons for input, the entry gate uses traffic light LEDs from Low Voltage Labs. These are great — I use them a lot with Pi projects as they’re an easy way of providing visual feedback without any soldering or setup time.
- One card reader: This came with the Monk Makes Clever Card Kit. You get one card reader in each kit, so I bought a second kit which got me even more cards and another switch and LED that I didn’t use on this project. You also get the Pi GPIO helper overlay pictured below in these kits, they’re really good value.
- A speaker: there’s no screen based output for this component, so I wanted it to play sounds in addition to the visual output from the traffic lights. To do this I used a Jawbone Jambox connected to the Pi’s audio out jack. Any external powered speaker should do.
- A nice enclosure: A nice 3D printed box or similar to enclose the Pi and mount the card reader, perhaps with some holes for the LEDs to poke through. Again, I didn’t have the time or materials for this so simply stood the card reader up on its end, using Blu-tack (mounting putty) to hold it in place.
The completed entry gate looks like this:
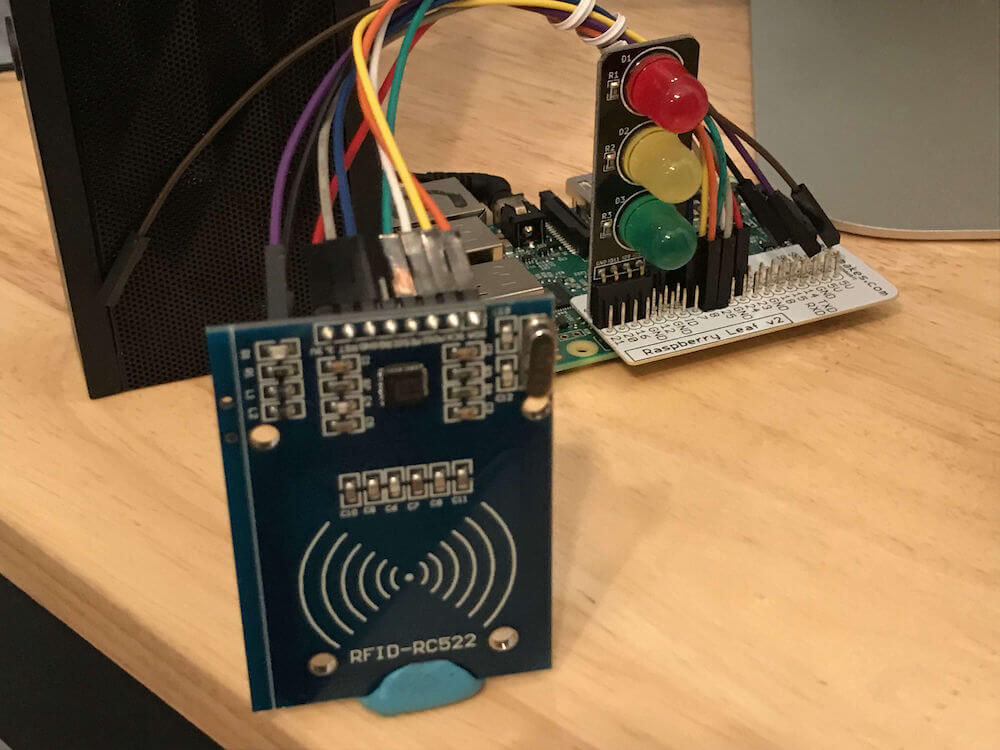
The wiring for the card reader is the same seven connection arrangement as used in the sales terminal component and documented in the kit. The traffic lights come pre-assembled with a common ground and just press onto a row of four GPIO pins, so long as the bottom one of the four is a ground pin. There’s no soldering required for this component.
Workflow
The logic for the Entry Gate looks goes something like this in pseudo Python notation:
# Turn off all the lights
while(True):
  # Turn on the red Light

  # Wait for a card to be presented
  # Check in Redis database to see if the card
  # has a pass associated with its serial number?
  if ( # Record found in Redis ):
    # Update this card's pass
    # - Single use pass: delete it from Redis
    # - Ten trip pass: update in Redis with 1 less trip
    #   remaining, delete it if 1 trip remains
    # - Two hour pass: if first use, set 2 hour expiry
    #   in Redis
    # Send message on Redis topic to inform other
    # component(s) that a card was used successfully
    # Play access granted audio
    # Turn red light off
    # Turn green light on
    # Wait 5 seconds
  else:
    # Flash the red light a few times
    # Play access denied audio
    # Send message on Redis pass-denied topic to
    # inform other component(s) of illegal use of
    # this card
Software
I wrote the software for this component in Python too, for basically the same reasons that made it a good choice for the Sales Terminal. The card reader and audio playing functionality is identical to that in the Sales Terminal. The primary hardware difference is that the Entry Gate uses GPIO pins as outputs to turn the traffic light LEDs on and off whereas the Sales Terminal used GPIO pins as inputs to read from the arcade buttons.
Again, let’s look at the key tasks that the software has to perform, and how it goes about doing those:
Reading the Smart Cards
This is performed in the same way as for the Ticket Sales Terminal component, so nothing new here.
Playing Sounds
The mechanism to play sounds is the same as that used in the Ticket Sales Terminal component. The only difference is that the sounds are from a free sound effects download rather than recordings of my voice.
Controlling the Traffic Lights
The traffic light LEDs are controlled using GPIO pins. Each light has its own pin which needs to be set as an output and can then be sent “high” / True to turn on the light, or “low” / False to turn it off.
The location on the Pi’s headers that I used for the traffic lights meant that they mapped to GPIO pins as follows (in entry-gate.py):
...
RED = 19
YELLOW = 13
GREEN = 26
...
Turning the lights on and off as needed is then a simple matter of using the RPi.GPIO package:
import RPi.GPIO as GPIO
...
def flashRedLight(numTimes):
  for x in range(numTimes - 1):
    GPIO.output(RED, True)
    time.sleep(0.5)
    GPIO.output(RED, False)
    time.sleep(0.5)
If you’re interested in learning more about this, you may find my article “Playing with Raspberry Pi and Python: Traffic Lights” interesting as this contains a full explanation.
Interacting with Redis
The entry gate needs to connect to Redis in order to:
- Check if a card has a pass associated with it.
- Delete passes that have no further usage left on them.
- Update the number of trips remaining on a ten trip pass.
- Add a two hour time to live on the first use of a two hour pass.
- Publish a message for any interested subscribers to pick up whenever entry to the system is granted or denied, as well as when a two hour pass is first activated. These messages should contain details about the time or number of trips remaining on the pass.
To check if a pass exists for a given card I could use the Redis EXISTS command… but as I know I want to get all the values in the hash stored in Redis for that card I figured HGETALL was a better choice, saving a second call to the database in the case that the key does exist:
def getPassForCard(cardSerialNumber):
  return r.hgetall(cardSerialNumber)
If a single use pass was presented, I simply need to remove that hash from the database by deleting its key with the DEL command which is delete in the Python client:
r.delete(cardSerialNumber)
If a two hour pass was presented then the action taken depends on whether the pass is being used for the first time or not…
TWO_HOURS = 60 * 60 * 2
passTtl = r.ttl(cardSerialNumber)

if (not passTtl):
  r.expire(cardSerialNumber, TWO_HOURS)
else:
  print('Two hour pass has ' + str(round((passTtl / 60), 1)) + ' minutes remaining.')
Here I check if the key in Redis has an expiry time set already using the TTL command. If it does (value returned was non-negative), then I log the time remaining. If there’s no TTL set, we start the two hour expiry period for this pass using the EXPIRE command. Two hour passes never get explicitly deleted using the DEL command as EXPIRE takes care of that.
In the case of the ten trip pass some logic is required to determine what to do:
tripsRemaining = cardPass.get('tripsRemaining')

# Note tripsRemaining comes back as a String
if (tripsRemaining == '1'):
  # Final trip for this pass, so delete this key
  r.delete(cardSerialNumber)
else:
  # Remove one trip from this pass
  r.hincrby(cardSerialNumber, 'tripsRemaining', -1)
If the field tripsRemaining is set to 1, then this pass is being used for the final time so it gets deleted from Redis. Note that Redis stores values as strings, hence the comparison with the string '1' rather than numeric 1.
If this pass has more than one trip remaining, the value of the tripsRemaining field in the Redis hash used to store the pass is reduced by one. Redis doesn’t have a decrement command so instead I use the HINCRBY command to increment the value by -1 which is the same as decrementing it.
The entry gate also publishes messages to different channels for each event that happens. It uses the same mechanism to do this as the sales terminal does.
System Monitor
The system monitor’s role is to subscribe to the pub/sub topics that the other components publish messages on and to display those as sort of a central systemwide status. I didn’t build any hardware for this component and chose to use Node.js over Python.
The system monitor is very simple and uses a couple of modules from npm:
- node-redis-pubsub: Makes connecting to Redis and subscribing to pub/sub topics simple.
- chalk: A module to display text in different colors in the terminal. I used this to display exception cases such as attempts to enter the transit system without a valid pass stand out from normal business events such as adding a pass to a card.
When running it looks like this:
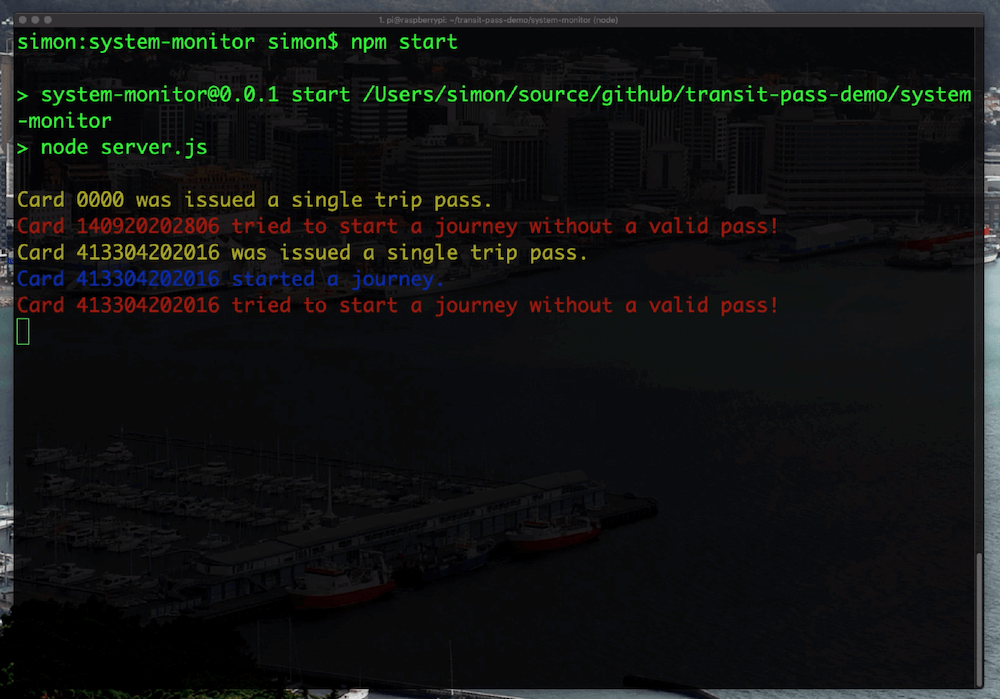
The code is very simple, in the example below r is an instance of node-redis-pubsub that has been configured to connect to my cloud Redis instance. I have one event handler defined to output one message for pass-used messages, unless the pass was a ten trip pass in which case the other handler fires:
const PASS_TYPE_TEN_TRIP = 'TEN_TRIP'
...
r.on('pass-used:*', (msg) => {
  // some type of pass used
  console.log(chalk.blue(`Card ${msg.cardSerialNumber} started a journey.`))
})
r.on(`pass-used:${PASS_TYPE_TEN_TRIP}`, (msg) => {
  console.log(chalk.yellow(`Card ${msg.cardSerialNumber} has ${msg.remainingTrips} of 10 trips remaining.`))
})
...
The full source code consists of these plus a few more event handlers for different message topics.
This component doesn’t interact with Redis as a database at all, it only uses the message broker functionality.
Hopefully, you found this an interesting read. It was an enjoyable project to make! I could have played around with Redis without all of the additional hardware but where’s the fun in that!
 Controlling Raspberry Pi GPIO Pins from Bash Scripts: Traffic Lights