 Simon Prickett

Recently we’ve all been spending a lot more of our time on video conference calls from home. I’m sure that, like me, you find yourself needing to mute your microphone and turn off the camera frequently. Perhaps something you can’t control is going on in the background, or someone needs your attention for a moment. Perhaps you are having a sneezing fit or something’s boiling over on the hob.
With the popular video conferencing service Zoom, there’s no single “I need privacy now” button that will both mute the microphone and turn off the camera. You need to become proficient at hitting (on a Macintosh) Command + Shift + A to toggle the microphone and Command + Shift + V to toggle the video camera. I set out to see if I could build a single button custom keyboard that would do this for me, and to do so in a way that would make it easily customizable for other purposes.
Your support helps to fund future projects!
Let’s take a look at how to make one, starting with the hardware…
Hardware Build
I really enjoy building things that use arcade buttons, as they’re very satisfying to press, super durable and some even have LEDs inside them so you can use them as an input and an output. I’ve previously built a weekly task tracker box with Arduino using these, as well as a game with a Raspberry Pi. For this project I decided that something with a really good click sound when pressed was better than a flashy LED, so I reached for a pile of older arcade buttons that I had kicking around. These use a microswitch so make a very satisfying mechanical noise when pressed. Here’s the one I had on hand:
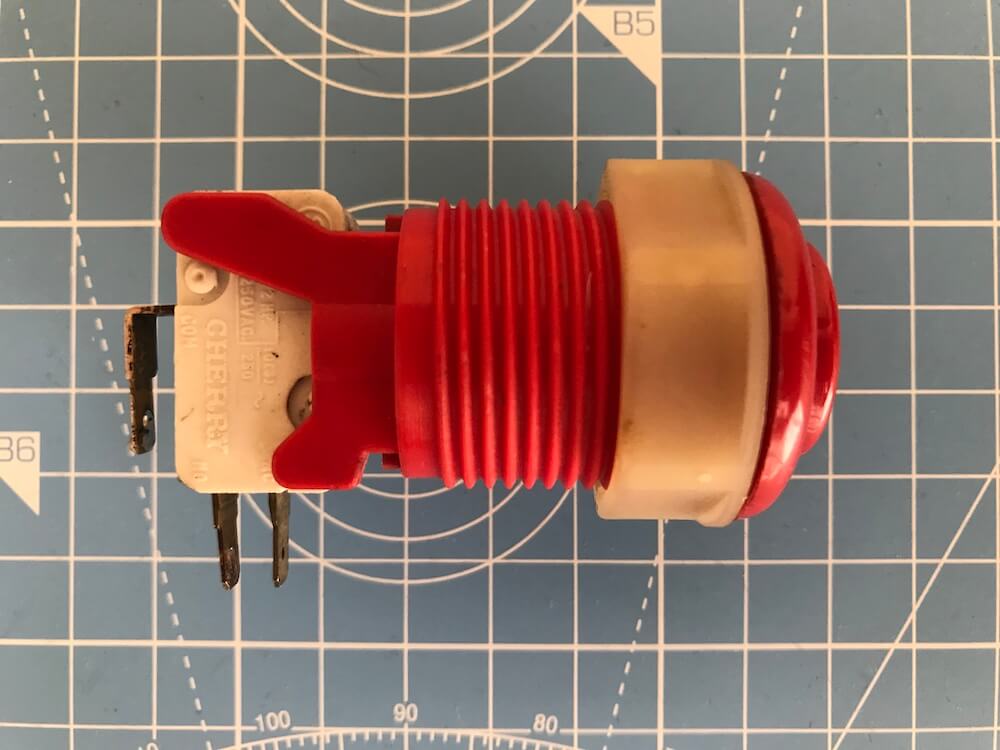
If you don’t have one of these, you can get them from eBay or many other online arcade parts stores. Some places sell the microswitches separately, just be sure to get both the button and a microswitch to slot into it as the button won’t function without the switch. Any type of button switch will work for this project though! I’ve put a shopping list at the end of this article.
On its own, a microswitch or arcade button isn’t going to be understood by a computer as a keypress… we need to trick the computer into thinking it’s got an external keyboard attached, then have the button press send the right sequence of key codes to trigger the desired action. Luckily, we don’t need to build our own keyboard logic board type thing, as Adafruit makes something called the Trinket M0 which costs $8.95 and can handle all of that for us. Here’s what one looks like (they’re very small, this image from Adafruit is magnified):
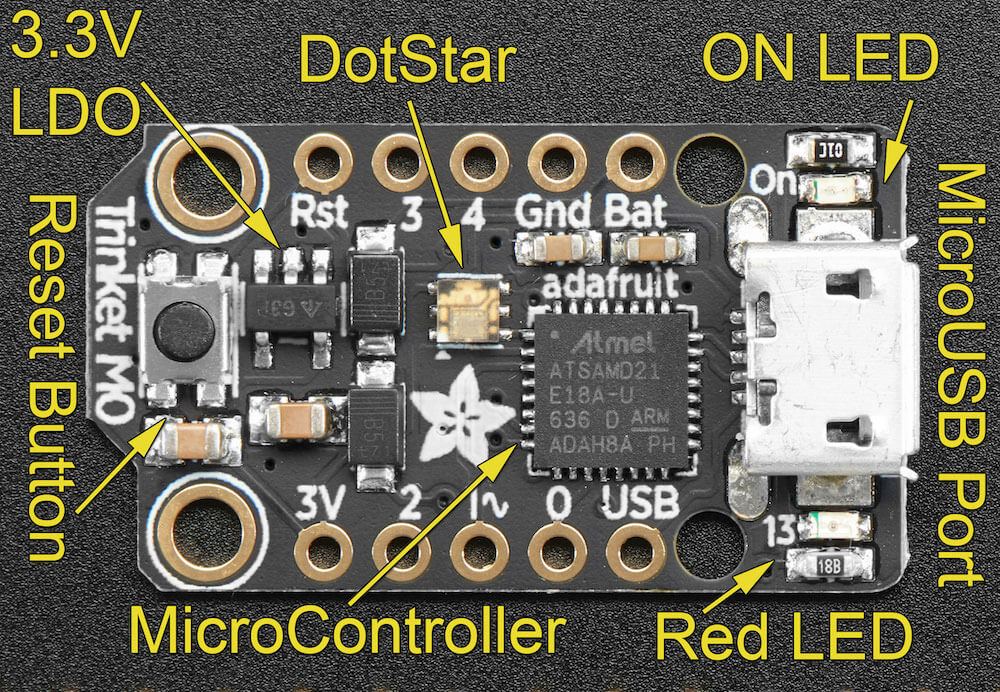
If you get one of these, be sure to get the “M0” model (Adafruit product 3500) and not the regular older Trinket $6.95 (Adafruit product 1501) - this one uses older USB logic and won’t work as a keyboard with many computers any more.
The Trinket M0 is a tiny Arduino compatible programmable board that can be programmed with Circuit Python or in C using the Arduino IDE. I used the latter as I’m more familiar with it, but you could totally do this project in either language. The features of the Trinket M0 that we’ll be relying on for this project are:
- Native USB support - plug it in to any computer and it will be seen as an external device with no drivers needed… we’ll use this to make a fake keyboard, allowing us to send special keystrokes when the button is pressed. To connect to the computer (both to program the board and to use it as a fake keyboard, we’ll need a USB to micro USB data cable - like the ones you get with most Android phones).
- GPIO pins - pins on the board that we can solder our arcade button to, and then write software that runs on the Trinket to detect the button being pressed so we can then generate those special keystrokes and send them down the USB cable.
- A built in multi-colored LED… so we can make an attractive display when we mount the board in an enclosure :)
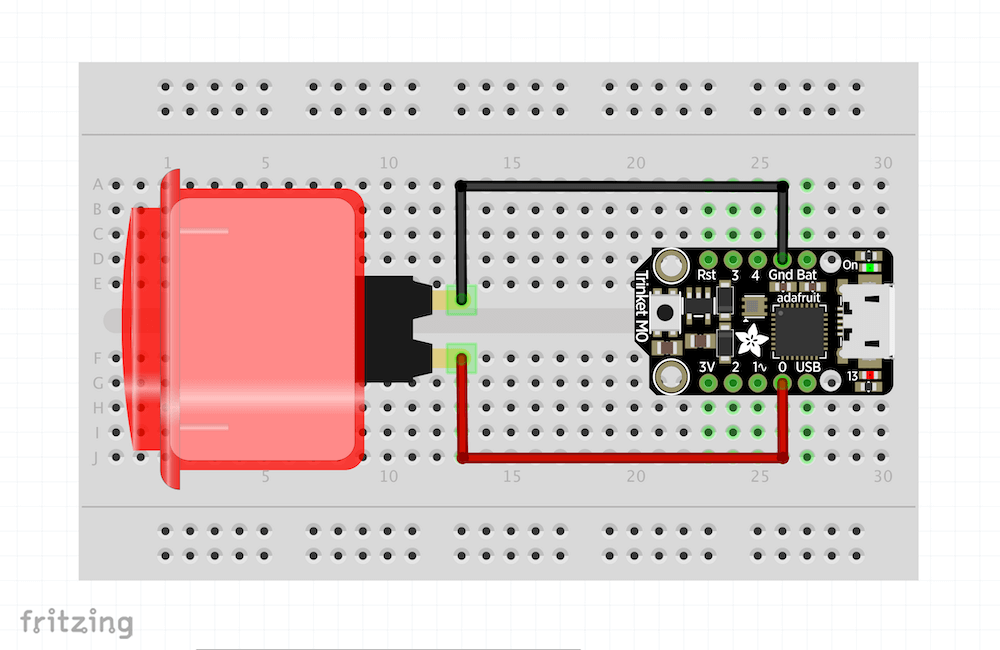
We’ll need to wire the arcade button (in my case the microswitch that attaches to the arcade button) to the Trinket. We’ll do this by soldering two wires:
- One from the ground pin of the microswitch to the single ground pin on the Trinket.
- Another from the other pin on the microswitch to one of the numbered GPIO pins on the Trinket… I used pin 0 but you can use any of them so long as you remember which one when you write the Arduino sketch later.
Here’s my wiring diagram:
Soldering this up is a little tricky as the Trinket is very small, but take your time and don’t forget you can always remove the solder and try again! Here’s what it looks like when done… I used black for the ground connection and red for the live one, but it’s the same single core wire inside both.
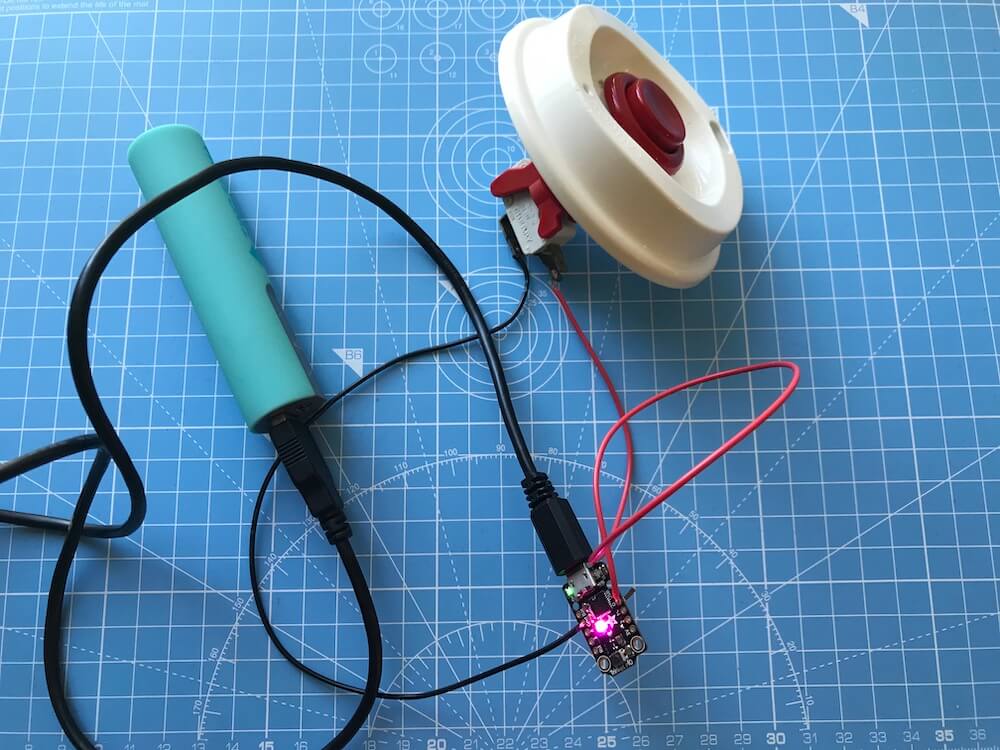
Don’t forget to push the wires through the holes in the Trinket before soldering them on, then clip any excess wire with pliers aftwerwards. If you need help with this technique, Sparkfun has a good tutorial. We’ll find out if the circuit works later, when we come to write software for it…
In the image above I have the Trinket connected to a USB power source, just to check that it powered up and worked after soldering, and that I hadn’t fried it :)
Finally on the hardware side, we’ll want to put the button and the Trinket in a sturdy enclosure, so that we can hit that button hard when we need to get out of a situation on Zoom! As the Trinket will connect to the computer using the USB cable, we’ll need something we can make two holes in - one to mount the button, the other to let the USB cable pass through. As we’re also going to use the Trinket’s multi-colored LED, the enclosure should be somewhat translucent, so it acts as an LED diffuser and lets some light escape.
Looking around at what I had handy, I figured a reusable Starbucks hot cup (available at any Starbucks) would do. I drilled a hole in the top with a forstner drill bit, and attached the arcade button using its screw collar. I then drilled a smaller hole in the bottom to allow the USB cable to enter…

Any enclosure that you can make work will do of course!
Software
To make this a really flexible project, I decided that I would write some software to run on the computer as well as on the Trinket… Why is this necessary, the computer should be able to accept keystrokes and that’s all we need right?
We could build this so that when the arcade button is pressed, the Trinket sends the key commands for toggle audio on Zoom (Command + Shift + A) then sends the key commands for toggle video on Zoom (Command + Shift + V). This way, we don’t need any software on the computer (assuming the computer is a Macintosh as we’re sending Mac OS key sequences - Windows users you’d need to swap in the equivalent Windows key combinations). This is a nice simple approach, but there’s a few downsides:
- What happens if Zoom isn’t running?
- What happens if Zoom is running but doesn’t have keyboard focus - say you’re on a Zoom call but really bidding on that eBay auction you’ve had your eye on for ages in the browser… pressing the button would send the key strokes to the browser causing who knows what to happen!
- If we wanted to change the key strokes sent by the Trinket, we’d have to re-flash it with an updated Arduino sketch - not a huge deal, but maybe inconvenient.
- We can’t implement complex logic as we can just send key presses to the computer and have it interpret them.
What I decided to do was always have the Trinket emit a special and unused key sequence whenever the arcade button was pressed. I then built some Mac specific software and configuration that allows an AppleScript to run whenever this sequence of keys is pressed. This buys the flexibility of unlocking the power of AppleScript. With AppleScript I can add logic there to deal with things like checking an application is running, start it if necessary, do something else if it isn’t etc, as well as sending it key presses.
With this in mind, I decided to try and build something like this:
- When the arcade button is pressed, software on the Trinket detects that and sends a special key sequence to the computer.
- The special key sequence triggers a specific AppleScript.
- Logic in the AppleScript then:
- Checks to see if the Zoom application is running.
- If it is, it:
- Sends it the Command + Shift + A key presses to toggle the microphone.
- Sends it the Command + Shift + V key presses to toggle the video camera.
- If it isn’t, use the AppleScript speech capability to say “Zoom is not running.”
I decided not to worry about the case where the Zoom application is running, but isn’t actively in a video call at the time. All that happens if the button is pressed in this scenario is that Zoom ignores it.
Accomplishing this requires two different pieces of software:
- An Arduino sketch running on the Trinket.
- An AppleScript on the computer that it’s connected to.
Let’s check out both of these now.
Software for the Trinket Board
The Trinket M0 can run either Arduino IDE (C) or Circuit Python code. I went with the C option as I am most familiar with it. Adafruit provides excellent instructions for setting up the Arduino IDE and selecting the right board type etc.
The sketch for the Trinket needs to do the following:
- Listen for the arcade button to be pressed (pin 0 goes low).
- Send keypresses for the Control, Alt, Command and F1 keys down the USB cable to the attached computer (this is our trigger key combination).
- Make the Trinket’s built in multi-colored LED flash red briefly when the button is pressed, so that we know the button press was detected.
- Optionally but nice: use the Trinket’s built in multi-colored LED to do a little light show when the button isn’t being used.
Here’s my final Arduino sketch that accomplishes all of these goals:
Like all Arduino sketches, this has two main functions:
setup: runs once when then board is powered on.loop: runs in a loop continuously while the board is powered on.
Let’s take a look at how this works at a high level:
- First, to make things easier I’m using some libraries:
Adafruit_DotStar.h- an Adafruit library to control the multi-colored LED on the Trinket.Bounce2.h- debouncer library to provide a higher level API for detecting button presses. I’ve used this before in my task tracker project and wrote about how it works there.Keyboard.han Arduino library that simulates a keyboard, providing a high level API to send key press combinations to the computer via USB.
- The button press detection works using the debouncer library…
- At line 7 I create an instance of the debouncer.
- Lines 18 and 19 in the
setupfunction associate the debouncer with pin 0 (the one that’s soldered to the arcade button) and configure its sensitivity. - Line 25 at the top of the
loopfunction updates the debouncer to see if the button was pressed. - The block beginning at line 42 is executed if the button was pressed:
- The Trinket’s LED is set to show red.
- The keyboard library presses the Control, Alt, Command (GUI) and F1 keys down.
- After a short delay, the keyboard library releases all of the pressed keys.
- There’s then a short delay to stop the user pressing the button too quickly and accidentally setting it off again.
- If this doesn’t work, then it’s possible that the circuit wasn’t soldered correctly… if it’s all good you can expect to see the LED go red whenever you press the arcade button.
- The background flashing LED pattern that’s just for fun works like this:
- Lines 11 and 12 set up an array of different color codes and a variable to track which one we’re showing at a given time.
- Line 13 figures out how many colors are in the array, we’ll need this to know when to cycle back to the start of the array.
- Line 15 declares a variable we’ll use to track time… so that the LED can be set to each color for a period before changing to the next color.
- At line 27 we get the number of milliseconds that the board has been up and running for.
- Line 29 compares that to the previous value from the last loop iteration, and if a second or more has passed, changes the LED color by picking the next color from the array or starting again at the first one if we’re at the end of the array.
Software and Setup for Mac OS
There’s a couple of distinct pieces here… an AppleScript and some operating system setup using Automator and Accessibility features in Mac OS.
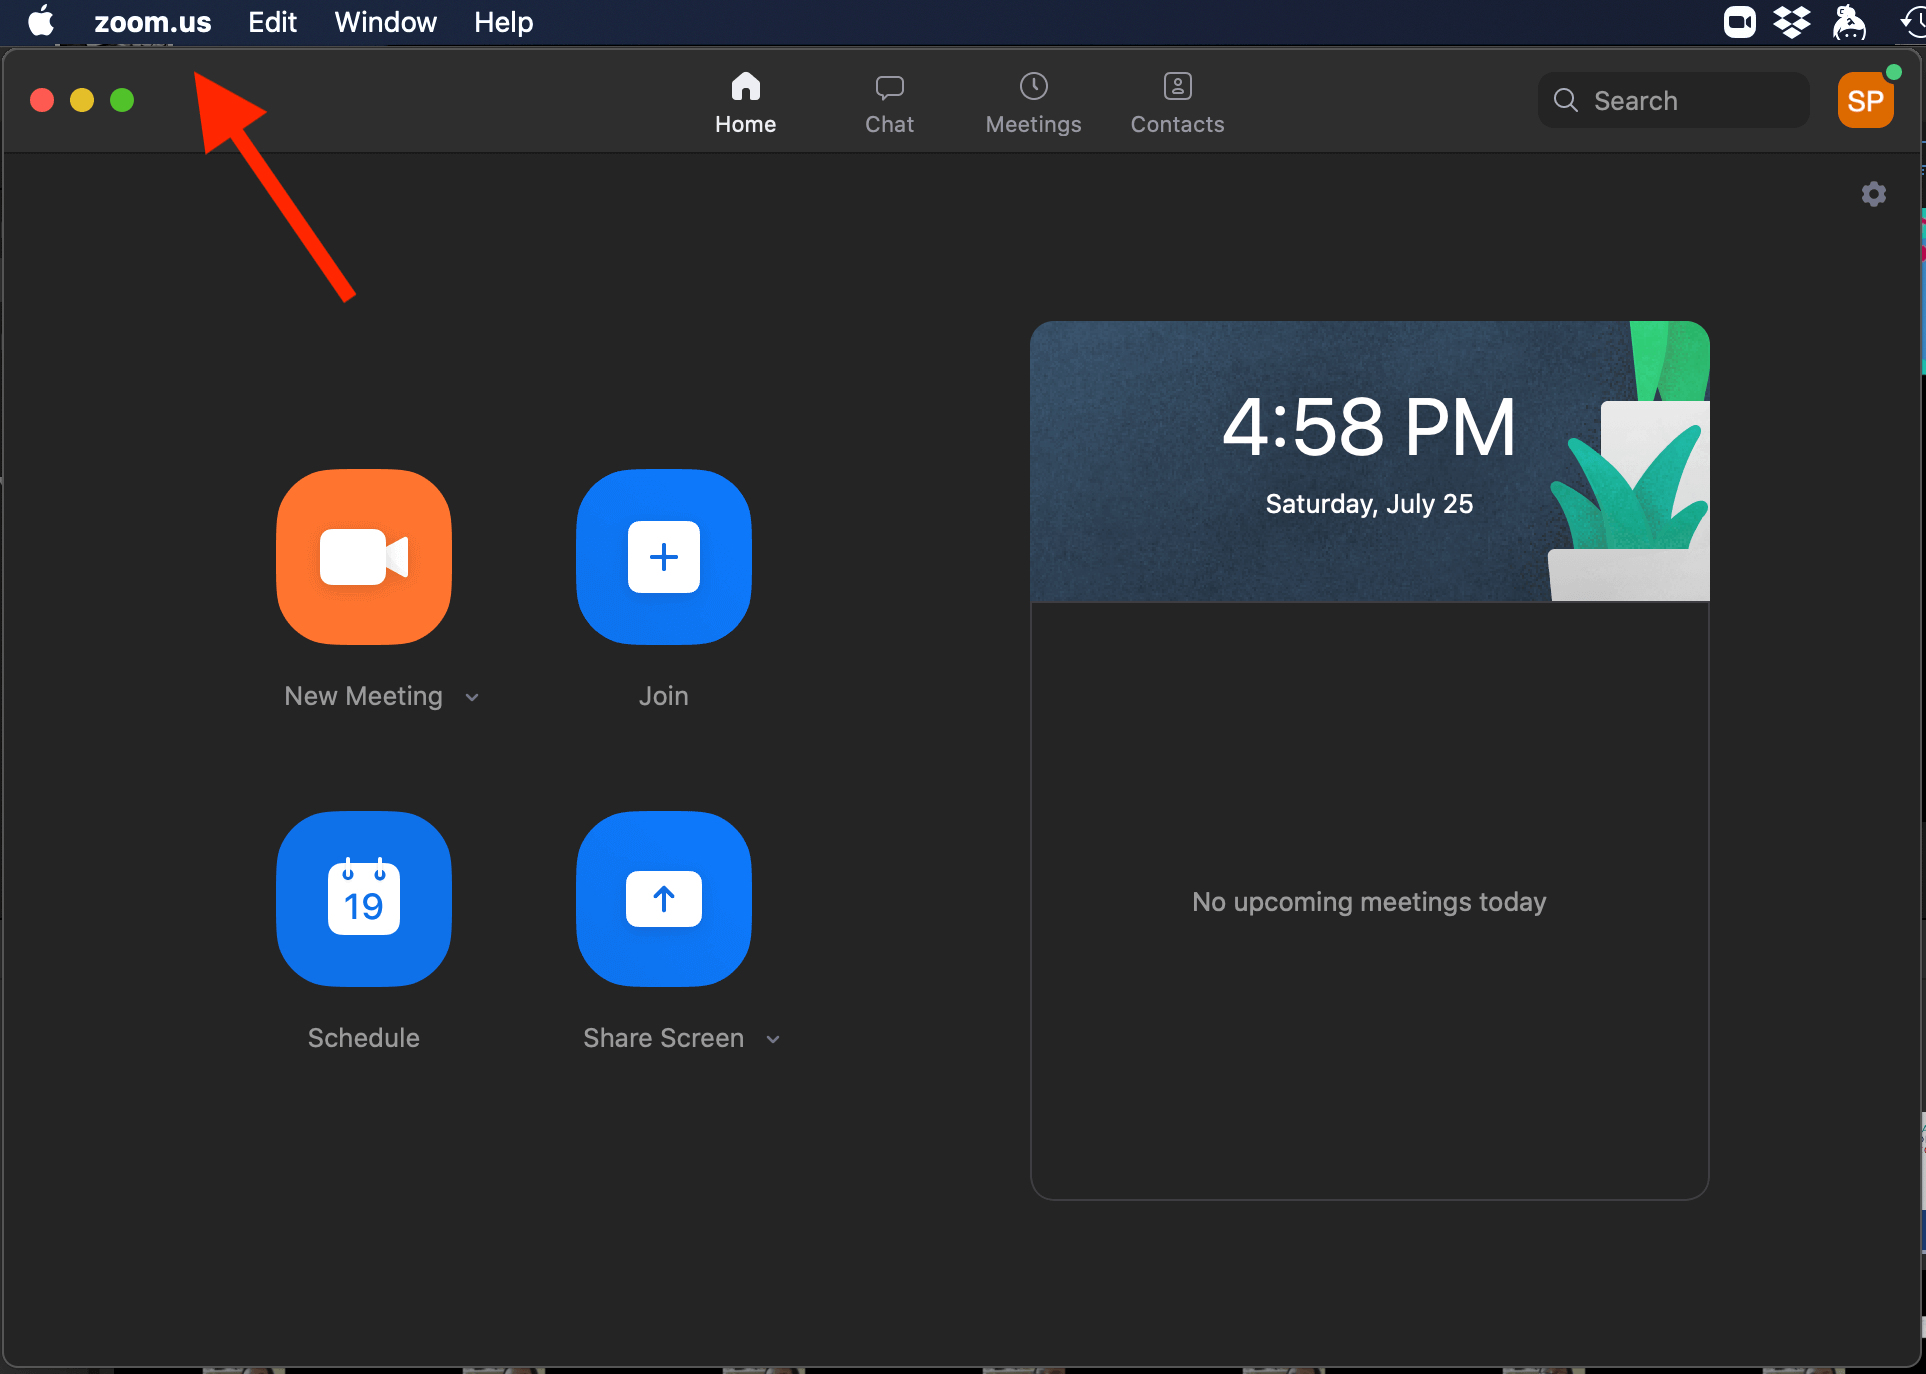
The first thing I worked on was the AppleScript. It’s easy to test this without the arcade button hardware as you can just run it from the Mac OS Script Editor application. The hardest part of this was working out what the “name” for the Zoom application is, turns out it is “zoom.us” which is what it shows up as next to the Apple icon at the top of the screen when it’s running:
Here’s the completed AppleScript:
This checks if Zoom is running, if not it has the Mac say that it isn’t. If it is, then it activates Zoom and sends it the keypresses to toggle the video and audio. Sadly Zoom doesn’t have specific key presses for turning audio on and off, so toggle is the best we can do here. A true “panic switch” would always turn them off no matter how many times you pressed it :) … Well actually, it turns out that Zoom changes the text on one of the menu items when you are muted and this can be used to determine the call state from within an AppleScript… a couple of readers provided enhancements to my script that handle this condition, making a real kill switch. I’ll provide links to this at the end.
This AppleScript runs whenever the Mac receives the special key sequence that’s generated by the Trinket when the arcade button is pressed. We need to save this AppleScript as an “Application”, so that we can call it from Automator later. Details of how to do this can be found in a linked article further down…
If we want to use the arcade button to trigger different actions, it’s now a simple case of changing the contents of the AppleScript to do something else… The possibilities here are endless, we could implement a very long and complex sequence of events and logic that can control almost anything on the Mac. The rest of the configuration (Automator and Arduino sketch on the Trinket) won’t need to change.
Next up we want to configure the Mac so that it automatically runs our AppleScript when the special key combination that the Trinket generates is received. We’ll use the Mac OS Automator application.
The steps involved are:
- Save the AppleScript as an application.
- Create an Automator Quick Action to invoke the AppleScript.
- Associate the special key combination from the Trinket with that Quick Action.
- Allow Automator to control the computer via Accessibility Settings.
This process could be a whole article of its own - fortunately it’s all documented in this article on addictivetips.com which walks you through it all. I used this when setting mine up and it’s worked great. For Mac OS Catalina you may get asked to confirm that you want Automator to have accessibility permissions the first time you press the arcade button, so be sure to test it before you need it in that Zoom emergency!
Demo Time!
Here’s a demo of the final setup working its magic…
Stuff You Need to Make One
- Adafruit Trinket M0.
- Microswitch.
- Buttons that use Microswitches.
- Other arcade buttons (some may have microswitches built in). Some of the fancy ones have LEDs built into them, I’ve used those in a previous project and recommend them.
- A USB to micro USB data cable (nothing special about this, you might have one from something else, for example an Android phone). If the machine you’re connecting to uses USB C you might want to get a USB C to micro USB cable instead. Either way make sure it’s both a charge and data cable :)
- Some wire - I used red and black to distinguish ground from live / signal but you can use the same color for both it doesn’t matter. Single core wire makes soldering easier, but anything that fits through the holes in the Trinket board should do!
- A soldering set - soldering iron and solder.
- An enclosure - I used a reusable Starbucks hot cup that I had, but anything sturdy enough to hold the arcade button will do.
- Depending on your enclosure, maybe some Forstner bits to drill tidy circular holes. Make sure there’s one that’s an appropriate size for your arcade button!
- As the Trinket M0 supports both, you could build this project with either CircuitPython or Arduino. I chose Arduino as I am more familiar with it, if you want to do the same then download the free Arduino IDE and consider making an optional donation if possible.
Thanks!
Thanks for reading, hope you found this fun and maybe try to make something similar for yourself! I’ve put my code into a GitHub repository that you’re free to use as you see fit.
Enhancement: Thanks to the Community!
One of the great things about open source is that people are free to take your work and improve on it… a couple of readers noticed that my AppleScript could be made better by checking the text of one of the Zoom application’s menu items as this changes when the audio is muted. The same can be done to determine camera status. This then allows for a real panic button that, no matter how many times you press it or what state your microphone and camera were in, will always result in you being muted and off camera.
Mike Garuccio contacted me from Cleveland, Ohio to share his AppleScript improvement, which you can see here:
I also love that people made their own versions of the hardware that are cooler than mine, check this out from Enrico in New Mexico:
Created a little Zoom meeting panic button. Thanks to @simon_prickett for the tutorial. https://t.co/0bCTAtcLA9 pic.twitter.com/mg0HJUmiep
— Enrico 🏳️🌈 (@nrico) September 14, 2020
If you’ve taken this project and made your own version I’d love to hear from you!
Another fun project that uses a lot of the same components and ideas is this Trinket powered foot switch. I also found this article very useful.
 Building a Redis Prize Draw Application with Flask or Express