 Simon Prickett

A long time ago, I used to be a regular listener to Simon Mayo’s Radio 1 show. He ran a “Dead or Alive” segment where a listener would call in, and he’d challenge them to tell him whether a series of celebrities were dead or still alive.
I figured this might be a fun game to replicate, using Wikipedia pages as my source of truth. I’m working on building that… watch this space. Rather than write all the code I’d need as one project, I decided that the core “hey Wikipedia, is this person dead or alive right now” functionality could be broken out and released as its own npm package. So, let’s take a look at how to do that…
What’s an npm Package?
For our purposes, a package is a set of files that form a Node.js module (something that we’d require in a Node.js application). Packages have a package.json file describing their contents. npm provides an online repository and searchable catalog to share packages at npmjs.com.
In short, a package is a standardized way of sharing code that can be anything from a simple utility function to a complete framework such as Express or a command line utility like Gulp.
We access npm through its command line npm utility. If you’ve installed Node.js, you’ll already have this as it is bundled with Node.
We’ll build something akin to a utility library that exposes a single function to do one thing…
Your support helps to fund future projects!
Building a wikipediadeadoralive Package
Let’s build a package from scratch… naming things is hard, so before spending any time on that, make sure that the package name you want isn’t already in use by searching on npm. I found that wikipediadeadoralive wasn’t taken, so ran with that.
We’ll share the package’s source code publicly on GitHub, so I created a public repo for that first. I’ll need the URL for that shortly…
The next step is to use the npm command line to generate a package.json file. npm init walks us through this in a question and answer format like so:
$ mkdir wikipediadeadoralive
$ cd wikipediadeadoralive/
$ npm init
This utility will walk you through creating a package.json file.
It only covers the most common items, and tries to guess sensible defaults.

See `npm help json` for definitive documentation on these fields
and exactly what they do.

Use `npm install <pkg>` afterwards to install a package and
save it as a dependency in the package.json file.

Press ^C at any time to quit.
package name: (wikipediadeadoralive)
version: (1.0.0)
description: Check if someone is dead or alive using Wikipedia!
entry point: (index.js)
test command:
git repository: https://github.com/simonprickett/wikipedia-dead-or-alive.git
keywords: Wikipedia
author: Simon Prickett
license: (ISC) MIT
About to write to /Users/simon/source/projects/wikipediadeadoralive/package.json:

{
  "name": "wikipediadeadoralive",
  "version": "1.0.0",
  "description": "Check if someone is dead or alive using Wikipedia!",
  "main": "index.js",
  "scripts": {
    "test": "echo \"Error: no test specified\" && exit 1"
  },
  "repository": {
    "type": "git",
    "url": "git+https://github.com/simonprickett/wikipedia-dead-or-alive.git"
  },
  "keywords": [
    "Wikipedia"
  ],
  "author": "Simon Prickett",
  "license": "MIT",
  "bugs": {
    "url": "https://github.com/simonprickett/wikipedia-dead-or-alive/issues"
  },
  "homepage": "https://github.com/simonprickett/wikipedia-dead-or-alive#readme"
}


Is this OK? (yes) yes
Once npm init is finished, we’ve got our package.json file. While creating it, we set the “main” file to be index.js (the default), so we’ll need to create that file too:
$ touch index.js
This will be the only source code file we’ll need to implement our package, but more complex packages can include any number of files.
When implementing a package, we’ll often want to use functionality provided in other packages… in this case, we’ll need to make HTTP requests to Wikipedia. Node’s built in methods for doing this are pretty low level, so I wanted to use something that mirrors the Fetch API that browsers have instead. To use an equivalent in Node, we’ll install the node-fetch package from… npm of course:
$ npm install node-fetch
npm notice created a lockfile as package-lock.json. You should commit this file.
+ [email protected]
added 1 package from 1 contributor and audited 1 package in 0.685s
found 0 vulnerabilities
This step adds a new file to our package – package-lock.json. This is an automatically generated file that’ll track all of our other package dependencies, and their dependencies. There’s no need to edit this file.
With all this setup complete, we can now start writing some code… index.js will contain a normal Node.js module… so we’ll need to export anything that we want to share with calling code, and we’ll wrap that in an object. We’ll share a single async function called getStatus that takes a Wikipedia page name as a parameter:
// Require our only dependency...
const fetch = require('node-fetch');

// Other functions and stuff we want to keep private...

const wikipediaDeadOrAlive = {
  // Stuff we want calling code to access...

  getStatus: async (pageName) => {
    // TODO implement function... using fetch...
  }
};

module.exports = wikipediaDeadOrAlive;
And that’s it for the structure of our module, and the package that contains it. Obviously we need to implement the body of the getStatus function, and you can see how I did that on GitHub here.
Testing the Package
Before sharing our package with the world, it’s probably good to test it :) As I was going to be sharing the source code, I figured it was best to use some sort of proper testing framework… so decided to use Jest. There’s nothing special about testing this versus any other Node module… simply require it, then use it in your tests.
I created a test folder in the package’s root folder, and added a file named deadoralive.test.js in there. In the test file, we require the module using it’s relative path and file name like so:
const wikipediaDeadOrAlive = require('../index.js');

// Tests someone who is alive.
test('Pharrell Williams, alive...', async () => {
  const result = await wikipediaDeadOrAlive.getStatus('Pharrell_Williams');

  expect(result.name).toBe('Pharrell Williams');
  expect(result.dead).toBe(false);
  expect(result.died).toBeNull();
  expect(result.description.length).toBeGreaterThan(0);
});
This tests that my implementation of getStatus returns an object that looks like this:
{
  name: 'Pharrell Williams',
  dead: false,
  died: null,
  description: 'Pharrell Lanscilo Williams is an American singer, rapper, songwriter, record producer, fashion designer, and entrepreneur.'
}
As the value of description could be edited at any time on Wikipedia, I just check that something with any number of characters in it is returned.
Publishing the Package
To make a complete package, we’ll want to add a couple more files… When running npm init earlier, we chose MIT as the license, so we’ll need a file named LICENSE containing the text of the MIT license. We’ll also want a README.md file, describing the package and how to use it - npm will use this in the package’s page in their repository. Here’s the LICENSE and README.md files I created for this project.
We’ll publish the package to both GitHub and npm. npm will create links back to the GitHub repo on the package’s page in their catalog, and it’ll use the GitHub URL in package.json to do this. So first, commit all the code (don’t forget package.json, package-lock.json, your LICENSE and README.md files) and push it to GitHub.
Publishing is then very simple, first get an account on npm… then login at the command line and publish away:
$ npm login
Username: simonprickett
Password: ***************************
Email: (this IS public) [email protected]
Enter one-time password from your authenticator app: ******
Logged in as simonprickett on https://registry.npmjs.org/.
$ npm publish
npm notice
npm notice 📦  [email protected]
npm notice === Tarball Contents ===
npm notice 1.1kB LICENSE
npm notice 2.7kB test/deadoralive.test.js
npm notice 1.8kB index.js
npm notice 160B  tryit.js
npm notice 525B  package.json
npm notice 2.3kB README.md
npm notice === Tarball Details ===
npm notice name:          wikipediadeadoralive
npm notice version:       1.0.2
npm notice package size:  3.3 kB
npm notice unpacked size: 8.6 kB
npm notice shasum:        41cce5e9c14b859cfd81b0bd05893590186ab363
npm notice integrity:     sha512-8dfpxIYJc/Ds7[...]UsusfYkSqUGqg==
npm notice total files:   6
npm notice
This operation requires a one-time password.
Enter OTP: ******
+ [email protected]
The new version of the package will go live shortly after the publish command finishes. I’m using two factor authentication with npm, so I get asked for a OTP (One Time Password) from my authenticator app on my phone - you won’t see this if you don’t have this extra layer of security configured.
npm will publish your package using the version number in package.json, so don’t forget to bump that when you do a new release!
Publishing packages publicly, so that anyone can use them, is free.
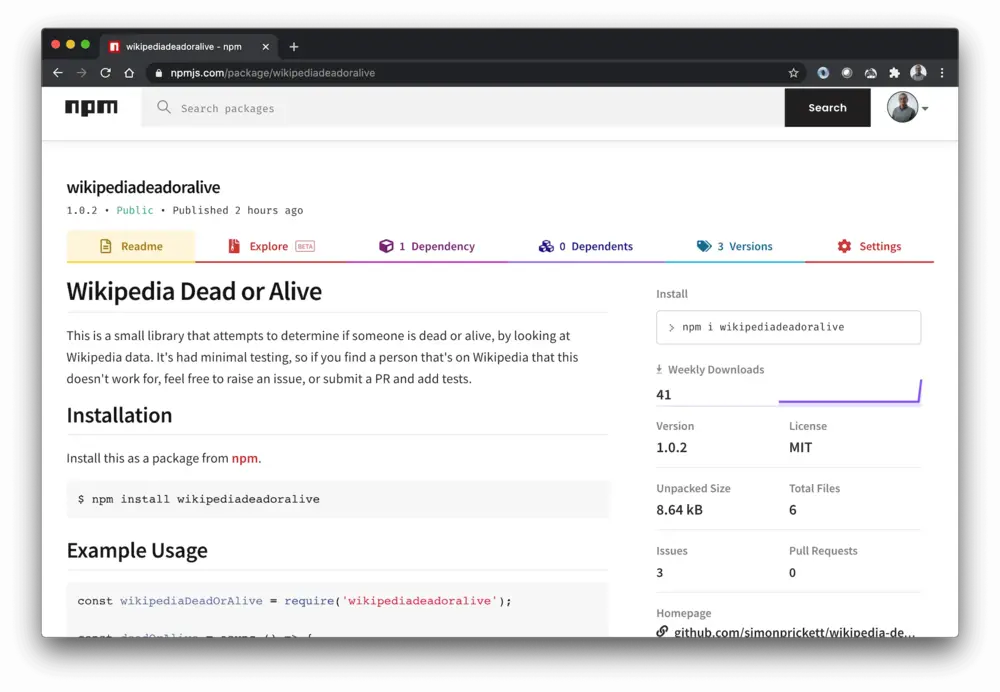
Once published, npm will use the README.md file as the basis of the package’s page. Here’s what it looks like:
Using the Package in a Project
Once the package is on npm, it can be installed and used in a project… let’s start one from scratch. At the npm init stage, just answer all the questions with the defaults:
$ mkdir dead-or-alive-project
$ cd dead-or-alive-project
$ touch doa.js
$ npm init
package name: (dead-or-alive-project)
version: (1.0.0)
description:
entry point: (doa.js)
test command:
git repository:
keywords:
author:
license: (ISC)
About to write to /Users/simon/source/projects/dead-or-alive-project/package.json:

{
  "name": "dead-or-alive-project",
  "version": "1.0.0",
  "description": "",
  "main": "doa.js",
  "scripts": {
    "test": "echo \"Error: no test specified\" && exit 1"
  },
  "author": "",
  "license": "ISC"
}


Is this OK? (yes) yes
This step creates an empty JavaScript file called doa.js that we’ll edit shortly, plus an npm package.json file.
Let’s install the package (which will also install its dependencies):
$ npm install wikipediadeadoralive
npm notice created a lockfile as package-lock.json. You should commit this file.
npm WARN [email protected] No description
npm WARN [email protected] No repository field.

+ [email protected]
added 2 packages from 2 contributors and audited 2 packages in 1.8s
found 0 vulnerabilities
This step modifies package.json to add wikipediadeadoralive as our new project’s only dependency. It also creates package-lock.json which stores information about the entire dependency tree.
Finally, we just need to add some code into doa.js that requires and uses the package:
const doa = require('wikipediadeadoralive');

const doaClient = async () => {
  const result = await doa.getStatus('Mikhail_Gorbachev');

  console.log(result);
};

doaClient();
Having saved our changes, we can then run it and see the results:
$ node doa.js
{ name: 'Mikhail Gorbachev',
  dead: false,
  died: null,
  description:
   'Mikhail Sergeyevich Gorbachev is a Russian and former Soviet politician.' }
For more information, see the package’s page on npm.
It’s Far from Perfect!
The dead or alive package makes quite a lot of assumptions about the structure of a person’s Wikipedia entry… these work in many cases (I’ve tested over 100 different pages), but there will inevitably be issues with it. For example, I’ve found that it performs poorly for people with Jr. in their names due to the ‘.’ character not being where my code expects it. I’ll work on this, and if you use the package and find problems with it, please head over to GitHub and file an issue or drop me a pull request if you have time! If you do choose to submit a pull request, check out the tests that I wrote too.
I’ll continue building a game that’s based on this, and write about that in future. If you find my npm package useful and decide to do something with it, or have questions - reach out I’d love to hear from you. Thanks for reading, hope this article helps you with how to get your own ideas shared with the world on npm!
 Using the Raspberry Pi 4 as a Desktop Computer