 Simon Prickett

The Pomodoro Technique is a time management method developed by Italian Francesco Cirillo in which a timer is used to break work into time periods separated by breaks. Each time period is called a pomodoro - Cirillo used a tomato shaped kitchen timer, and “tomato” in Italian is “pomodoro”.
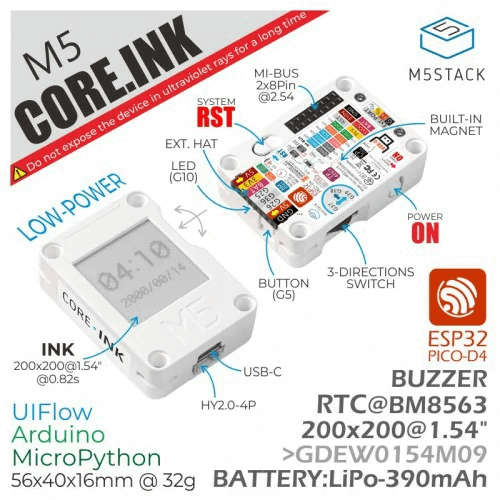
M5Stack is a company that makes a fascinating range of modular IoT devices and I’d wanted to try one for a while. I decided to start with their Core Ink product. I bought mine from Pimoroni, M5Stack also sell them direct.
This is a really nice self-contained unit with some buttons, an e-ink screen, a buzzer, rechargeable battery and wifi capabilities. It all fits inside a really nice case and looks like this:
I decided to use the Core Ink to make a Pomodoro timer as a gift to a loved one, programming in C using the Arduino IDE. I got my code onto it using the supplied USB C cable. Here’s what the final product looks like (sped up in the video):
As you can see in the video, my version of the timer works like this…
- Press the top button on the device to start it.
- The buzzer sounds.
- A 25 minute work period starts, with the display counting down the 25 minutes.
- The buzzer sounds, heralding a short 5 minute break… the display counts down the 5 minutes.
- The buzzer sounds, and another 25 minute work period starts…
- After 4 x 25 minute work periods separated by 5 minute breaks, there’s a longer 10 minute break.
- After the 10 minute break, the cycle begins again.
- At any point, pressing the top button again resets the timer to the idle state.
- Pressing the power button displays a goodbye message and turns the device off.
Your support helps to fund future projects!
Coding a Pomodoro Timer with the Arduino IDE
How does this work? At a high level, the code has the same two entry points as any other Arduino sketch:
setup(): Code that runs once when the device is initially powered up.loop(): Code that runs continuously in a loop oncesetup()has finished.
M5Stack provide an SDK for each of their devices, in the form of an Arduino library. This provides functions that make working with the device’s display, buttons and buzzer straightforward. Example code is provided, and I used this to learn about programming the device. I won’t focus on how to use the SDK in detail here, we’ll concentrate mostly on the logic for the Pomodoro timer instead.
The timer has three states, so I declared constants for each of those:
STATE_IDLE: Not currently in use, waiting to begin!STATE_WORKING: In one of the work periods.STATE_BREAK: In one of the break periods, which could be the shorter or longer break.
I’m storing the current state in a global variable named currentState, whose initial value gets set to STATE_IDLE. Other global variables track which iteration of the process we’re in so that we can have the longer break after 4 working periods, how many minutes are left in the current state, and the time at which we entered the current state.
The device doesn’t have a real time clock, so to monitor the passing of time I’m using the Arduino millis() function which tracks the number of milliseconds since the program started running (effectively the time the device was turned on). You can read about this function in the Arduino documentation.
Setup
The setup() function looks like this:
This initializes the M5 SDK, clears the screen and creates a drawing area on it, then displays an initial “Press to start” message. Finallly, it beeps the buzzer once. After this finishes executing, the loop() function begins executing continuously.
If you want to see how drawing text on the screen works, check out the full source code on GitHub.
Loop
Once setup() has completed, the device executes the code in the loop() function indefinitely. I chose to write my loop() function so that it works roughly like this for each iteration:
- Was the button on top of the device pressed? If so, beep the buzzer three times and reset some global variables tracking now many minutes remain in the current work interval and which iteration of the process we’re in. Also set the current state to
STATE_WORKING:
- Was the power button pressed? If so, display a goodbye message, beep the buzzer, clear the screen and shutdown the device:
- Then, if we’re not in the idle state, check if a minute has passed and decrement the minutes remaining in the current phase (working or long or short break) and update the screen. If no minutes remain in the current phase, beep the buzzer three times and figure out what to do next. If we’re in the working state, then a pomodoro interval has just ended and we need to take either a short or longer break depending on how many work intervals we’ve done. If we’re in the break state, then a break has just ended and it’s time to start a new work interval:
And that’s basically it. This was a relatively simple project that barely scratches the surface of what this device can do but which results in a nice end product :)
Try it Yourself!
Hope you enjoyed reading about this - if you get a Core Ink and want to try this out, I’ve put the code on GitHub and you’re free to use it or modify it for your own purposes. I’d love to see what you build!
(Main Photo by Rauf Allahverdiyev from Pexels).
 No, Maybe and Close Enough! Probabilistic Data Structures with Python