 Simon Prickett

This is the third of our articles in a series where we’re playing with the Low Voltage Labs LED Traffic Lights using Python on the Raspberry Pi. In the first article, we set up a basic traffic light pattern, then enhanced this in the second article to run the lights in either the UK or USA patterns according to the value of an environment variable.
This time, we’ll look at restructuring the code to use a Finite State Machine, so let’s go…
A Finite State Machine (sometimes known as a Finite State Automaton) is a computing model of a theoretical machine which can be in exactly one state at a given time. The machine will have a known (finite) number of states, with each state having one or more transitions to a new state. Modeling traffic lights is a simple example, but one that is often used in teaching materials to introduce the concept to students.
In order to figure out what our states and transitions are, we can draw out a basic state diagram to visualize them:
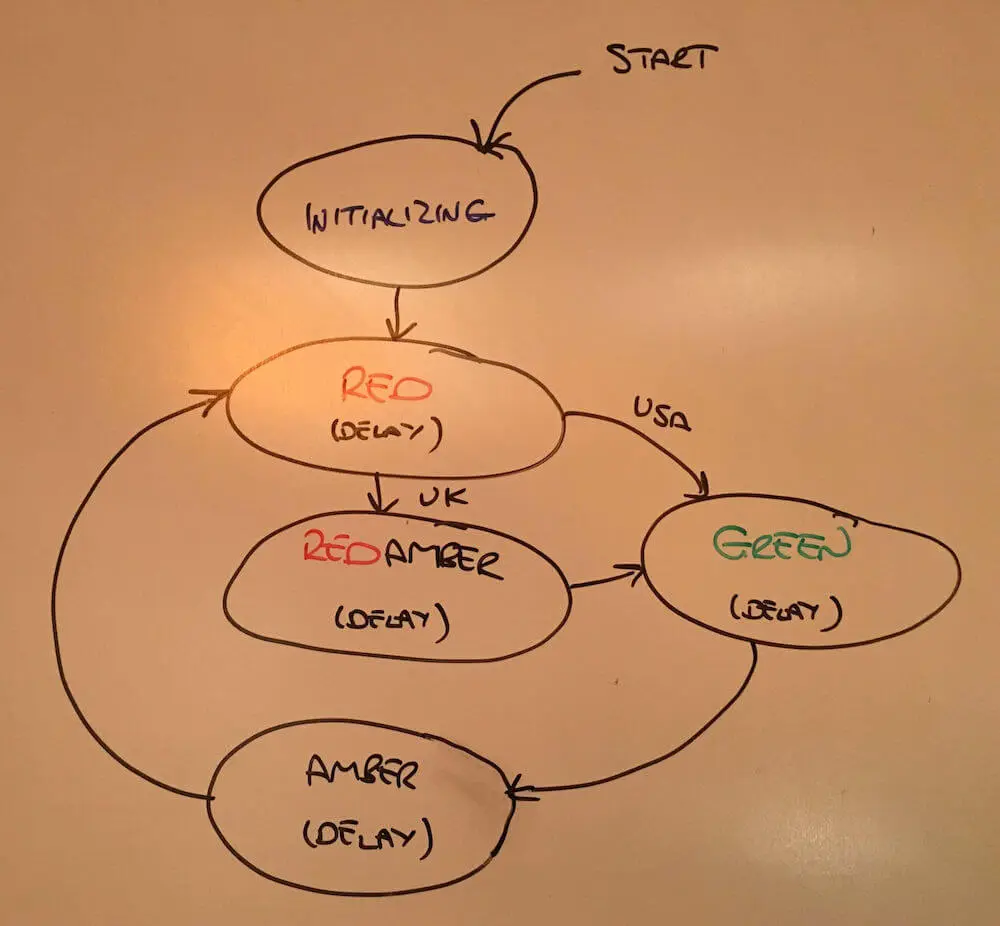
From the diagram, we can see that the traffic lights have five distinct states, each with a single transition to the next state, and that the state machine enters an infinite loop:
- INITIALIZING: set up and turn off all the lights
- RED: turn on the red light only, wait, then transition to REDAMBER if using the UK pattern, or GREEN if using the USA pattern. This is the only state in which we have to make a decision about the next state to transition to
- REDAMBER: turn on the red and amber lights only, wait, then transition to GREEN
- GREEN: turn on the green light only, wait, then transition to AMBER
- AMBER: turn on the amber light only, wait, then transition to RED
To make our code read better, we’ll introduce a couple of convenience classes… the first allows us to name all the states:
class TrafficLightStates:
  INITIALIZING = 1
  RED = 2
  REDAMBER = 3
  GREEN = 4
  AMBER = 5
And another allows us to give the GPIO pin numbers for each light on the traffic lights more meaningful names:
class TrafficLightLEDs:
  RED = 9
  AMBER = 10
  GREEN = 11
There are many ways we could implement a Finite State Machine, and there are even libraries for Python and many other languages specifically designed to help with this. For example, Transitions is a Finite State Machine framework for Python.
Your support helps to fund future projects!
In this case, we have a very simple set of states and transitions, so we can just use an if / elif / else statement to build out the Finite State Machine. This wouldn’t scale well for more complex models, but is fine for traffic lights.
First up, we need to keep track of which state the machine is in at any given time… we’ll do that with a variable currentState. At the beginning, this is set to the first state that the machine enters when “booted”:
currentState = TrafficLightStates.INITIALIZING
Then the bulk of our code becomes an infinite loop, in which we:
- Check the value of
currentState - Perform actions appropriate for the current state (turn LEDs on and off etc)
- Set the value of
currentStateto whatever the next state in our state diagram is - Go around the loop again
If we apply the above rules to each of our states, we end up with:
while True:
  if (currentState == TrafficLightStates.INITIALIZING):
    if ('TRAFFIC_LIGHT_COUNTRY' in os.environ) and (os.environ['TRAFFIC_LIGHT_COUNTRY'] in ['UK', 'USA']):
      pattern = os.environ['TRAFFIC_LIGHT_COUNTRY'].lower()
    else:
      print('TRAFFIC_LIGHT_COUNTRY should be set to UK or USA')
      sys.exit(1)
    # Setup Hardware
    GPIO.setmode(GPIO.BCM)
    GPIO.setup(TrafficLightLEDs.RED, GPIO.OUT)
    GPIO.setup(TrafficLightLEDs.AMBER, GPIO.OUT)
    GPIO.setup(TrafficLightLEDs.GREEN, GPIO.OUT)
    currentState = TrafficLightStates.RED
  elif (currentState == TrafficLightStates.RED):
    GPIO.output(TrafficLightLEDs.RED, True)
    GPIO.output(TrafficLightLEDs.AMBER, False)
    GPIO.output(TrafficLightLEDs.GREEN, False)
    time.sleep(3)
    if pattern == 'uk':
      currentState = TrafficLightStates.REDAMBER
    else:
      currentState = TrafficLightStates.GREEN
  elif (currentState == TrafficLightStates.REDAMBER):
    GPIO.output(TrafficLightLEDs.RED, True)
    GPIO.output(TrafficLightLEDs.AMBER, True)
    GPIO.output(TrafficLightLEDs.GREEN, False)
    time.sleep(1)
    currentState = TrafficLightStates.GREEN
  elif (currentState == TrafficLightStates.GREEN):
    GPIO.output(TrafficLightLEDs.RED, False)
    GPIO.output(TrafficLightLEDs.AMBER, False)
    GPIO.output(TrafficLightLEDs.GREEN, True)
    time.sleep(5)

    currentState = TrafficLightStates.AMBER
  elif (currentState == TrafficLightStates.AMBER):
    GPIO.output(TrafficLightLEDs.RED, False)
    GPIO.output(TrafficLightLEDs.AMBER, True)
    GPIO.output(TrafficLightLEDs.GREEN, False)

    if pattern == 'uk':
      time.sleep(2)
    else:
      time.sleep(3)
    currentState = TrafficLightStates.RED
  else:
    print 'Invalid state!'
To make each state self-contained and not dependent on a prior state, we’ve added code to explicitly turn each LED to the required on or off status for each state. This means that should we choose to run the lights in a different order, we just change the code that sets currentState, without changing the actual implementation of a state.
When set to operate using the UK pattern, the lights will cycle as follows:

And with the USA pattern, expect:

In this article, we changed the way that the traffic light code works to incorporate a Finite State Machine. Whilst this is a very simple example, Finite State Machines have a great many uses in programming — you’ll find them used in compiler implementations, game development, and in some of the C language firmware for connected thermostats that I’ve worked on before.
I’d love to hear what you’re up to with the Raspberry Pi — get in touch via the Contact page. If you enjoyed this article, please share it far and wide!
Main Photo Credit: Horia Varlan (Creative Commons 2.0 License).
 Playing with Raspberry Pi and Python: Traffic lights, Part 2