 Simon Prickett

Express is a popular framework for Node.js, intended for use in building web applications and APIs. In this article and the accompanying video, I’ll show you how to get started with it and we’ll build a server that mimics some behaviors of a key/value store. If you’re interested in learning more about Express, check out its website.
I’ll cover the concepts at a high level in this article. For a complete tutorial, watch the video below:
What We’ll Build
In this first part of the series, we’ll build an Express server that has some API endpoints that model a key/value store database. Think of a key/value store like a table of name/value pairs, so if we set the key favoritecolor to blue and the key luckynumber to 99, it might look something like this:

Our API will include functionality to set a key to a value, retrieve the value stored at a given key, and ask the database for information about things like the number of keys in use.
Your support helps to fund future projects!
How it Works
The video provides a complete run through of how the code in server.js works, so here’s a summary…
Setting up an Express Server
First up, I require Express and initialize it. I get the port number that Express will listen on from an environment variable, and set up an empty JavaScript object to represent the “database”. I then tell Express we want to use its JSON body parsing functionality (this will take the body of incoming POST requests and turn it into a JavaScript object for us):
The last line of code (app.listen) tells Express to listen for HTTP requests on the port that we set in our environment variable. If none was set, we declared this up top to default to 3000.
Adding Routes
Routes are functions that tell Express what to do when a HTTP request with a matching URL pattern is received by the server. Our application has four of these…
Home Page
This route is served on the / URL, and the code looks like this:
In Express, each route is serviced by a function that expects a req (request) and res (response) object… to tell Express when to invoke that function we pass it and a URL path as parameters to a function on the Express application object that corresponds to the HTTP verb to use. So in this case, we’re using app.get('/', (req, res) => { ... });.
We’ll see how to get data from the request object in other routes. This route simply builds up an object containing information about the Node.js process, and returns it as a HTTP response with a JSON payload using the json function on the res (response) object.
Set Key to Value
This route changes the state of our “database” by setting the value stored at a given key. If the key doesn’t exist in the database, it creates it. An existing key’s current value will be overwritten.
For this route, I wanted to use a POST request, sending in a JSON object that looks like this as the request body:
{
  "key": "favoritecolor",
  "value": "red"
}
The code looks like this:
Here, I get the values of key and value from the JSON request body using req.body.key and req.body.value… these were created for me by Express as we told it to look for JSON request bodies when we configured the server earlier. When it sees a JSON body, Express will parse it into an object on the request (req) for us. I don’t validate that the values I need are present - this doesn’t deal with bad requests well yet (that’ll be in part 2!).
For now, whatever happens, this route returns a success code and the 201 (created) HTTP response code. To do this, I’m using the res.json function again, this time passing in both the object that I want to return and overriding the default 200 response code with the status function. These chain, so I can do res.status(201).json({ ... });.
Get Value of Key
This route retrieves the value stored at the provided key name. Here, I’m using the ability to put variables into the route’s path:
The value :key in the URL path is parsed into a request parameter named key for us by Express, so for a URL /get/favoritecolor, the value of req.params.key will be set to favoritecolor.
Once I have that value, I return whatever the value in that key in our database object is. If nothing is set for the provided key, this resolves to an empty JSON object, otherwise the value stored will be returned as the value key in a JSON object like so:
{
  "value": "blue"
}
As with the other routes, I’m using res.json to return the result.
Database Info
This route uses a similar approach to the others, but what’s new here is that I’m using an optional query parameter to determine whether or not to return a simple or detailed response.
So, we can call this route either as /dbinfo or as /dbinfo?details=true.
Note that I’m using req.query.details to check for a query parameter named details. If present, Express will add this to the req.query object for us. We don’t need to pattern match this in the URL. Express will use this same function for both /dbinfo and /dbinfo?details=true.
Try it Yourself
To try this out, you’ll need git and Node.js installed. I recommend the latest “LTS” (Long Term Stable) version of Node. At the time of writing, this was 14.17.0 but it will change as new releases come out.
Get the Code
First, get the code:
$ git clone https://github.com/simonprickett/getting-started-with-express-part-1
$ cd getting-started-with-express-part-1
Install Dependencies
As with most Node.js projects, this one uses depdendencies from the npm package registry. These are listed in the package.json file:
  ...
  "dependencies": {
    "express": "^4.17.1"
  },
  "devDependencies": {
    "nodemon": "^2.0.7"
  }
  ...
Here, I’m declaring that the project uses the Express framework and that, for development only, I want to use nodemon. This is a convenience package that allows us to speed up development - it watches the Node.js project source code files and restarts the application whenever changes are detected.
Now, install these dependencies (The npm command is installed with Node.js, so you won’t need to install that separately):
$ npm install

added 168 packages, and audited 169 packages in 2s

11 packages are looking for funding
  run `npm fund` for details

found 0 vulnerabilities
$
Note that while the package.json file named two packages (Express and nodemon), 168 packages were installed. This is because each of the packages our application depends on have their own dependencies, so npm handled installing all of those for us.
The installed packages will now live in the node_modules folder. This generally isn’t something that gets checked into source control, as its contents can be re-created from package.json (and package-lock.json which tracks the exact version of all sub-dependencies for us).
Start the Server
The code from GitHub contains the completed project in the state that it is in at the end of the video. So, you’ll be able to try out setting keys to values, getting the value of a key, and asking the “database” for some basic information about itself.
There are two ways to start the server. If you want to be able to change the code in your IDE and have to server restart each time changes are saved, start it as follows:
$ npm run dev

> [email protected] dev
> ./node_modules/nodemon/bin/nodemon.js

[nodemon] 2.0.7
[nodemon] to restart at any time, enter `rs`
[nodemon] watching path(s): *.*
[nodemon] watching extensions: js,mjs,json
[nodemon] starting `node server.js`
Express application listening on port 3000.
This uses nodemon. To start it without the auto reloading behavior (for example on a production server), use:
$ npm start

> [email protected] start
> node server.js

Express application listening on port 3000.
Try the Endpoints
At this stage of development, our API has three endpoints:
GET /dbinfo: Gets information about the number of keys in the database, can optionally be passed adetails=truequery parameter that will additionally return the names of each key in the database.GET /get/:key: Gets the value stored in the database at:key. Example:GET /get/favoritecolor.POST /set: Sets the value of a key. This is aPOSTrequest that expects a JSON body that looks like this:{ "key": "favoritecolor", "value": "blue" }.
You can try the GET routes in a browser, but for the POST route you’ll need something else. You can either use a graphical tool such as Postman (free download) or the command line curl tool (may be installed with your operating system already). I’ll provide examples for both here.
Let’s start by setting a key. With Postman, you’ll create a POST request, set the URL to http://localhost:3000/set and set the body to be “Raw” and “JSON”. The screenshot below shows where these settings are, as well as the content of the JSON body for the request:
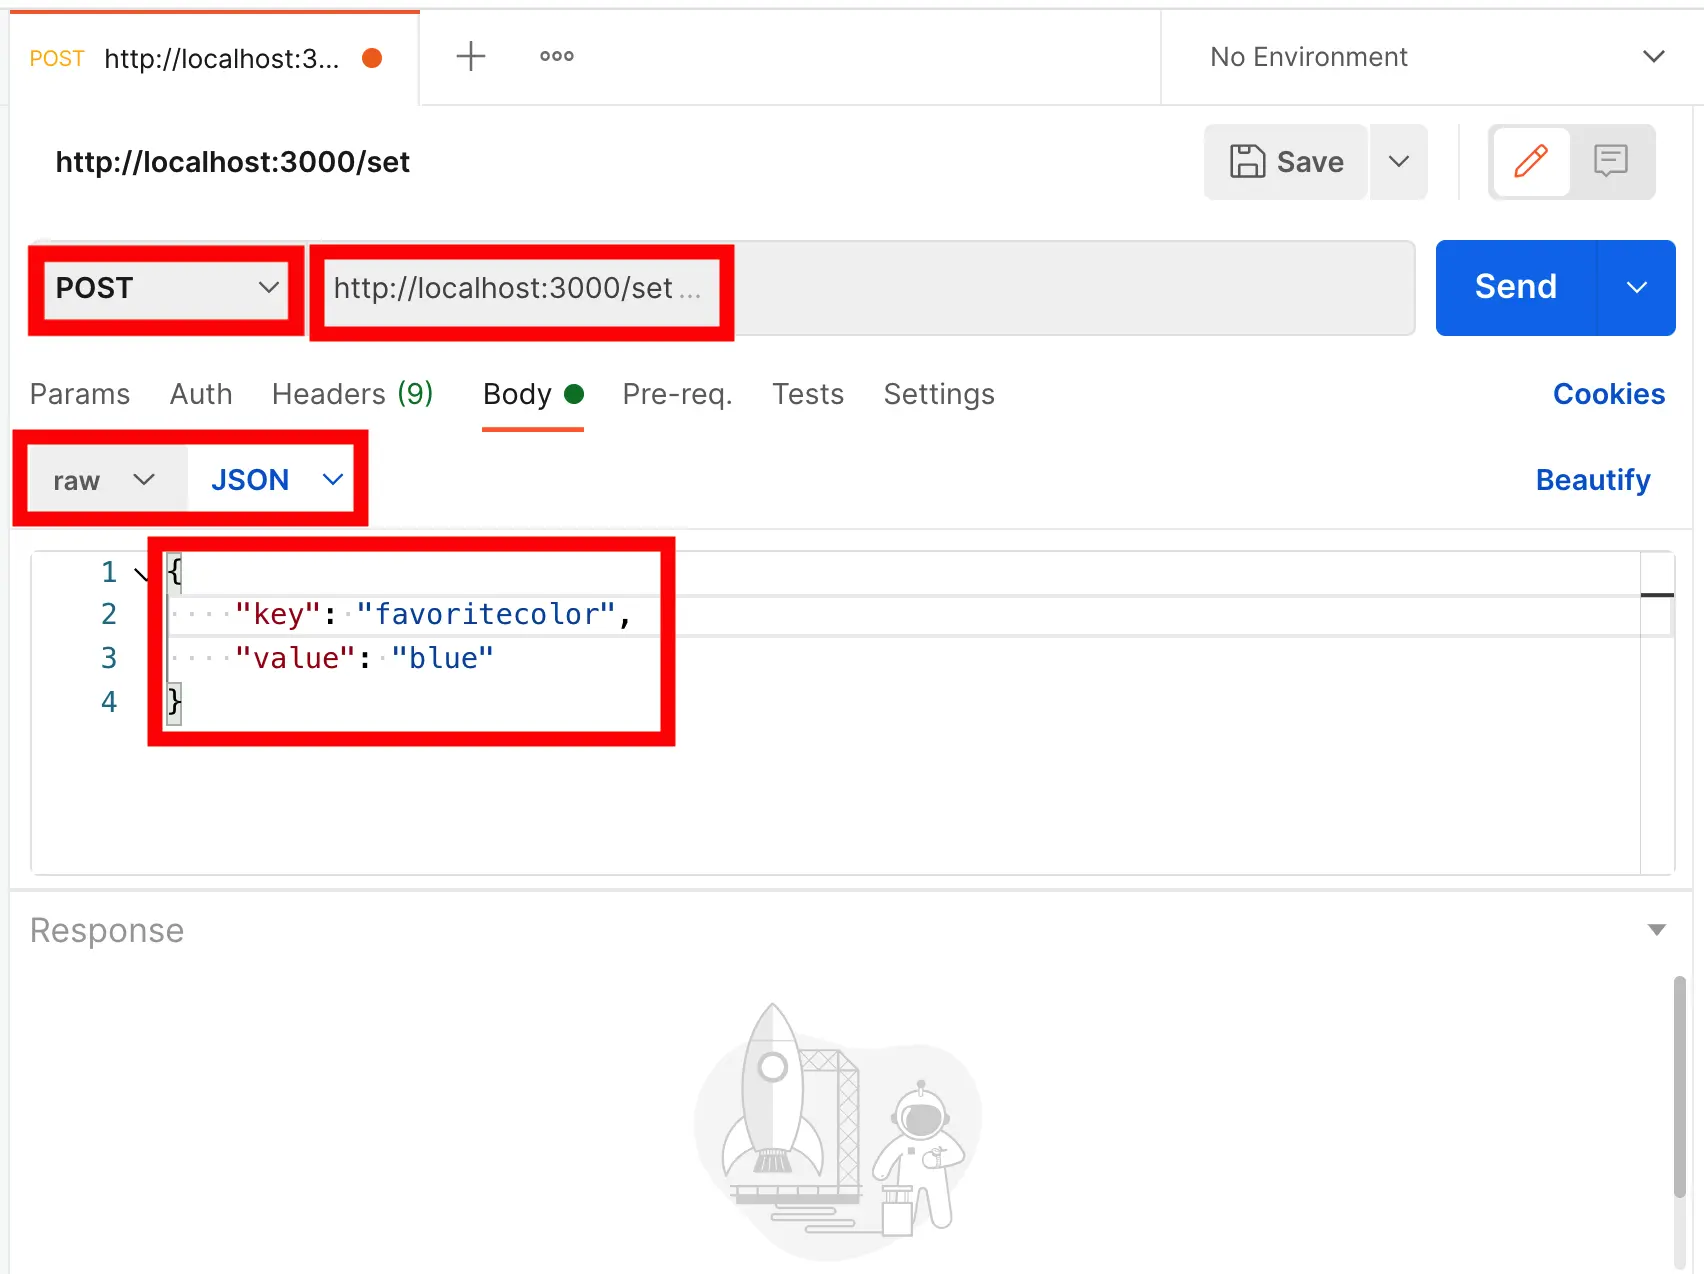
Click “Send” to submit the request and you should expect to see a 201 Created status code and JSON OK response:

If you’re using curl, try this:
$ curl --location --request POST 'http://localhost:3000/set' \
       --header 'Content-Type: application/json' \
       --data-raw '{
         "key": "favoritecolor",
         "value": "blue"
      }'
{"status":"OK"}$
Now we’ve set a value, let’s try getting it back. As this is a GET request you can use a browser for it:
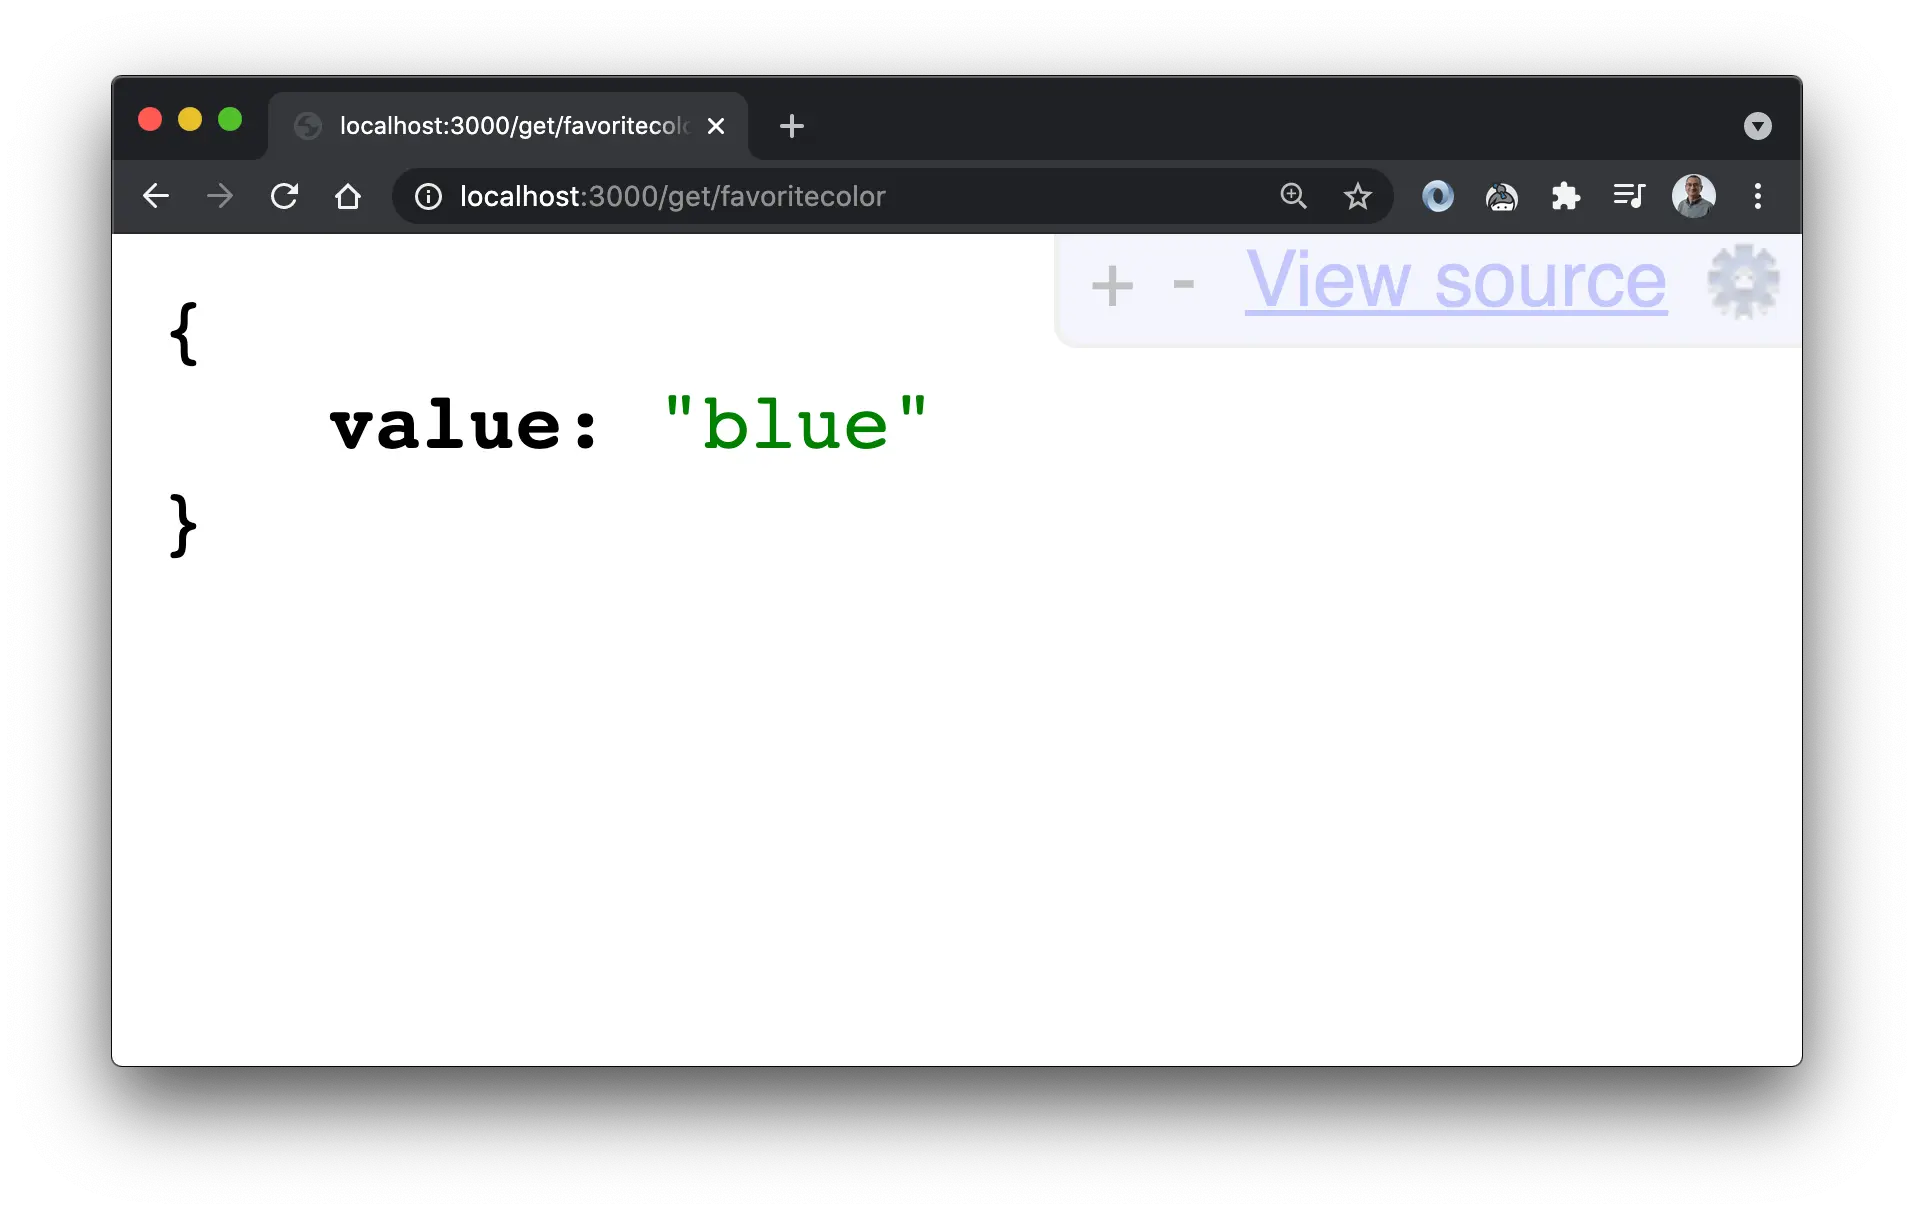
Or with curl:
$ curl --location --request GET 'http://localhost:3000/get/favoritecolor'
{"value":"blue"}$
The third and final endpoint allows us to see information about the state of the database. This is a GET request, so let’s use the browser. There are two ways we can call this… first to get basic information:
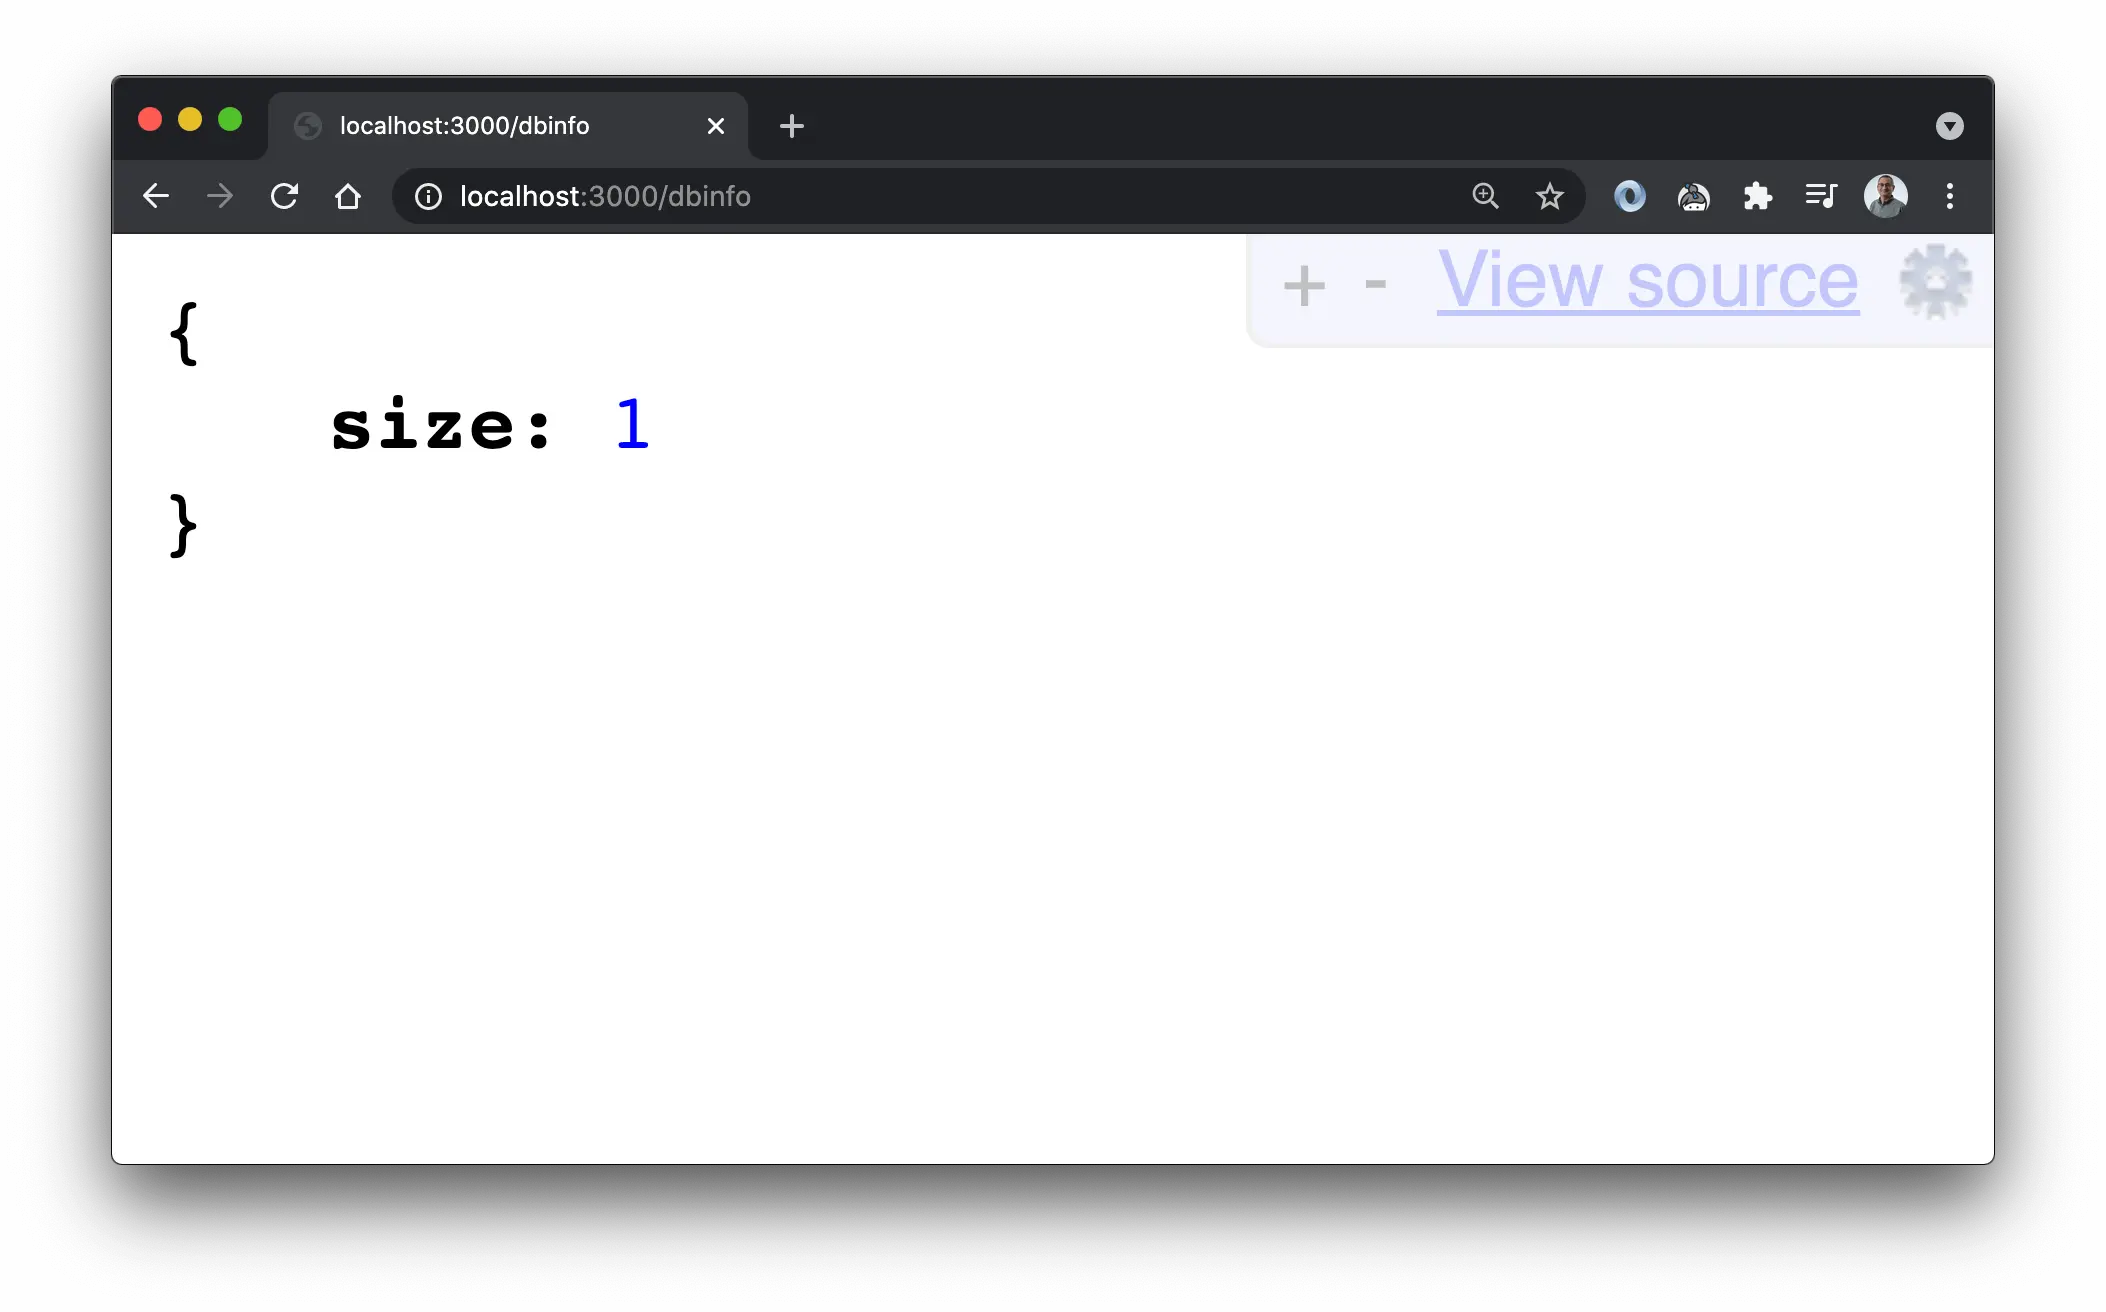
And again, with the optional query parameter details=true to get more information:

Next Steps
In a future video and accompanying article, I’ll show you how to add some Express middleware to validate parameters passed to routes, and how to protect some routes by requiring a valid API token supplied in a HTTP header.
What are you building with Express? Let me know via the Contact page. See you for part 2 in the near future!
 Buttons and LEDs with MicroPython for the Raspberry Pi Pico