 Simon Prickett

Who doesn’t like a good map? I’ve always enjoyed working with data that lends itself to mapping, and have built a few interactive things with the Google Maps API before. I’m also pretty interested in aviation and, as part of that, I keep a note of which airports I’ve flown between, which airlines and what type of aircraft I’ve travelled on.
I thought it would be fun to use this as a data set to experiment with the Google Maps Geometry API and put a picture of my favourite aircraft on my website, so here we go…

Side note: If you want to try an A340-300 flight these days, Lufthansa or Swiss are probably your best bet. I flew on every one of Virgin Atlantic’s A340-300s before they retired them :)
Airlines generally have maps of their route networks towards the back of the in flight magazine, or as posters in travel agencies (remember those?!). I wanted to make something like this to maintain and share a record of places I’ve flown from/to as if I were an airline myself. For example here’s a classic map for Pan American airlines:

Notice how these maps a curved line to representing the route between two airports. This is because a straight line isn’t actually the shortest distance between the two points when working with a three dimensional space such as our planet. The map projection makes the curved route look longer than a “straight” line between the two points, but in fact it isn’t. These curved routes are called “geodesic” or “great circle” routes. Read more about them here on gisgeography.com.
The Google Maps API makes it very easy to plot these routes on a map as we’ll see here.
Your support helps to fund future projects!
Route Map Data
This seemed like the perfect data source to try out the geodesic lines feature with, so I made a JSON file containing data about all of the airports I’ve visited, and the flights I’ve taken between them. The format of the file looks like this:
{
  "airports": {
    "BOG": {
      "name": "El Dorado International Airport",
      "shortName": "Bogotá",
      "location": {
        "latitude": 4.7014128,
        "longitude": -74.1466856
      }
    },
    "IAD": {
      "name": "Dulles International Airport",
      "shortName": "Washington Dulles",
      "location": {
        "latitude": 38.9531162,
        "longitude": -77.4587275
      }
    },
    ... similar for each airport I have visited...
  },
  "flights": [
    {
      "airports": [
        "IAD",
        "BOG"
      ],
      "status": "current"
    },
    ... similar for each airport pair I have flown between...
  ]
}
In the excerpt above, we can see that I’ve got two airports: Washington Dulles USA and Bogotá El Dorado Colombia defined in the airports object. Each airport’s key is its three letter IATA code. For each airport, I’m storing a longer and shorter version of the airport’s name, and it’s latitude / longitude position so that it can be placed on the map. Finally I’m using the status field to indicate if the route betwen the airports is one that my pretend airline currently operates (current), or one that’s planned in the future (planned) A.K.A. a route I am aiming to fly on myself in the near future. I’m not currently using the status field in this project, but wanted to capture it anyway.
Here’s the completed file, with all the routes that I can remember having flown on!
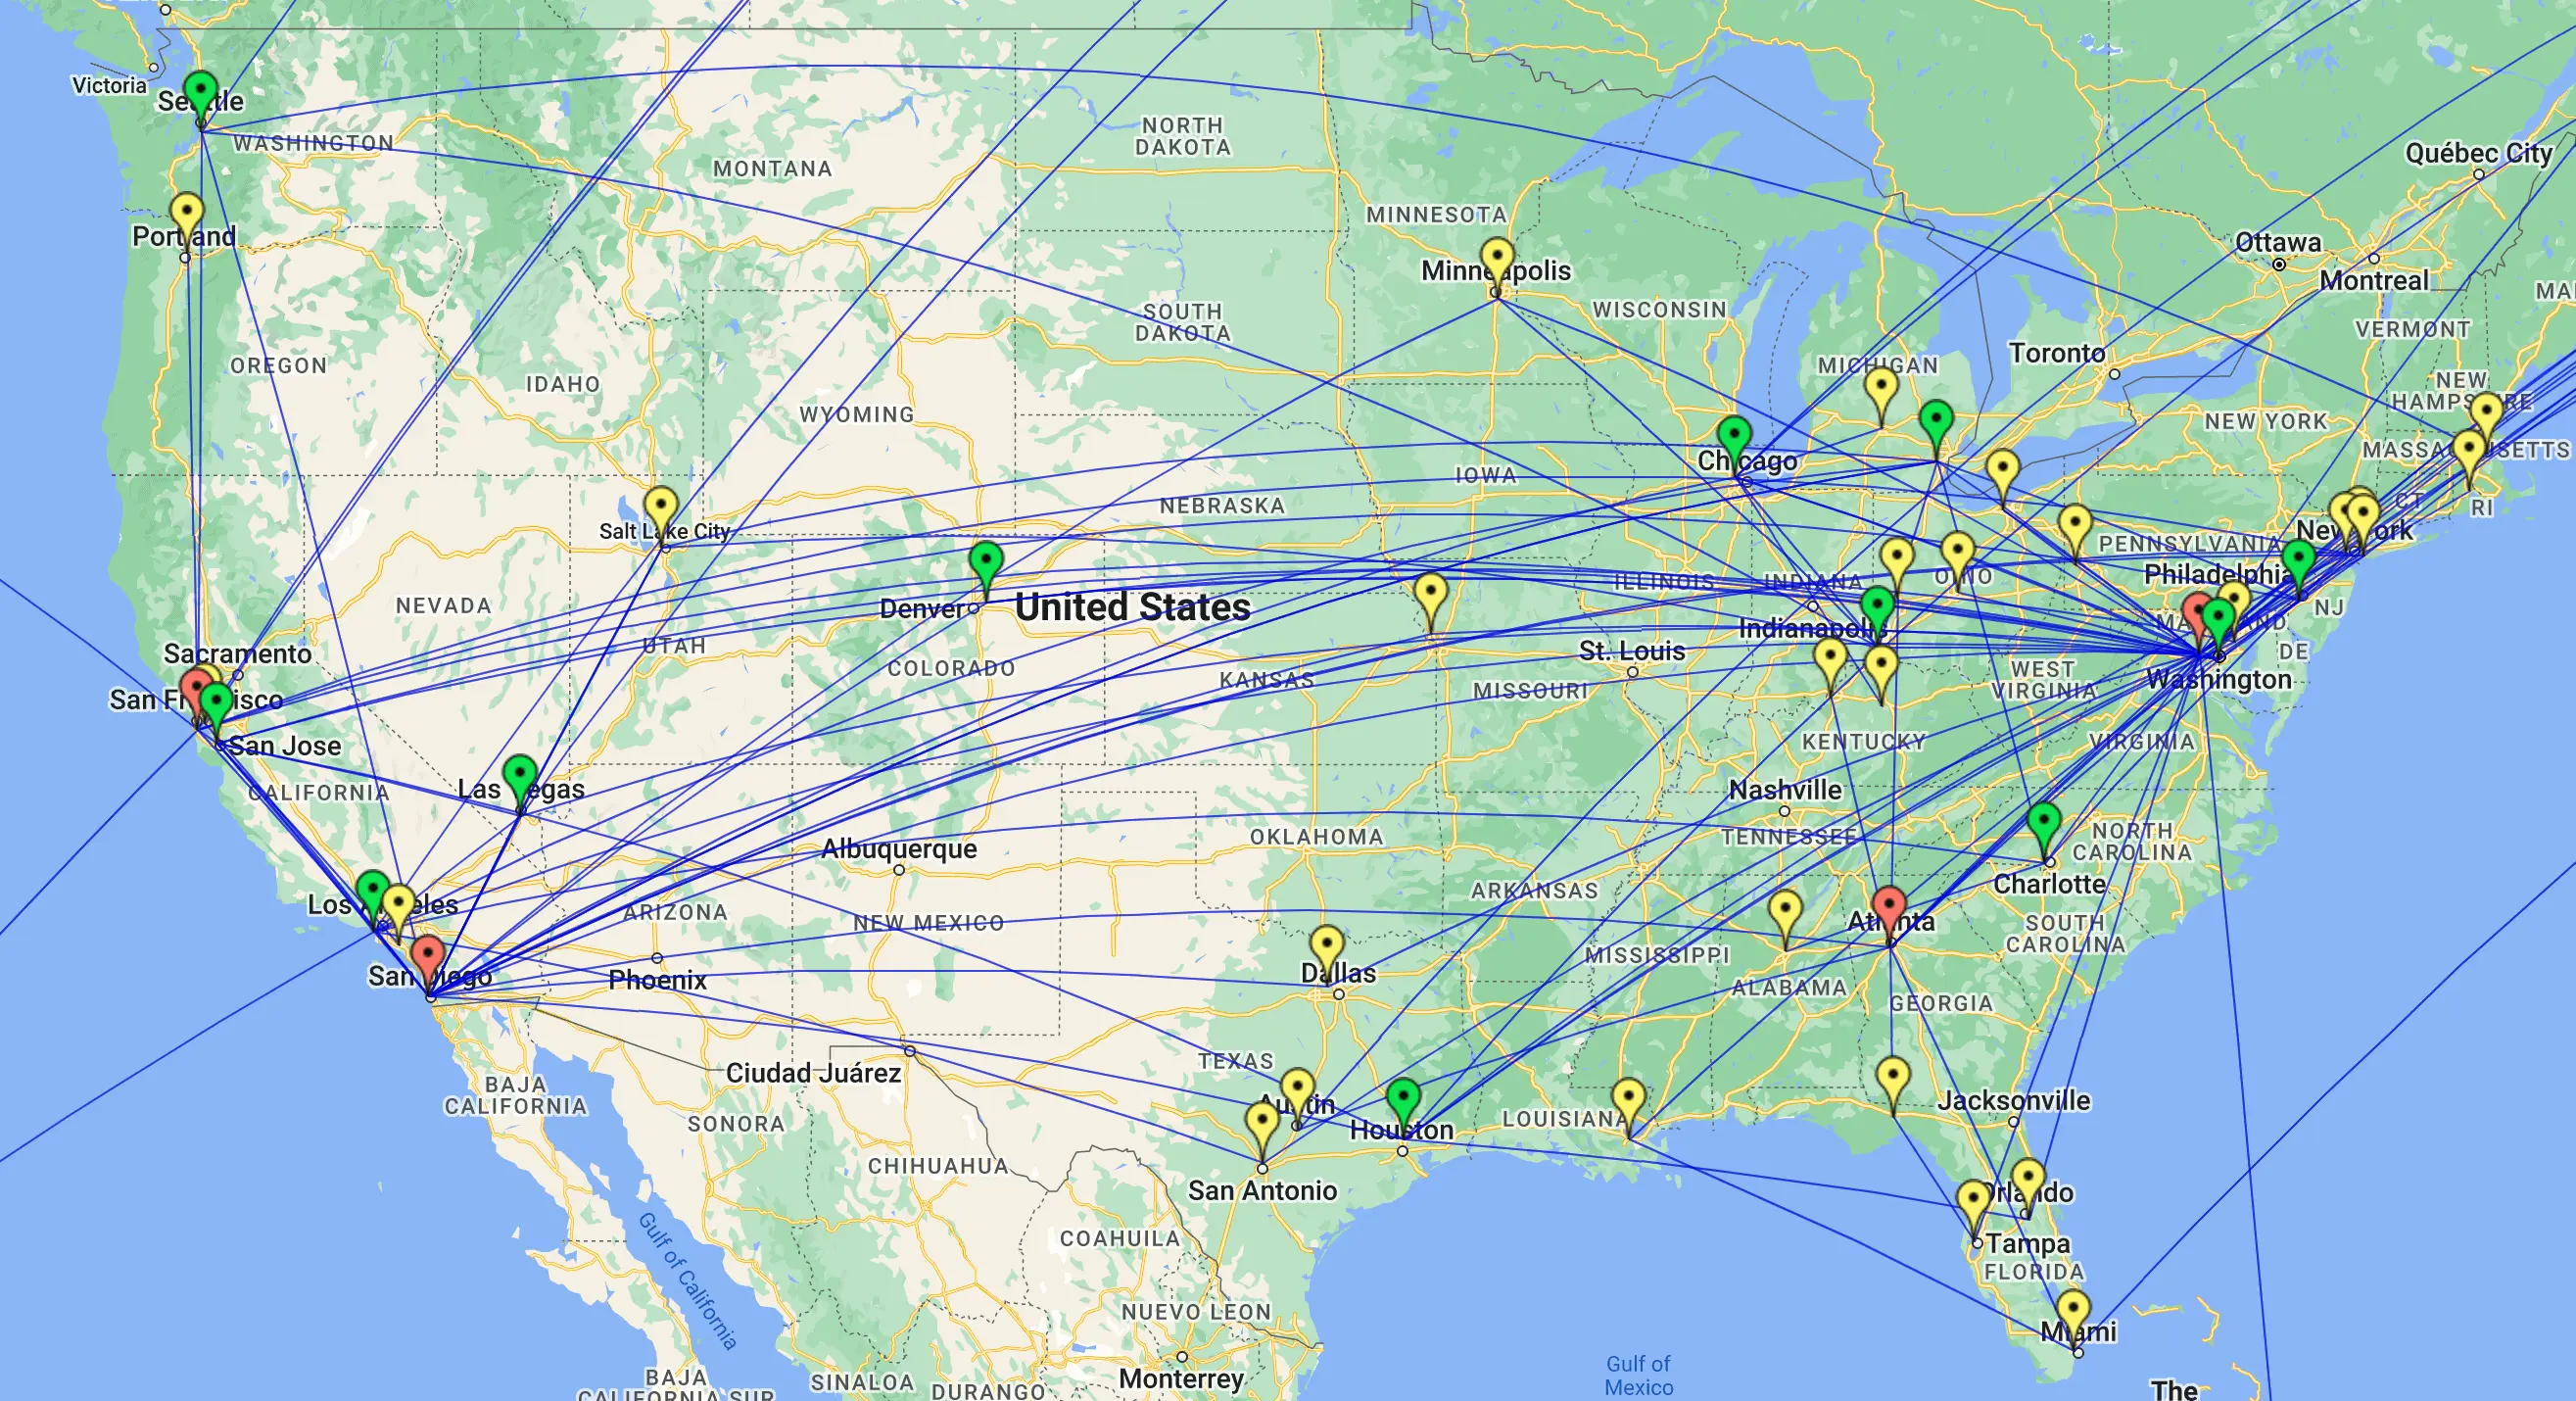
What I wanted to do with this data was make an interactive route map that first showed all of the possible routes (like the Pan American example above) then allowed the user to click on an airport and see just the routes from that airport. Like many airlines, I want my pretend one to operate on a hub and spoke model and for the map to reflect that certain airports are hubs. I decided to say that if an airport has 10 or more possible destinations I’ll call that a “main” hub and show it in red on the map. I’ll call airports with 5-9 destinations “regional” hubs, showing those in green on the map. Airports with less than 5 connections don’t get any special status, and will be shown in yellow on the map.
Demonstration
Before going into detail on how it works, here’s the finished article that you can play with.
Try moving around the map and clicking on different airports. Clicking on an airport shows the routes to/from that airport, and a popup listing them all. You can dismiss the popup to just see the routes. View a bigger version of the map here.
I love the way this looks as you zoom in and move around it. Here’s the view of “my United States network”:
How it Works
Here’s a high level overview of how this works…
HTML
The HTML is pretty simple, we just set up a div and give it a known ID (I went with map as that’s what will live in it) and size it according to how big we want the map to be. The only other things that we need are script tags to get the Google Maps API JavaScript file and a second JavaScript file containing the logic to build and manage our map. The complete HTML document looks like this:
<!DOCTYPE html>
<html>
  <head>
    <meta name="viewport" content="initial-scale=1.0">
    <meta charset="utf-8">
    <title>Airline Map</title>
  </head>
  <body>
    <h1>Airline Map</h1>
    <hr/>
    <div id="map" style="height: 600px; width: 100%"></div>
    <script src="https://maps.googleapis.com/maps/api/js?libraries=geometry&key=%%GOOGLE_MAP_KEY%%"></script>
    <script defer src="js/airline-google-map.js"></script>
  </body>
</html>
Note that we’re specifically requesting the additional geometry library for the Google Maps API, and that we have to provide a key (I’ve used %%GOOGLE_MAP_KEY%% as a placeholder here). Google doesn’t include the geometry library by default, as I guess most maps use cases don’t need it so they help to keep the overall page weight down by not loading it unless told to.
Google Maps API Key
To make Google Maps work when embedded in a web page, you need an API key. Google provides excellent documentation on how to get a key here.
Your key is a secret, but it’s going to have to be shared - you’ll need to put it in the URL for the Maps API JavaScript and that means it needs to go in your web page and be shared publically.
To stop others from misusing your key for their own purposes, you should give the key a meaningful name in your Google account so that you know what it’s for, then also restrict the key’s scope:
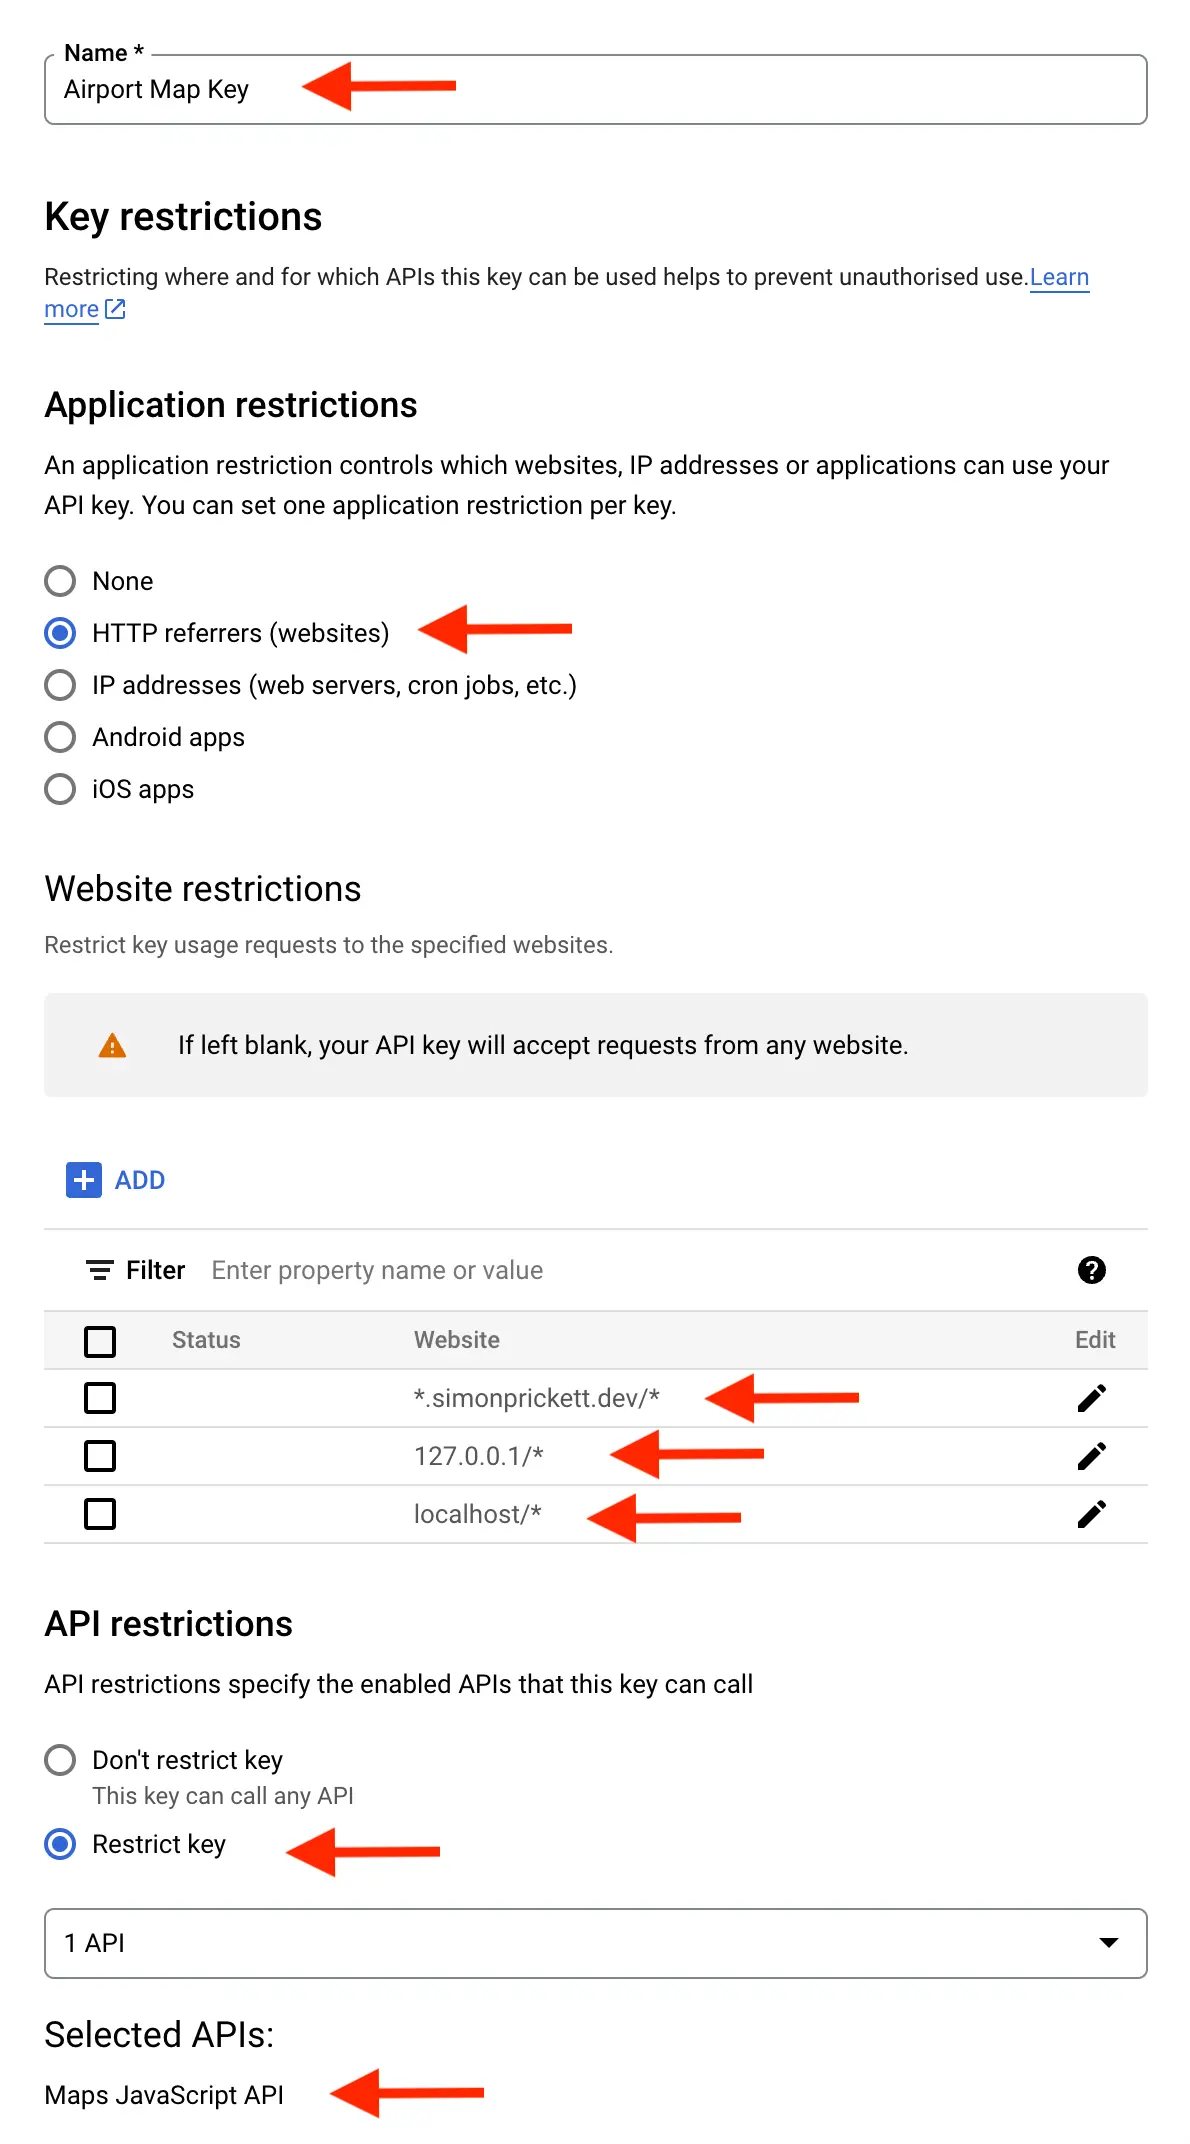
I’ve restricted my key so that it can only be used when developing locally (127.0.0.1 and localhost) or from my website (hosted on simonprickett.dev). I’ve also restricted the key to only be valid for the Google Maps API (and not other Google APIs). You should use similar restrictions when creating your own key.
Don’t commit your key to source control (e.g. GitHub). In my repository, I’ve provided a simple Node.js build script that replaces the value of %%GOOGLE_MAP_KEY%% in the HTML file with the actual key (real value provided through an environment variable) and places all of the files that you need to upload to your web server in a build folder which is then git ignored so that it can’t accidentally be committed. Use the instructions in my project README to follow along if you intend to deploy your own version of this project.
Desired Functionality
Here’s what I wanted from my map:
- When first loaded, display all of the routes as lines between each airport pair that I’ve flown between.
- Show each airport as a Google Maps marker, in different colours as follows:
- Red for “Main Hub” airports - ones where there are 10 or more destinations.
- Green for “Regional Hub” airports - ones having between 5 and 9 destinations.
- Yellow for other airports - ones having fewer than 5 destinations.
- Allow the user to zoom in and out and move around the map.
- When the user clicks on any airport marker:
- Show only the routes to/from that airport.
- Display a popup on the map showing the airport name and a list of all the destinatins from that airport.
- Display text indicating that the airport is a “Main Hub” or “Regional Hub” as appropriate.
- Allow the user to dismiss the popup.
Implementing the Functionality in JavaScript
Let’s see how I implemented all of the above in a relatively small amount of JavaScript!
First, let’s tackle a couple of “freebies” that we don’t need to write any code for… Google Maps manages scrolling and zooming for us, so nothing to do there. We also don’t need to write any code to handle dismissing popups (I might look into this in future to add some additional functionality though).
That leaves us with two tasks to write code for…
Display the Initial Map
Here we need to do a couple of things… first let’s draw a map and centre it on a particular location. As many of my flights originated or ended in the USA, I chose to centre the initial map view on a location in Kansas and with a zoom level that shows the rest of the world too:
const map = new google.maps.Map(document.getElementById('map'), {
  center: { lat: 38.499768, lng: -100.6875177 }, // This is Kansas, Dorothy...
  zoom: 2
});
I’ve put the map inside the div element with ID map in my HTML document. As we saw earlier, the size of that element in the final rendered page is determined inline in the HTML.
Now we have a map on the page, we need to add markers to it. For the initial view, I wanted to display all of the airports in the data file, with geodesic lines drawn between each flown airport pair.
This is achieved by reading the JSON data file, storing the value of the airports object in a global variable airports and the value of the flights array in a second global variable flights.
The code then loops over each airport object in airports. I also have a utility function getDestinationsForAirport that builds an array of the airport codes that a given airport is connected to.
For each airport, we’ll first work out what “type” of airport it is, and what colour marker to use. These data points depend on the number of destinations that getDestinationsForAirport found in the data file for this airport:
let markerColor;
let airportType;

if (destinations.length >= MAIN_HUB_NUM_DESTINATIONS) {
  markerColor = 'red';
  airportType = 'Main Hub';
} else if (destinations.length >= REGIONAL_HUB_NUM_DESTINATIONS) {
  markerColor = 'green';
  airportType = 'Regional Hub';
} else {
  markerColor = 'yellow';
}
We’ll add this information to a HTML fragment that will pop up when the marker is clicked, using a Google Maps InfoWindow:
const infoWindow = new google.maps.InfoWindow({
  content: `<div>${airport.name}</div><hr/><p>We fly from ${airportType ? 'our ' + airportType + ' at ' : ''} ${airport.shortName} to:</p>${renderDestinations(destinations)}`
});
Finally, we can use information about the airport’s location plus our infoWindow to create a
Google Maps Marker for it on the map:
const marker = new google.maps.Marker({
  title: airport.name,
  airportCode,
  destinations,
  infoWindow,
  map,
  position: {
    lat: airport.location.latitude,
    lng: airport.location.longitude
  },
  icon: {
    url: `http://maps.google.com/mapfiles/ms/icons/${markerColor}-dot.png`
  }
});
Alongside some items the Marker expects (a title, position, icon and the map to attach to), I’m passing in other data that we’ll need to remember in there for later when the user clicks the marker. Each Marker needs to have a click event associated with it - we’ll cover those in the next sub-section.
Each airport’s marker is then stored in the airport’s object inside the global airports object that contains all the airport data (that’s a lot of saying airport!).
Once we’ve created all our markers we’ll need to loop over all the airports once more, this time drawing lines from each airport to the others that it’s connected to - this gives us that initial route map look where all the connections between all of the airports are shown at the same time.
We’ll use an inner loop to draw one line per airport connection:
for (const airportCode in airports) {
  const airport = airports[airportCode];

  for (const destination of airport.marker.destinations) {
    currentLines.push(new google.maps.Polyline({
      strokeColor: '#0000DD',
      strokeOpacity: 0.5,
      strokeWeight: 1,
      geodesic: true,
      map: map,
      path: [airport.marker.getPosition(), airports[destination].marker.getPosition()]
    }));
  }
}
We use the Google Maps Polyline to represent a line. Each line is added to the map (map: map), and given a few configuration parameters such as the colour, opacity and pen thickness to use when drawing the line.
To get a geodesic line, we set geodesic: true. The start and end points of the line are determined by the array of LatLng position objects in path. Here we’re only specifying two but we could add as many as we need.
Note that we’re adding each line to a global array currentLines. We’ll need this later, when processing a click event on one of the airport markers…
Handle a Click Event on a Marker
Next we need to focus on what happens when the user clicks on one of the airport markers… this is handled using a click event callback function that we add to each marker while creating them.
When a marker is clicked, we first want to remove all the lines that are currently drawn on the map. We do this by looping over every line in the currentLines array, setting the map reference for each line to null.
Then we’ll want to close any currently open information window (e.g. if the user had previously clicked a map marker and its information window is open).
Having done that, it’s then a case of opening the clicked marker’s information window and looping over the array of destination markers connected to the clicked one, drawing a geodesic line between the two posisions:
Here’s the code:
google.maps.event.addListener(marker, 'click', () => {
  for (const polyLine of currentLines) {
    polyLine.setMap(null);
  }

  currentLines = [];

  if (currentInfoWindow) {
    currentInfoWindow.close();
  }

  marker.infoWindow.open(map, marker)
  currentInfoWindow = marker.infoWindow;

  for (const destination of marker.destinations) {
    const geodesicPoly = new google.maps.Polyline({
      strokeColor: '#0000DD',
      strokeOpacity: 0.5,
      strokeWeight: 2,
      geodesic: true,
      map: map,
      path: [marker.getPosition(), airports[destination].marker.getPosition()]
    });

    currentLines.push(geodesicPoly);
  }
});
We first empty out the currentLines array and add each newly drawn line back into it, so that these can be erased when the user clicks a different marker. That’s “all there is to it”!
Future Enhancements
What else would I like to add in future? Well, right now there’s no way to get back to the initial view with every line between every airport on it once you click an airport and bring up a marker. You can refresh the page, but that doesn’t feel good - maybe I should add a button that does this?
I’d also like to look into more formatting on the information windows, maybe adding a picture for each location or something.
Finally I should use that status field in the data file, perhaps adding flights that I plan to take with a status of future and showing those in a different colour on the map.
Try it Yourself!
If you want to study this further or try running it yourself, I’ve made it available on GitHub for your entertainment. Don’t forget that you’ll need your own Google Maps API key. Let me know if you build anything based on this, I’d love to see it!
Main photograph by Porapak Apichodilok on Pexels.