 Simon Prickett

Introduced in 2015, Amazon Echo is a wireless speaker and microphone device that allows users to interact with online services by voice. Alexa is the name of the speech service that powers Echo (and other devices), as well as a companion smartphone app for Android and iOS. It has a wide range of capabilities out of the box, which developers can extend using the “Alexa Skills Kit” SDK. The Skills Kit runs in the cloud, handling a lot of the heavy lifting traditionally associated with voice interfaces such as speech recognition and text-to-speech encoding.
(This article originally appeared on the Modus Create blog).
In this post, we’ll take a look at developing a custom skill that allows users to ask Alexa questions about the status of the BART transit system in the San Francisco Bay Area, receiving spoken responses containing up-to-date information. Transit is just one of many industries that could benefit from the ability to conduct user interactions by voice — other use cases could be as diverse as controlling other in-home IoT enabled devices, engaging in e-commerce, playing games, or enabling seniors and those with disabilities to live more independently. As we’ll see, all you need to integrate with Alexa is an API to get data from, your imagination and some basic coding skills.
Anatomy of an Alexa Custom Skill
In order to develop a Custom Skill, we need to understand how Alexa receives spoken instructions from a device such as the Echo and translates them into “intents” which are processed by backend code that assembles an appropriate text response for Alexa to read to the user.
The overall flow looks roughly like this:
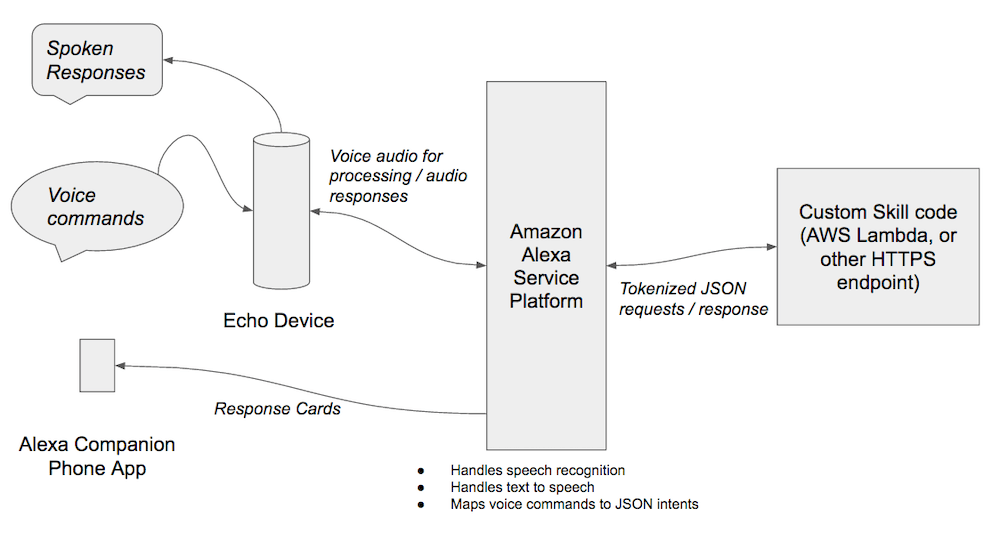
- The user speaks to Echo, using trigger words so that Echo knows that it is being addressed, and identifies the Skill that the user wishes to interact with. For example, “Alexa, ask BART when are the trains from Balboa Park”. In this case, “Alexa” is the trigger word to make the Echo listen, and “BART” identifies the skill that the user wants to direct their enquiry to.
- Echo sends the request to the Alexa Service Platform, which handles speech recognition, turning the user’s speech into tokens identifying the “intent” and any associated contextual parameters. In our example, the “intent” would be that the user wants to know about train times, and the context for that would be that they are interested specifically in train times for the Balboa Park station. Intents, and possible parameter values for them are held by the Alexa Service Platform as configuration items for the Skill.
- The intent and parameters for the user’s request are then sent as a JSON encoded text document to the server side Skill implementation for processing. The Alexa Service Platform knows where to send these requests as it maintains a set of backend URLs or Lambda ARNs for each Custom Skill.
- The Custom Skill receives the JSON via a HTTPs request (or if the Custom Skill is implemented as an AWS Lambda function, via invocation of the Lambda function at the configured ARN).
- The Custom Skill code parses the JSON, reading the intent and context, and then performs suitable processing to retrieve data appropriate to those (for example, call APIs, look up data in a database, retrieve data from the user’s session). In our example, the code would need to call the BART API to get train departures from a station, specifying that it wants departures from Balboa Park.
- A response JSON document is then sent back to the Alexa Service Platform containing both the text that Alexa should speak to the user and markup containing text and an optional image URL for a “card” that appears in the Alexa companion smartphone app.
- The Alexa Service Platform receives the response, and uses text to speech to speak the response to the user whilst also pushing a card to the companion app.
For this example, we’re going to use an AWS Lambda function for our Custom Skill logic, and we’ll implement that logic in Python. This saves us the overhead of setting up our own server to host and run the skill, avoids the requirement to obtain an SSL certificate for our server, and allows us to benefit from the auto scaling features of AWS Lambda should our skill become popular and receive a lot of traffic from Echo owners. Python is an arbitrary choice here, we could also have chosen Java or JavaScript (Node.js).
Your support helps to fund future projects!
First, let’s look at configuring the Alexa service, which is handled within the Amazon Developer portal.
Alexa Service Setup
To configure a Custom Skill for Alexa, we begin at developer.amazon.com and login with our AWS account details. From here, we’ll select the “Alexa” tab, then “Get Started” from the “Alexa Skills Kit” section. Clicking “Add a New Skill” takes us to the page where we’ll set up our Custom Skill, starting with the word that Alexa will need to recognize in order to know that a request is intended for us.
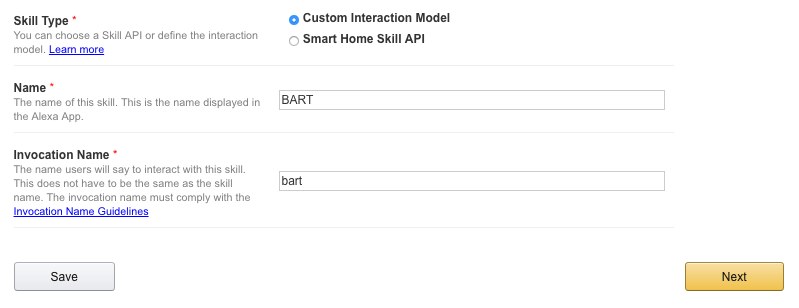
Initial Setup
Here, we need to select “Custom Interaction Model” for our Skill Type, and set Name and Invocation Name to “BART” and “bart” respectively. “BART” will be the name that is displayed in the Alexa companion app when it renders response from our Skill, and “bart” is the trigger word to tell Alexa to route requests to our Skill’s backend code.
At this step, our new Skill is also assigned an application ID, which looks something like this:
amzn1.echo-sdk-ams.app.bd304b90–031d-xxxx-xxxx-1e4fd4772bab
We’ll need this later when implementing the Custom Skill backend, in order to know that requests we receive are from the expected source. The next page in the setup wizard is where we will configure the speech interface for our Custom Skill. This breaks down into the following three distinct sections:
Configuring the Intent Schema
In the Alexa architecture, Intents can be thought of as distinct functions that a Skill can perform. The Alexa platform uses an “Intent Schema”, expressed in JSON, to communicate which function the code for a Custom Skill should execute to fulfill a given request. Intents can also take arguments which are known here as Slots.
For our BART train example, we’ll want to be able to ask Alexa a number of different questions about trains, stations and the system status as a whole. Each of these is an Intent, and they will be:
GetStatus: get information about the overall BART system status.GetElevators: get information about any elevator outages across the system.GetTrainTimes: get train departure times for a specified station — this requires a Slot or argument to allow us to specify which station we want to get train times for. This is the Intent we will focus on for this case study.
Additionally we’ll have Alexa listen out for a few standard Intents that Custom Skills should implement:
AMAZON.HelpIntent: provide the user with some help text.AMAZON.StopIntent: let the user stop an operation.AMAZON.CancelIntent: let the user cancel an operation.
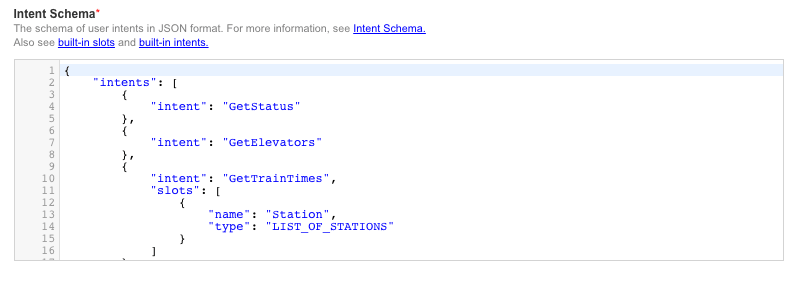
Our completed Intent Schema looks like this:
{
  "intents": [
    {
      "intent": "GetStatus"
    },
    {
      "intent": "GetElevators"
    },
    {
      "intent": "GetTrainTimes",
      "slots": [
        {
          "name": "Station",
          "type": "LIST_OF_STATIONS"
        }
      ]
    },
    {
      "intent": "AMAZON.HelpIntent"
    },
    {
      "intent": "AMAZON.StopIntent"
    },
    {
      "intent": "AMAZON.CancelIntent"
    }
  ]
}
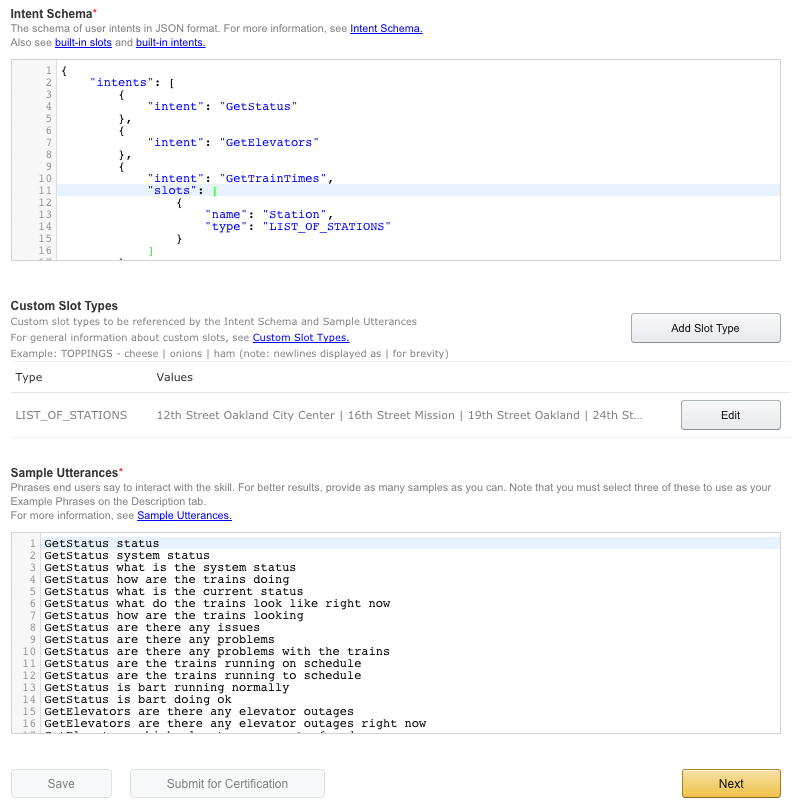
To associate this schema with our Custom Skill we simply paste it into the “Intent Schema” field:
Next up we need to define what LIST_OF_STATIONS represents.
Configuring Custom Slot Types
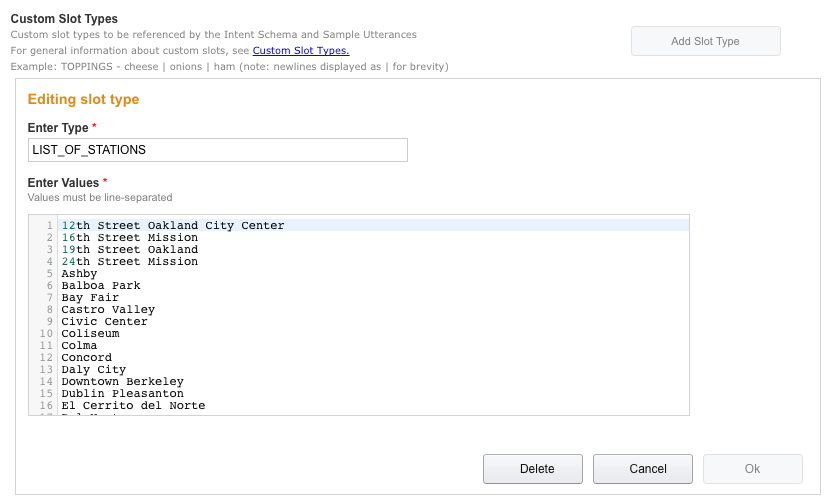
One of our intents, GetTrainTimes, requires a set of valid values for its parameter, so that the backend code knows which station the user wants train times for. In our interaction model, we specified a Custom Slot Type LIST_OF_STATIONS that should contain all of the possible values for station names, so that Alexa can listen for these and pass the appropriate value to our Custom Skill backend for a given request.
In order to populate this list, we simply paste a newline separated list of all of the BART station names into the “Custom Slot Types” field, and name the type LIST_OF_STATIONS, which matches the name we used in our GetTrainTimes intent:
Having fully configured our interaction model, we then need to associate these with phrases.
Configuring Sample Utterances
“Sample Utterances” are where we define the phrases that Alexa needs to hear in order to invoke each of our Custom Skill’s Intents. This is done using a simple text list of the format:
<Intent Name> <Phrase>
Where <Phrase> can optionally contain references to Slots (arguments). We’ll use the following set of Sample Utterances here:
GetStatus status
GetStatus system status
GetStatus what is the system status
GetStatus how are the trains doing
GetStatus what is the current status
GetStatus what do the trains look like right now
GetStatus how are the trains looking
GetStatus are there any issues
GetStatus are there any problems
GetStatus are there any problems with the trains
GetStatus are the trains running on schedule
GetStatus are the trains running to schedule
GetStatus is bart running normally
GetStatus is bart doing ok
GetElevators are there any elevator outages
GetElevators are there any elevator outages right now
GetElevators which elevators are out of order
GetElevators how are the elevators
GetElevators how are the elevators looking
GetElevators are there any problems with the elevators
GetTrainTimes when are the trains from {Station}
GetTrainTimes what time are the trains from {Station}
GetTrainTimes trains from {Station}
GetTrainTimes departures from {Station}
For the GetTrainTimes Intent, note that we need to provide a placeholder for a station name. This is achieved using {Station}, which indicates any value from the “Station” Slot in our Intent Schema.
Note also that we don’t need to provide sample utterances for the stop, cancel, and help intents. Alexa understands appropriate phrases to invoke each of these out of the box.
Pasting the above into the “Sample Utterances” box completes the interaction model which now looks something like this:
We can now click “Next” to configure the endpoint that our Custom Skill’s code will reside at.
Custom Skill Endpoint Configuration
Once Alexa has used our Intent Schema and Sample Utterances to decode which Intent (and optionally which Slot(s) or argument(s)) the user is trying to invoke, it will pass this information as a JSON document to code that we need to write to implement our Custom Skill logic.
This code needs to reside either on AWS as a Lambda function, or anywhere that the Alexa platform can reach it via a HTTPS post with a JSON body.
For our example, we’ll use AWS Lambda, so we’ll need to create a Lambda function as described in the next section, then enter the ARN for that function into the “Endpoint” field in the configuration form:

Alexa will then send all requests to this endpoint, and expect an appropriate JSON response back from it. To make that happen, we’ll need to write some code…
Coding the Custom Skill
As we decided to use AWS Lambda to implement our Custom Skill with, we’ll need to set up a new Lambda function. This needs to be done in the US East (N. Virginia) AWS region as the Alexa Skills Kit requires this.
The trigger for our function needs to be set to “Alexa Skills Kit” (if you don’t see this as an option when setting up the function, then you are likely not working in the US East region).
As with all Lambda functions, our function’s entry point is:
def lambda_handler(event, context):
    # Code...
event is the JSON received from the Alexa platform, and looks like this:
{
  "session": {
    "sessionId": "SessionId.6ab325dd-xxxx-xxxx-aee5-456cd330932a",
    "application": {
      "applicationId": "amzn1.echo-sdk-ams.app.bd304b90-xxxx-xxxx-86ae-1e4fd4772bab"
    },
    "attributes": {},
    "user": {
      "userId": "amzn1.ask.account.XXXXXX"
    },
    "new": true
  },
  "request": {
    "type": "IntentRequest",
    "requestId": "EdwRequestId.b851ed18-2ca8-xxxx-xxxx-cca3f2b521e4",
    "timestamp": "2016-07-05T15:27:34Z",
    "intent": {
      "name": "GetTrainTimes",
      "slots": {
        "Station": {
          "name": "Station",
          "value": "Balboa Park"
        }
      }
    },
    "locale": "en-US"
  },
  "version": "1.0"
}
The first thing our function should do is make sure that it was called from the correct application on the Alexa platform, so that we don’t accept requests from other origins. The Application ID can be used for this:
if (event['session']['application']['applicationId'] !=
    "amzn1.echo-sdk-ams.app.bd304b90-xxxx-xxxx-86ae-1e4fd4772bab"):
    raise ValueError("Invalid Application ID")
By the time our code receives the JSON from Alexa, the original phrase “What time are the trains from Balboa Park?” has been abstracted away to:
"intent": {
  "name": "GetTrainTimes",
  "slots": {
    "Station": {
      "name": "Station",
      "value": "Balboa Park"
    }
  }
}
Which is all that we need to determine which action to take here. Our code can read GetTrainTimes and Balboa Park from the JSON and use these values to ask the BART API when the next trains leave from that station. At this point, there’s nothing Alexa specific; we’re just using Python’s urllib2 and json libraries to make a network call and parse the response.
Once we have our train times data, we assemble it into a response document using the JSON schema that Alexa expects. Here we use two separate keys, outputSpeech for the message that Alexa will speak to the user, and card for the text that appears in the companion smartphone app. The complete JSON document that is the return value of our Lambda function looks like this (text truncated for brevity):
{
  "version": "1.0",
  "response": {
    "outputSpeech": {
      "type": "PlainText",
      "text": "Train departures from Balboa Park are as follows: Towards Daly City on platform 1. In 3 minutes: 9 car train. In 9 minutes: 9 car train. In 11 minutes: 10 car train. Towards Dublin/Pleasanton on platform 2. In 13 minutes: 9 car train..."
    },
    "card": {
      "content": "Train departures from Balboa Park are as follows: Towards Daly City on platform 1. In 3 minutes: 9 car train. In 9 minutes: 9 car train. In 11 minutes: 10 car train. Towards Dublin/Pleasanton on platform 2. In 13 minutes: 9 car train...",
      "title": "BART Departures from Balboa Park",
      "type": "Simple"
    },
    "reprompt": {
      "outputSpeech": {
        "type": "PlainText",
        "text": ""
      }
    },
    "shouldEndSession": false
  },
  "sessionAttributes": {}
}
Implementation of the other Intents needed to round out our Custom Skill’s full list of capabilities use the same pattern. You can see the complete Python source for the Lambda function that implements the Custom Skill including all of the intents in our interaction model on GitHub here.
AWS also provides a quick start blueprint called “alexa-skills-kit-color-expert-python” which is a good start point containing a scaffold capable of receiving requests from Alexa and packaging up correctly formatted responses. If you prefer to write your Lambda functions in Node.js, there’s a blueprint called “alexa-skills-kit-color-expert” that contains the same example functionality using JavaScript.
Testing
The Custom Skill can be tested using the Service Simulator within the Amazon Developer portal and without the need to use an Echo hardware device. We can type in sample sentences that the user might speak, view the JSON message that is sent to the Lambda function and its response JSON as well as listen to how the response would sound when played back on an Echo.
For example, to get train times from Balboa Park:
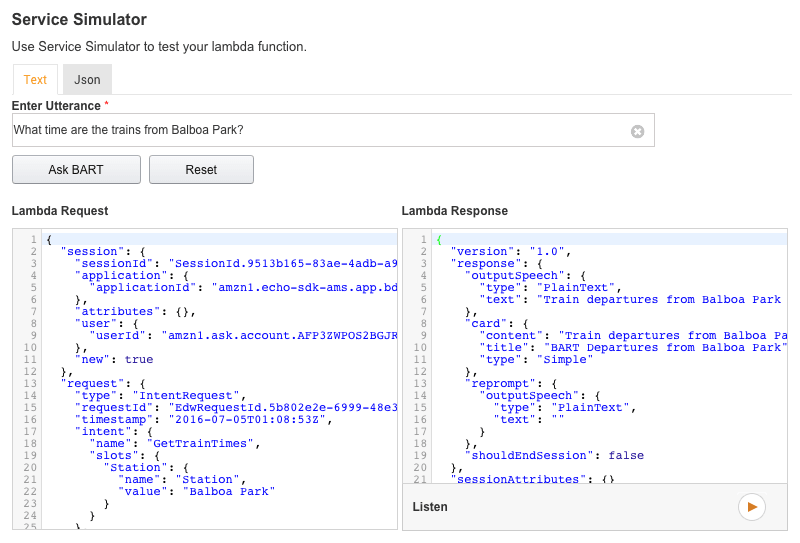
Here we can see that Alexa determined that this request related to the GetTrainTimes intent (because we used a phrase from our sample utterances that are associated with that intent). Alexa also determined that Balboa Park was the value of the station slot.
The Lambda function read GetTrainTimes as the intent and called the get_train_times Python function that we wrote. This looked at the station name value “Balboa Park” that was passed to it, and dereferenced this to the station code “BALB” by calling the get_station_code function.
Having got the station code, the Lambda function then called the BART API, retrieved the JSON for train times from Balboa Park, and built the JSON response seen on the right of the screenshot containing both the spoken and written responses used to render replies via Alexa’s voice and companion app respectively. This can be a really useful debugger, and also allows those without the Echo hardware to build Custom Skills.
If an Echo device is associated with our Amazon developer account, we can go ahead and directly test this with that device. If not, we can hear what the response would sound like simply by pressing the “Listen” button in the Service Simulator.
Demonstration
On a real Echo device, we would need to use the trigger word, and the word that identifies our Custom Skill so we would say:
“Alexa, ask BART what time are the trains from Balboa Park?”
Along with each audio response that users hear via their Echo device, we’re also sending a written response which appears in the Alexa companion smartphone app. Here’s an example response for our enquiry about train times from Balboa Park:

Wrap Up
As we have seen, it is relatively straightforward to develop a custom skill for the Amazon Echo platform. The Alexa service abstracts away many of the traditional complexities developers face when working with voice interfaces, as it deals with the complex speech recognition and text to speech aspects of the system.
Developers have the flexibility to choose to run and auto scale their Skill’s backend logic using AWS Lambda, other AWS hosting options such as EC2 or Elastic Beanstalk or to run scale and manage the code anywhere that the Alexa platform can reach with an SSL encrypted HTTP request. This latter option allows the code to be hosted on premise rather than with AWS, which may be desirable for some developers. As Lambda is an option, not a requirement for custom skill authoring, developers can write their backend code in any language (although those choosing to take advantage of Lambda will need to choose between Python, Java or JavaScript).
Once we’re happy with our skill, we could go ahead and submit it to Amazon for certification to make it available publicly for all users to discover via the Alexa app. We could also extend our example to include session storage to remember data between individual requests from the same user, or persistent database storage to store, for example, the user’s home and work stations between sessions. This would then allow us to answer user enquiries such as “Alexa, ask BART when is the next train to work?”.
If you are interested in exploring the code for this example skill some more, it’s available from our Github repo. Amazon also provides excellent reference materials and tutorials for Alexa developers, including a walk through of creating a Lambda function, interaction model and sample utterances here.
If you know someone who would find this article informative, please share!
(Main Image by Peyri Herrera via Flickr, Creative Commons License).
 Biting into TACO, Microsoft's Enhanced Cordova CLI