 Simon Prickett

Plugins are used with Apache Cordova / Adobe PhoneGap to extend the platform’s functionality so that it can communicate with native device APIs not normally accessible through a web view. There are many plugins available “off the shelf”, however sometimes a new one is needed when nothing suitable can be found. The Cordova platform provides an interface to its JavaScript to native bridge, and a set of classes allowing developers to build their own plugins.
(This article originally appeared on the Modus Create blog).
Way back in 2013, Modus Create published a popular blog post covering how to create your own plugin for Cordova / PhoneGap. Since then, there have been many improvements to the tooling for working with Cordova and the way that plugins are distributed has changed. In our 2013 post, we also only covered plugin creation for iOS.
Your support helps to fund future projects!
Let’s revisit plugin authoring in 2016, and extend the scope of the exercise to include both Android and iOS. We’ll also take a look at how plugins can be used without writing native code, as a way to package and distribute useful JavaScript to multiple Cordova apps.
Prerequisites
Since we’ll be developing a small plugin for both Android and iOS, we require a Mac with the latest versions of:
- Apache Cordova
- Node.js
- Xcode
- Android SDK
Additionally, we’ll use the Plugman tool to help with plugin development. Assuming we have all the items above installed and ready to go, let’s get Plugman from npm via Terminal:
$ npm install -g plugman
$ plugman — version
1.1.0
Scope of Our New Plugin
As the aim here is to look at the process for creating a plugin, we’ll build a simple example based on the one that the Cordova documentation uses. This simply provides an echo function that takes a String parameter and returns it back to the caller via a success function.
We’ll implement this for iOS and Android, extending it to use a native dialog for iOS and a Toast on Android. Additionally, we’ll add a second function echojs which approximates the same behavior without any native code in order to show how the plugin mechanism can also be used to distribute useful JavaScript library routines.
Initial Plugin Creation
Plugman can help us get going by creating a plugin scaffold, much like the Cordova CLI does for a new app. We can create a new ModusEcho plugin like so:
$ plugman create — name ModusEcho — plugin_id com-moduscreate-plugins-echo — plugin_version 0.0.1 — path modusechoplugin
$ ls -l modusechoplugin/ModusEcho
-rw-r--r-- 1 simon staff 372 Feb 3 12:32 plugin.xml
drwxr-xr-x 2 simon staff  68 Feb 3 12:32 src
drwxr-xr-x 3 simon staff 102 Feb 3 12:32 www
srcis an empty directory.wwwcontains our skeleton JavaScript interface module that plugman created for us.
The initial plugin.xml that Plugman created looks like this:
<?xml version='1.0' encoding='utf-8'?>
<plugin id="com-moduscreate-plugins-echo" version="0.0.1" xmlns="http://apache.org/cordova/ns/plugins/1.0" xmlns:android="http://schemas.android.com/apk/res/android"
>
  <name>ModusEcho</name>
  <js-module name="ModusEcho" src="www/ModusEcho.js">
    <clobbers target="cordova.plugins.ModusEcho" />
  </js-module>
</plugin>
Let’s change the clobbers element to make our plugin functions accessible to Cordova apps as modusecho.<functionName>.
<?xml version='1.0' encoding='utf-8'?>
<plugin id="com-moduscreate-plugins-echo" version="0.0.1" xmlns="http://apache.org/cordova/ns/plugins/1.0" xmlns:android="http://schemas.android.com/apk/res/android">
  <name>ModusEcho</name>
    <js-module name="ModusEcho" src="www/ModusEcho.js">
  <clobbers target="modusecho" />
  </js-module>
</plugin>
The initial JavaScript module www/ModusEcho.js that Plugman created looks like this:
var exec = require('cordova/exec');
exports.coolMethod = function(arg0, success, error) {
  exec(success, error, "ModusEcho", "coolMethod", [arg0]);
};
Next, we’ll amend that to suit our needs.
Implementing the Common JavaScript Interface
Plugman created a sample method coolMethod for us. Let’s change that to be called echo:
var exec = require('cordova/exec');
exports.echo = function(arg0, success, error) {
  exec(success, error, "ModusEcho", "echo", [arg0]);
};
This module uses the Cordova bridge’s exec function to handle calling native code for each platform that we choose to implement the plugin for. Cordova exec requires the following arguments:
- A
successcallback function. - An
errorcallback function. - The name of the native “service” to call (
ModusEcho). - The name of the native “action” to call (
echo). - An array of arguments to pass to the native action.
Think of service and action as a class and a method to call on that class. We will need to implement each action for each platform that we choose to support in that platform’s own native language (e.g Objective C for iOS, Java for Android).
To demonstrate that plugins can be useful without native code too, let’s add a JavaScript only function: echojs. In this case, we wouldn’t need to require cordova/exec nor call exec, simply implement your logic in JS and call the success / error callbacks as appropriate. For example:
exports.echojs = function(arg0, success, error) {
  // Do something
  success(arg0);
};
Implementing the Android Native Code
We now need to edit plugin.xml to configure the package and class file that we will use to implement the native parts of the plugin for Android.
Add the following to plugin.xml as a child of the <plugin> element:
<platform name="android">
  <config-file target="config.xml" parent="/*">
    <feature name="ModusEcho">
      <param name="android-package"
             value="com.moduscreate.plugin.ModusEcho"/>
    </feature>
  </config-file>
  <source-file
     src="src/android/com/moduscreate/plugin/ModusEcho.java"
     target-dir="src/com/moduscreate/plugin" />
</platform>
The above defines where our Java source will live, and which plugin service it maps to. Then we need to add a Java class at:
src/android/com/moduscreate/plugin/ModusEcho.java
This class will need to extend org.apache.cordova.CordovaPlugin, and needs to implement:
execute— a method called by the Cordova bridge which provides the name of the plugin method it expects to execute, plus any parameters. This should call the native code for that method and immediately returntrueif the method exists, orfalseif it doesn’t.- Methods for each of the native functions that the plugin provides — in our case, a single method for the
echofunction.
Our ModusEcho.java class looks like this:
package com.moduscreate.plugin;
import org.apache.cordova.CordovaPlugin;
import org.apache.cordova.CallbackContext;
import org.json.JSONArray;
import org.json.JSONObject;
import org.json.JSONException;
import android.content.Context;
import android.widget.Toast;

public class ModusEcho extends CordovaPlugin {
  @Override
  public boolean execute(
    String action, JSONArray args, CallbackContext callbackContext
  ) throws JSONException {
    if ("echo".equals(action)) {
      echo(args.getString(0), callbackContext);
      return true;
    }
    return false;
  }

  private void echo(String msg, CallbackContext callbackContext) {
    if (msg == null || msg.length() == 0) {
      callbackContext.error("Empty message!");
    } else {
      Toast.makeText(webView.getContext(), msg, Toast.LENGTH_LONG)
      .show();
      callbackContext.success(msg);
    }
  }
}
The public method execute overrides a method in CordovaPlugin, works out which action the bridge wants to be executed, then calls the Java code for that action. In our case, we are looking for an action called echo. This action needs to be passed the first argument from the Cordova bridge, and the CallbackContext which gives it access to the success and error callbacks in the Cordova JavaScript app.
The private method echo implements our plugin’s native echo functionality. It will show a Toast (a small Android native popup window that dismisses itself after a few seconds), then send the original message back to the Cordova JavaScript app using the success method of the CallbackContext that was originally passed to execute. If the message was empty, we use the error method of the CallbackContext object to tell the Cordova JavaScript app that the native code failed; this will invoke the error callback function in the JavaScript app.
When displaying the Toast, our echo method needs access to the app’s global Context, which we can obtain using the webView object that we get from extending CordovaPlugin. This represents the running Cordova app, and we can get the global Context from there using:
webView.getContext();
Testing the Android Code
There isn’t a really good way to test a plugin without installing it into an app, and building it to see what happens. Let’s create a test app, adding our plugin to it by referencing it as a folder on the local filesystem:
$ cordova create testapp com.moduscreate.testapp TestApp
$ cd testapp
$ cordova platform add android
$ cordova plugin add <path/to/plugin>
e.g.
$ cordova plugin add ../modusechoplugin/ModusEcho/
You should see the following output:
Installing "com-moduscreate-plugins-echo" for android
And we can check the plugin made it into the project with:
$ cordova plugin ls
whose output should include:
com-moduscreate-plugins-echo 0.0.1 "ModusEcho"
Additionally, we can check that our Java class was correctly copied into the Android app project:
$ find platforms/android | grep ModusEcho.java
$ platforms/android/src/com/moduscreate/plugin/ModusEcho.java
Now we can test build the Android app:
$ cordova build android
The app should build successfully. If the build finishes with errors, we will need to edit the ModusEcho.java plugin file to correct them. One good way of doing this is to edit the Java source directly inside the test app project (it’s in platforms/android/src/com/moduscreate/plugin/ModusEcho.java), and rebuild the app then manually copy the plugin’s Java class(es) back to the plugin project’s own folder once we have it working.
However, our test app still doesn’t use the plugin code yet as we didn’t change the generated “Device Ready!” boilerplate. To test the plugin within our app, we’ll replace the generated onDeviceReady function in www/js/index.js with the following:
onDeviceReady: function() {
  app.receivedEvent('deviceready');
  modusecho.echo(
    'Plugin Ready!',
    function(msg) {
      document
        .getElementById('deviceready')
        .querySelector('.received')
        .innerHTML = msg;
    },
    function(err) {
      document
        .getElementById('deviceready')
        .innerHTML = '<p class="event received">' + err + '</p>';
    }
  );
  modusecho.echojs(
    'Hello Plugin',
    function(msg) {
      document.getElementsByTagName('h1')[0].innerHTML = msg;
    },
    function(err) {
      document.getElementsByTagName('h1')[0].innerHTML = err;
    }
  );
}
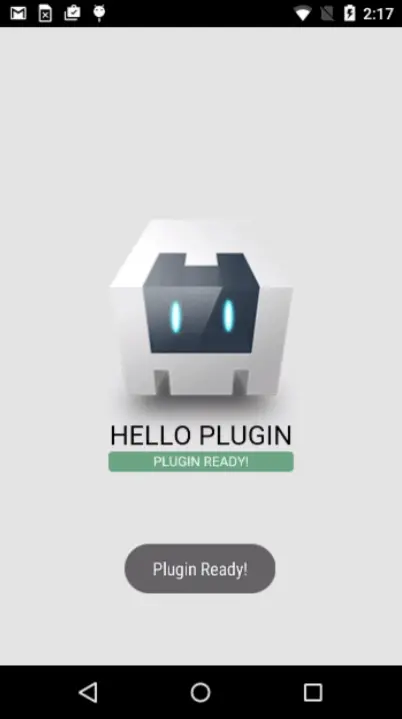
Now when we run the test app, we should see “Plugin Ready!”, and a toast pops up for a few seconds if the native code in the plugin is working. We should also expect to see “Hello Plugin” if the pure JavaScript function in the plugin works. A successful test of the plugin looks like this:
Once we’re satisfied that the Android implementation of our plugin is working properly, we can move on to looking at iOS.
Implementing the iOS Native Code
As we did for Android earlier, we now need to edit plugin.xml to configure the package and class file that we will use to implement the native parts of the plugin for iOS.
Add the following to plugin.xml as a child of the <plugin> element:
<platform name="ios">
  <config-file target="config.xml" parent="/*">
    <feature name="ModusEcho">
      <param name="ios-package" value="ModusEcho" />
    </feature>
  </config-file>
  <header-file src="src/ios/ModusEcho.h" />
  <source-file src="src/ios/ModusEcho.m" />
</platform>
We now need to add a header and implementation file to the plugin by creating them at:
src/ios/ModusEcho.h
src/ios/ModusEcho.m
Our ModusEcho.h needs to look like this:
#import <Cordova/CDV.h>

@interface ModusEcho : CDVPlugin

- (void)echo:(CDVInvokedUrlCommand*)command;

@end
Unlike Android, iOS plugins don’t use an execute method to route incoming calls from the Javascript bridge to the right functions, we just declare the functions that make up the plugin’s interface directly. Parameters are passed in through CDVInvokedUrlCommand.
Our ModusEcho.m needs to look like this:
#import "ModusEcho.h"
#import <Cordova/CDV.h>

@implementation ModusEcho

- (void)echo:(CDVInvokedUrlCommand*)command
{
  CDVPluginResult* pluginResult = nil;
  NSString* msg = [command.arguments objectAtIndex:0];
  if (msg == nil || [msg length] == 0) {
    pluginResult =
      [CDVPluginResult resultWithStatus:CDVCommandStatus_ERROR];
  } else {
    UIAlertView *toast = [
      [UIAlertView alloc] initWithTitle:@""
      message:msg
      delegate:nil
      cancelButtonTitle:nil
      otherButtonTitles:nil, nil
    ];

    [toast show];

    dispatch_after(
      dispatch_time(DISPATCH_TIME_NOW, 3 * NSEC_PER_SEC),
      dispatch_get_main_queue(), ^{
        [toast dismissWithClickedButtonIndex:0 animated:YES];
      }
    );

    pluginResult =
      [CDVPluginResult resultWithStatus:CDVCommandStatus_OK
messageAsString:msg];
  }

  [self.commandDelegate
    sendPluginResult:pluginResult
    callbackId:command.callbackId
  ];
}
@end
The body of our echo method checks if the message to echo was empty, and will cause the onError function in the JavaScript to be run if so. For a non-empty message, we want to create something with similar behavior to Android’s Toast, and then invoked the onSuccess function in the JavaScript, supplying it with the message that we echo’ed.
iOS lacks an immediate equivalent to Android’s Toast, so we’re using an idea from this StackOverflow thread to create something that’s a little like a Toast based on a UIAlertView having no buttons, and a timer that dismisses it after a few seconds.
Testing the iOS Code
Let’s test our iOS implementation by going back to the test app that we created earlier and amending it to work with iOS. We’ll remove the previous version of our plugin, add the Cordova iOS platform, then add our plugin again:
$ cordova plugin rm com-moduscreate-plugins-echo
$ cordova platform add ios
$ cordova plugin add ../modusechoplugin/ModusEcho/
This time, adding the plugin should generate additional output for iOS:
Installing "com-moduscreate-plugins-echo" for android
Installing "com-moduscreate-plugins-echo" for ios
We can now check that our Objective C source files were correctly copied into the iOS app project:
$ find platforms/ios|grep ModusEcho.[hm]
platforms/ios/TestApp/Plugins/com-moduscreate-plugins-echo/ModusEcho.h
platforms/ios/TestApp/Plugins/com-moduscreate-plugins-echo/ModusEcho.m
As our plugin has the same methods and method signatures on both platforms, we don’t need to change the JavaScript used by the test app. The change we made to onDeviceReady to test the Android platform should continue to work unchanged for iOS. Let’s build and test it:
$ cordova build ios
$ cordova emulate ios
We should see the same results as we did for Android, the native Toast for iOS looks and behaves slightly differently, but the “Plugin Ready!” and “Hello Plugin” texts should be the same. A successful test for iOS looks like this:

Extra Plugin Configuration
Now that we have our plugin set up and working on both platforms that we want to support, we can add a couple of additional XML elements to plugin.xml to better describe it:
<description>Modus Create Demo Cordova Plugin</description>
<license>MIT</license>
<keywords>cordova,demo,modus</keywords>
Our plugin doesn’t require a particular version of the Cordova iOS or Android platform, but if we did need to specify that we could also do so with the engines element. For example, to specify that we require at least version 4.0.0 of the Android platform, we would add the following as a child of the plugin element:
<engines>
  <engine name="cordova-android" version=">=4.0.0" />
</engines>
Adding Hooks
Cordova hooks are scripts that developers can add to apps or plugins, allowing the Cordova CLI to run them at different points when executing commands. For plugins, hooks could be useful when we need to configure a plugin post-installation. For example, to add API credentials that may be needed to make the plugin work correctly.
Our plugin doesn’t require this functionality, but for completeness let’s take a look at how it works. Plugin hook scripts are configured in plugin.xml using hook elements which specify when the CLI should run the hook and the path to its script.
Let’s configure a hook to run after the plugin is installed, by adding the following to plugin.xml as a child of the plugin element:
<hook type="after_plugin_add" src="hooks/after_plugin_add.js" />
Next we’ll add a new folder called hooks to the plugin’s root (the same folder that plugin.xml resides in), and in that create a node script after_plugin_add.js that looks like this:
#!/usr/bin/env node
console.log('******************************************');
console.log('* Hello from post plugin add hook script *');
console.log('******************************************');
As this needs to be executable, we’ll also need to change the file permissions on it:
$ chmod 755 hooks/after_plugin_add.js
Having done all this, our script will now be run immediately after the plugin has been added to an app as shown below:
$ cordova plugin rm com-moduscreate-plugins-echo
$ cordova platform add ios
$ cordova plugin add ../modusechoplugin/ModusEcho/
Installing "com-moduscreate-plugins-echo" for android
Installing "com-moduscreate-plugins-echo" for ios
******************************************
* Hello from post plugin add hook script *
******************************************
We could then go on to replace our console.log statements with any other logic to configure the plugin post-installation.
Distributing the Plugin
Now we’ve completed our new plugin and tested it, we probably want to share it with others on our team, or the wider community at large. The original Cordova Plugins Registry at plugins.cordova.io was moved to npm in October 2015, so our choices for hosting our new plugin are now npm (or a private npm registry) or git (for example Github).
Distribution via GitHub
Distributing our plugin via GitHub is simply a matter of creating a repo for it and ensuring that the following are in the root:
src(containing our native code for Android and iOS)www(containing our JavaScript interface)plugin.xml(configuration)
Any other files that we choose to place in the repo will also be installed into the folder plugins/com-moduscreate-plugins-echo when adding the plugin to the app. For example we may choose to include a readme and/or license files.
Our demo plugin can be found on GitHub, and installed into an app using:
$ cordova plugin add https://github.com/ModusCreateOrg/cordova-plugin-example
Distribution via npm
Plugman can help with creating npm’s required package.json, and populating it with appropriate keywords so that it can be found easily in a repository:
$ cd <plugin root folder — where plugin.xml lives>
$ plugman createpackagejson .
Plugman asks some simple questions about what to call the plugin, what the version number and license should be, etc — many of the default answers are pulled from values in plugin.xml so creating a package.json file is very simple. When finished, it will have added something like the following to the root directory of the plugin project:
{
  "name": "ModusEcho",
  "version": "0.0.1",
  "description": "Modus Create Demo Cordova Plugin",
  "cordova": {
    "id": "com-moduscreate-plugins-echo",
    "platforms": [
      "android",
      "ios"
    ]
  },
  "repository": {
    "type": "git",
    "url": "git+https://github.com/ModusCreateOrg/cordova-plugin-example.git"
  },
  "keywords": [
    "cordova",
    "demo",
    "modus",
    "ecosystem:cordova",
    "cordova-android",
    "cordova-ios"
  ],
  "author": "Modus Create",
  "license": "MIT",
  "bugs": {
    "url": "https://github.com/ModusCreateOrg/cordova-plugin-example/issues"
  },
  "homepage": "https://github.com/ModusCreateOrg/cordova-plugin-example#readme"
}
npm no longer allows capital letters in package names, so we’ll need to change our package name from ModusEcho to modusecho in package.json before going any further.
We can then publish our plugin to npm:
$ npm adduser
<Answer prompts for username, password, email if not already setup>
$ npm publish
Which should make our plugin available on the npm registry. We can now install it into an app using:
$ cordova plugin add modusecho
Fetching plugin "modusecho" via npm
Installing "com-moduscreate-plugins-echo" for android
Installing "com-moduscreate-plugins-echo" for ios
******************************************
* Hello from post plugin add hook script *
******************************************
Conclusion
Creating a new plugin for Cordova can appear to be a little daunting at first, but hopefully this tutorial has helped provide a walkthrough of the process that breaks it down into achievable steps. If you’d like to view the complete code for our ModusEcho plugin, you can find it on GitHub. It also exists as a package on npm.
Whilst there’s a huge collection of existing plugins already out there, the chances are that you’ll periodically need to create a new one for your own specific needs or to share some common JavaScript across several of your Cordova apps.
We’re always interested to learn how people use Cordova and its supporting ecosystem, and would love to hear from you.
 New in Cordova 6: App Templates Using Git